Written by Victor Sonck, Developer Advocate at ClearML
ClearML is now officially integrated into the NVIDIA TAO Toolkit 🎉.
For those of you that don’t know yet, the NVIDIA TAO Toolkit, built on TensorFlow and PyTorch, is a low-code version of the NVIDIA TAO framework that accelerates the model training process by abstracting away the AI/deep learning framework complexity. The TAO Toolkit lets you use the power of transfer learning to fine-tune NVIDIA pretrained models with your own data and optimize for inference—without AI expertise or large training datasets. Click here to go to their documentation to get started!
Now, with the addition of ClearML, you get a lot more insight into the training process using our open source experiment manager. It tracks incoming metrics, model files, plots and debug images in real time, so you can always see how your training tasks are doing. Once everything is captured by ClearML it’s very easy to compare multiple different experiments to see which parameter combinations perform better.
In this blogpost, I’ll walk you through setting up NVIDIA TAO to use ClearML and show you what the results in ClearML look like. Buckle up!
Installing the NVIDIA TAO Toolkit
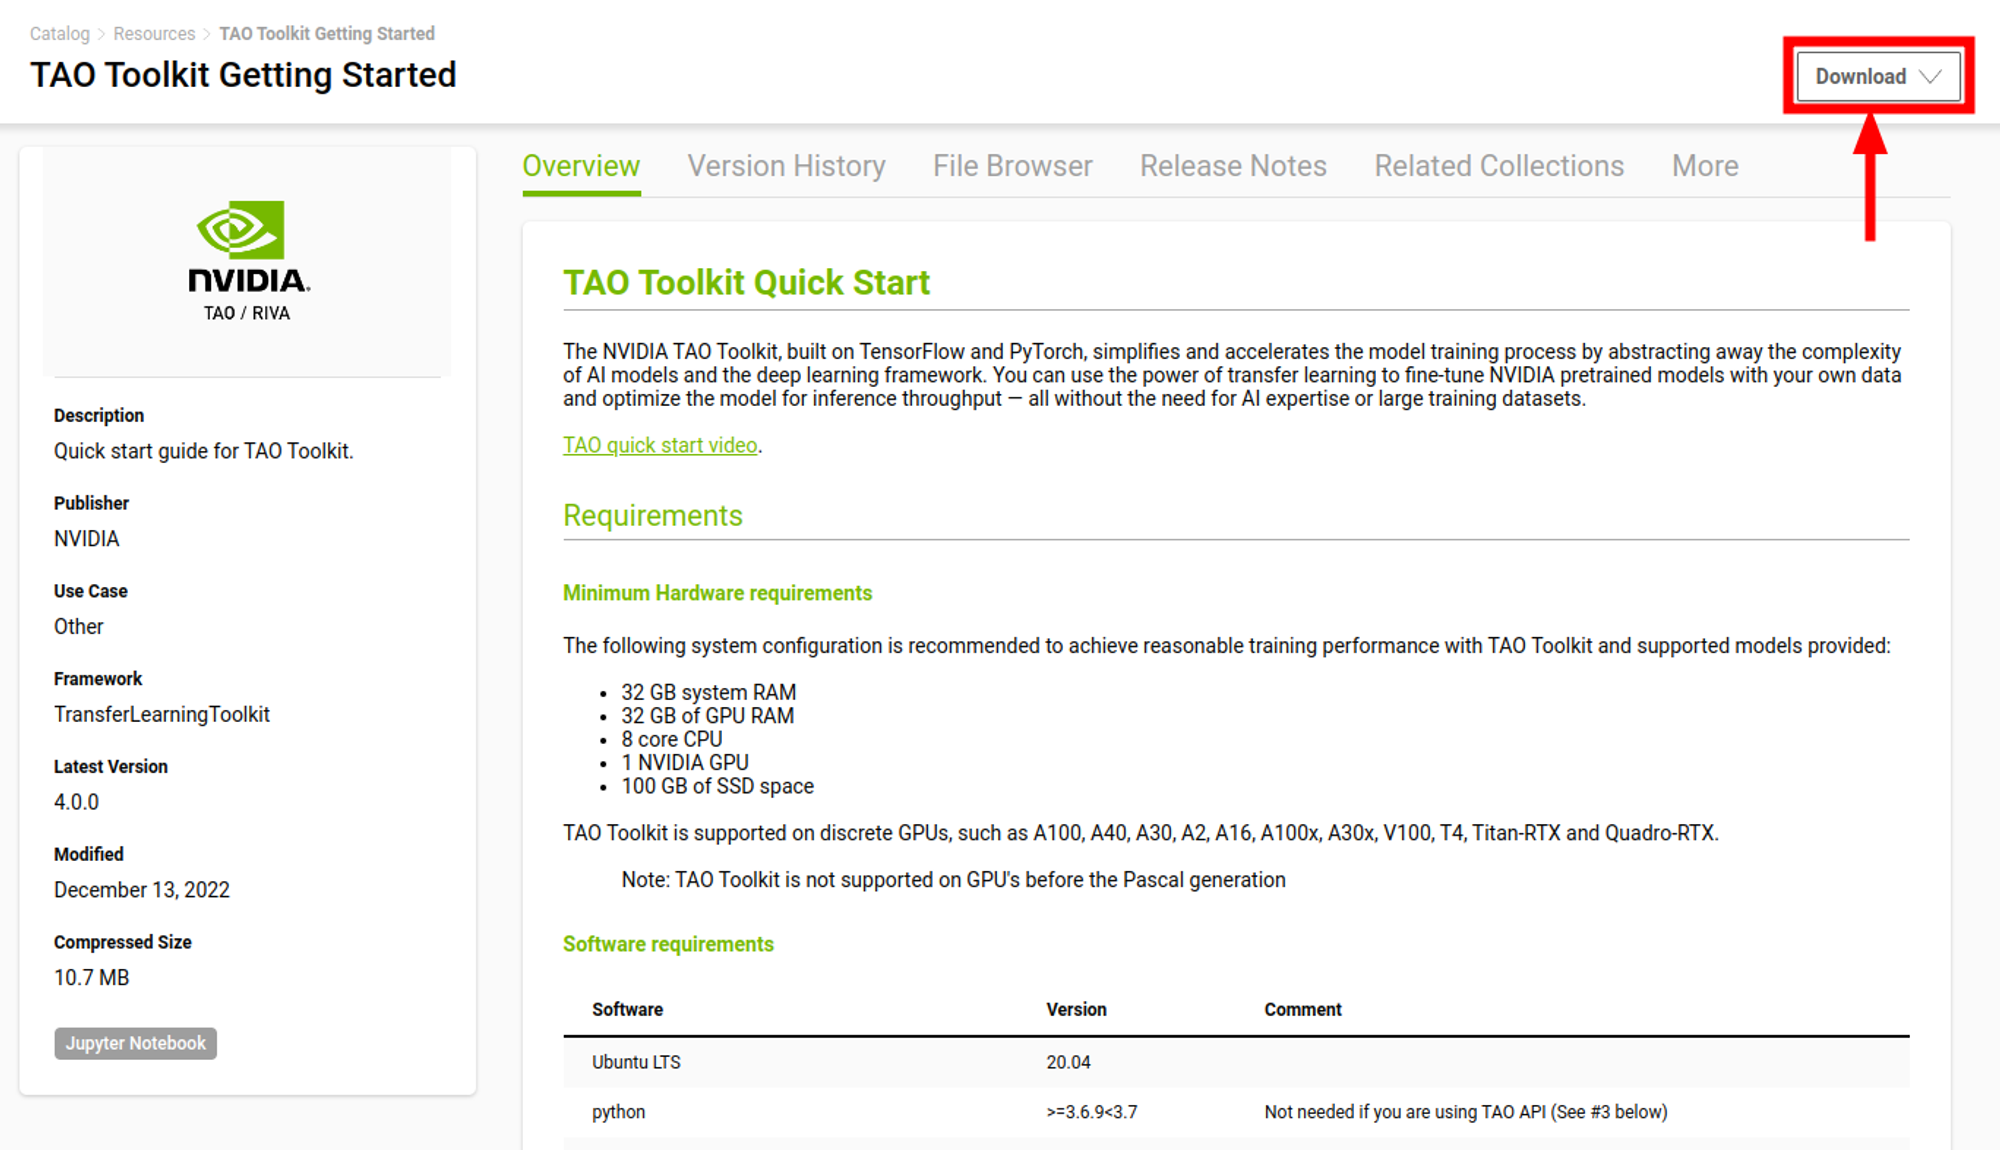
You can find all the available information on how to use the TAO Toolkit here, but in order to get our feet wet, we’ll be using the QuickStart notebooks in this blogpost.
On the QuickStart page, click “Download” on the top right to get the relevant materials.
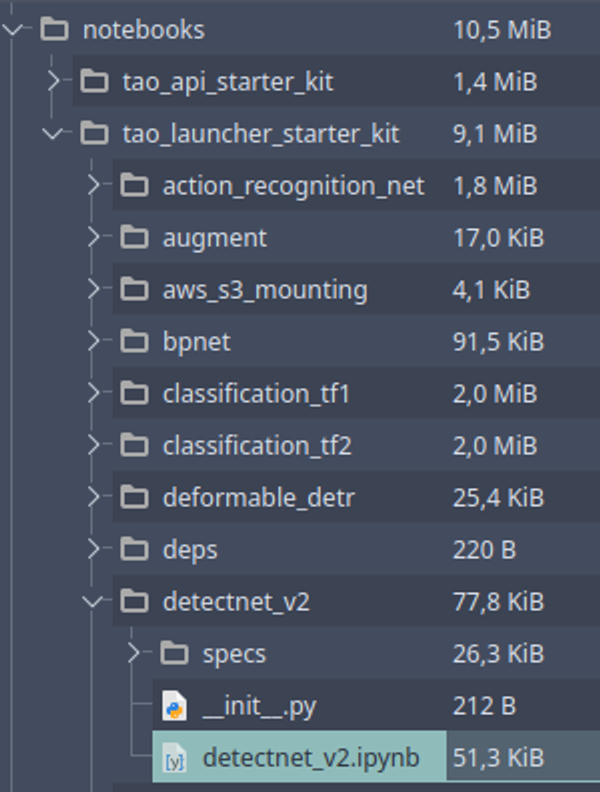
You’ll receive a zipfile containing some example notebooks to show you how to use the TAO Toolkit. In this blogpost we’ll focus on the TAO Launcher and specifically run the notebook located under notebooks/tao_launcher_starter_kit/detectnet_v2
In this example, the detectnet_v2 notebook is a control plane from which we can configure and run the NVIDIA TAO Launcher. Based on the configurations specified in the notebook, the launcher will know what to do and when, this format makes it a little easier for us to keep track of what’s what.
Read the instructions in the notebook carefully, sometimes you’ll have to edit some parameters depending on your own system, such as folder paths.
On a high level, this notebook will guide you through TAO Launcher installation, dataset and pretrained model preparation, model training, model optimizing and model exporting. That quite a mouthful!
Enabling ClearML
The now integrated ClearML Experiment Manager is most useful during model training of course, so that’s where we’ll focus on in this blogpost.
ClearML Server
During training, TAO will generate quite a bit of useful output, such as performance metrics, console logs, plots and debug images. Not to mention our valuable trained model!
All of these outputs are sent to a ClearML Server during training. ClearML is open source, so you can deploy your own server locally if you want to, or you can use the free hosted version at app.clear.ml.
Register HERE for a free hosted server.
Now, TAO needs some credential information to be allowed to connect to the server
Getting and initializing credentials
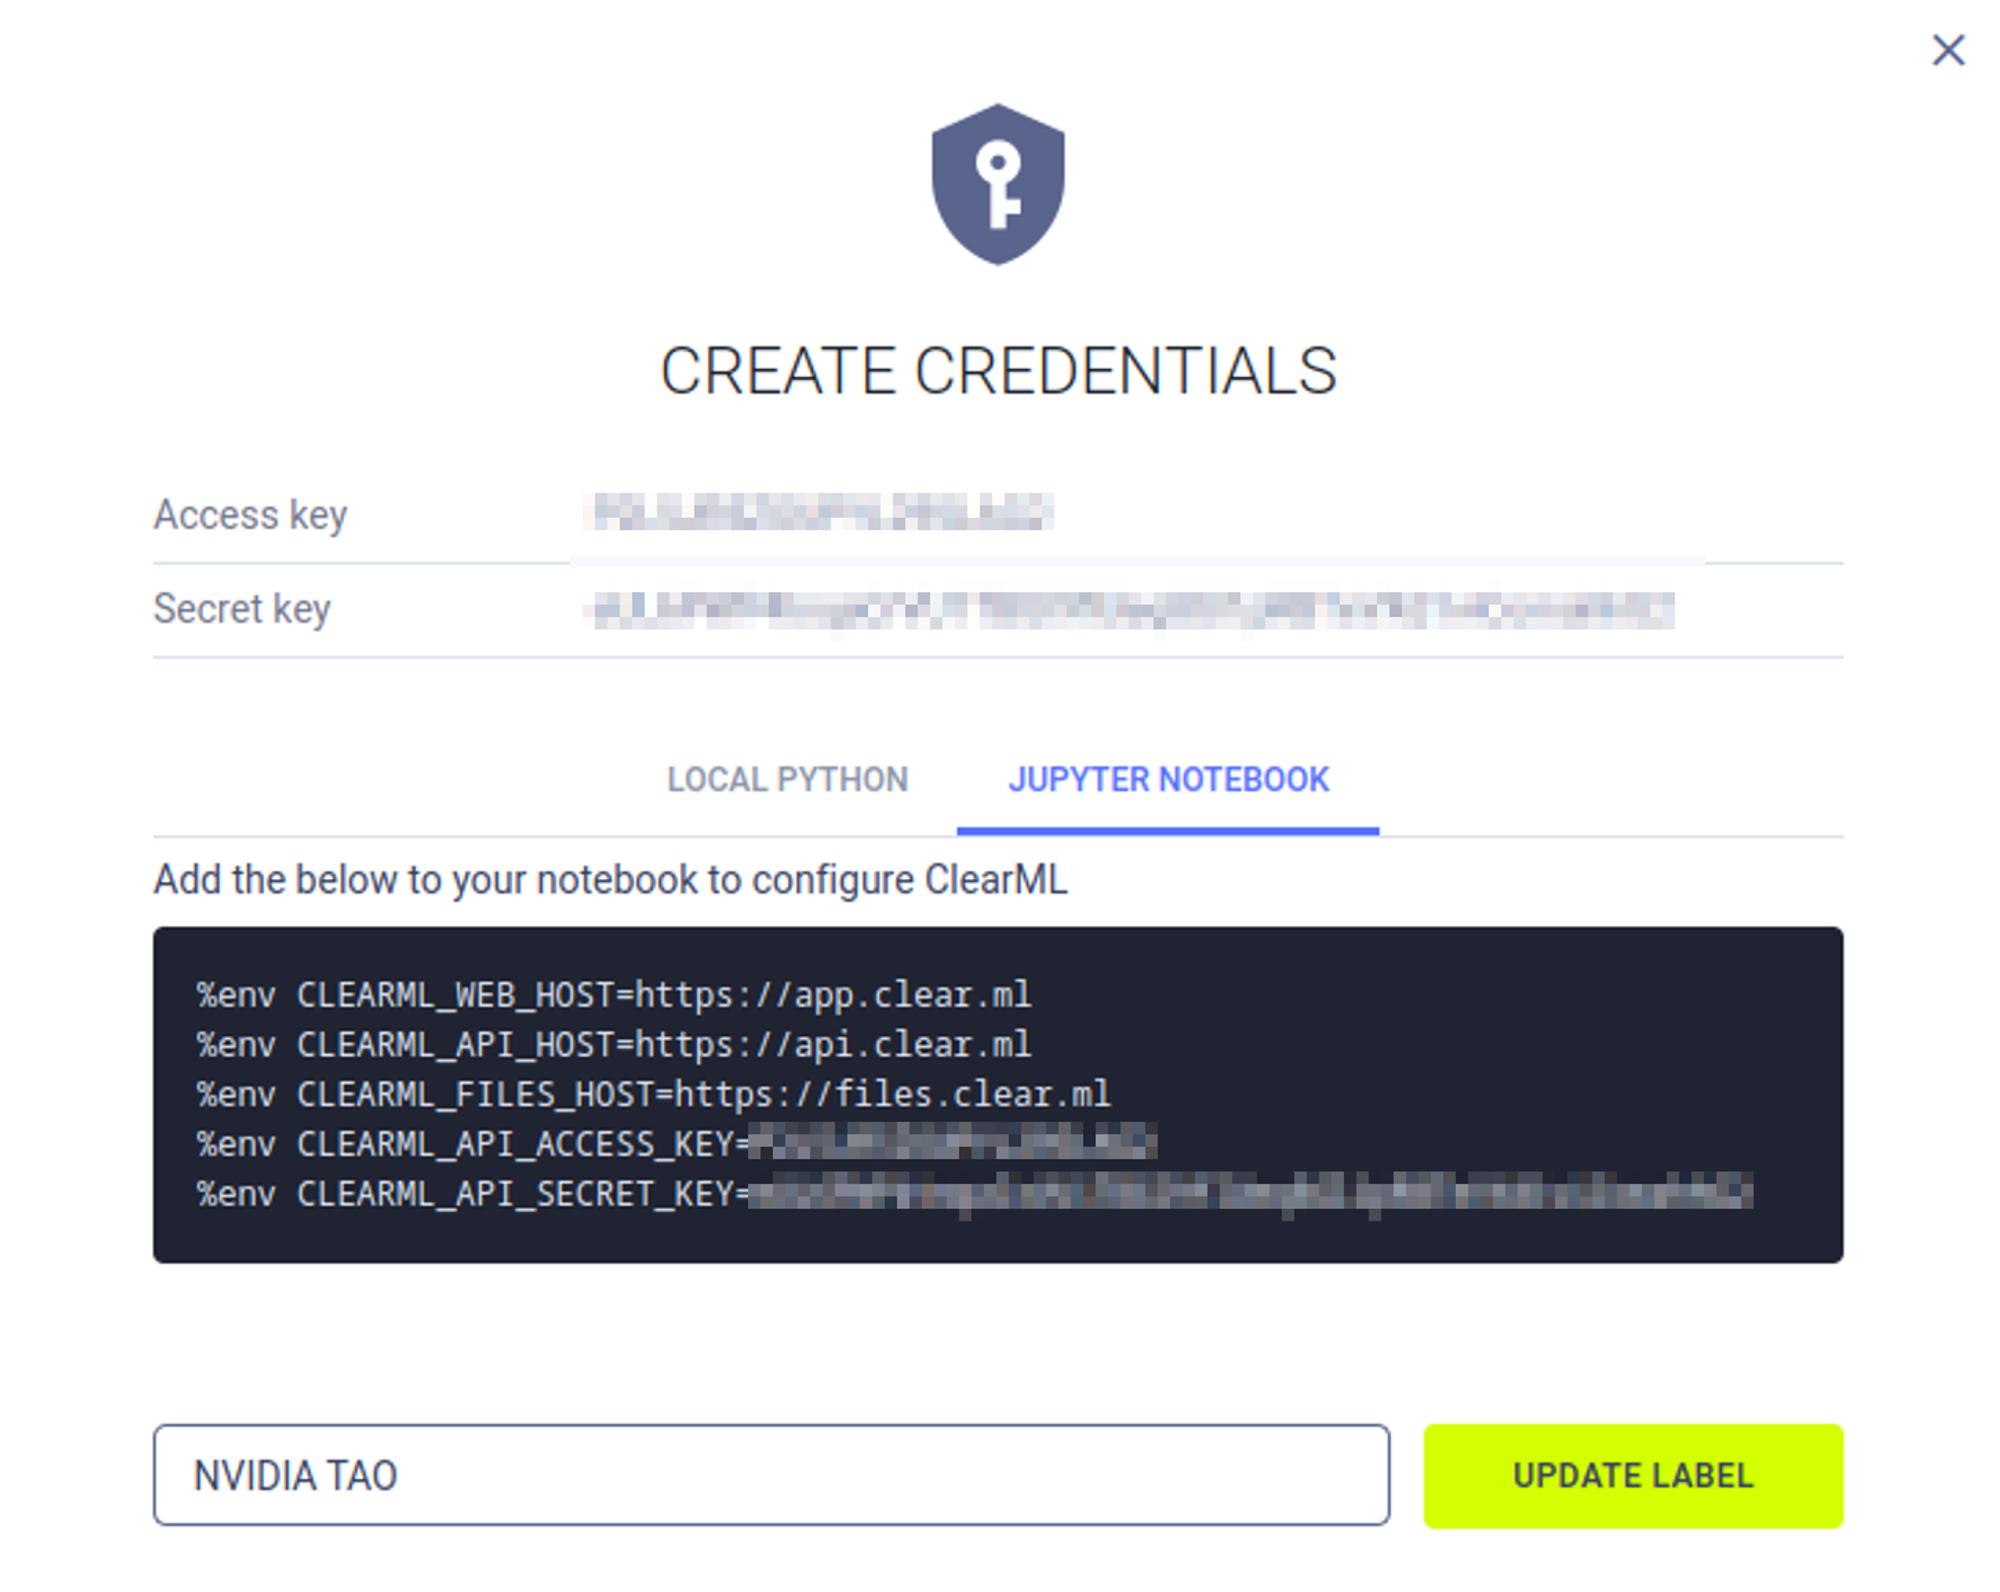
Creating credentials is a breeze, you can find detailed instructions here, but to save you click, here are the most important instructions:
Open the ClearML Web UI in a browser (hosted version is app.clear.ml). On the SETTINGS > WORKSPACE page, click Create new credentials. Then click on the “Jupyter Notebook” tab to get the credentials in the correct format. You can copy everything when hovering over the black section.
Now we go back to the detectnet_v2 notebook and add these credentials to the right cell. Under section 0. you’ll find a subsection called A. Third Party MLOPS integration . Uncomment the ClearML cell and paste your new credentials in the cell. Don’t worry about the formatting, os.environ has the same effect as the copied %env . The cell should look like this:
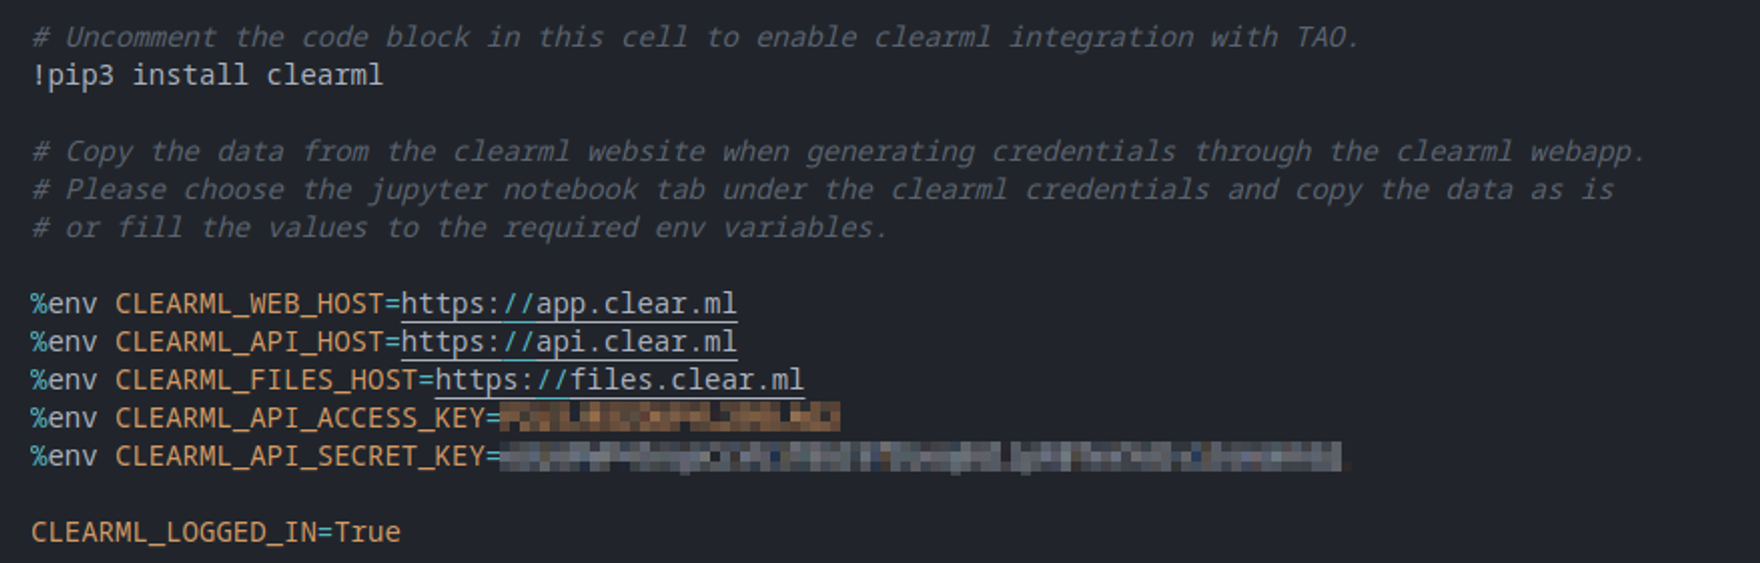
Or this is also fine:

With this set up, you should be good to go! Follow the rest of the instructions in the notebook to prepare the data and start training.
Training configuration
If you now continue with the training flow, you should see the newly created ClearML task pop up both in the console (in between the Tensorflow logs) and in the webUI. There are quite sane defaults setup for everything, but in many cases, you might want to change some settings here and there.

Uploading the model
By default, ClearML only keeps track of the model name, it won’t actually upload the model. When you’re training locally, this is an excellent way to save bandwidth, but there are of course situations where you do want to upload the models.
To do that, go back to the ClearML cell in the notebook and add the following line:
%env CLEARML_DEFAULT_OUTPUT_URI=https://files.clear.ml
This will tell ClearML to upload any captured models directly to the hosted server. If you’re hosting your own server, you should adjust the URL to your own files endpoint.
You can also configure ClearML to store your models on a cloud bucket like S3. This is a more advanced feature that’s beyond the scope of this blogpost, but you can find more information on how to do that here.
Task configuration
While going through the notebook, you’ll see that a specific configuration file is used for model training.

In this configuration file, you’ll find a lot of options to play around with, but the specific section we’re interested in is located under training_config > visualizer > clearml_config. Here, you can set a custom project name, task name and tags for the ClearML Task.
clearml_config{
	  project: "TAO Toolkit ClearML Demo"
	  task: "detectnet_v2_resnet18_clearml"
	  tags: "detectnet_v2"
	  tags: "training"
	  tags: "resnet18"
	  tags: "unpruned"
}
Visualizer configuration
Under training_config > visualizer , you’ll also find frequency settings that tell TAO when to log how many visualization images. Setting the logging frequency to something lower than the default of 50, will report images to ClearML more often.
Analysing the results
Experiment management UI
After running the notebook, you’ll see that we now have 2 ClearML tasks, one for the normal model training and one of the training of the pruned model.
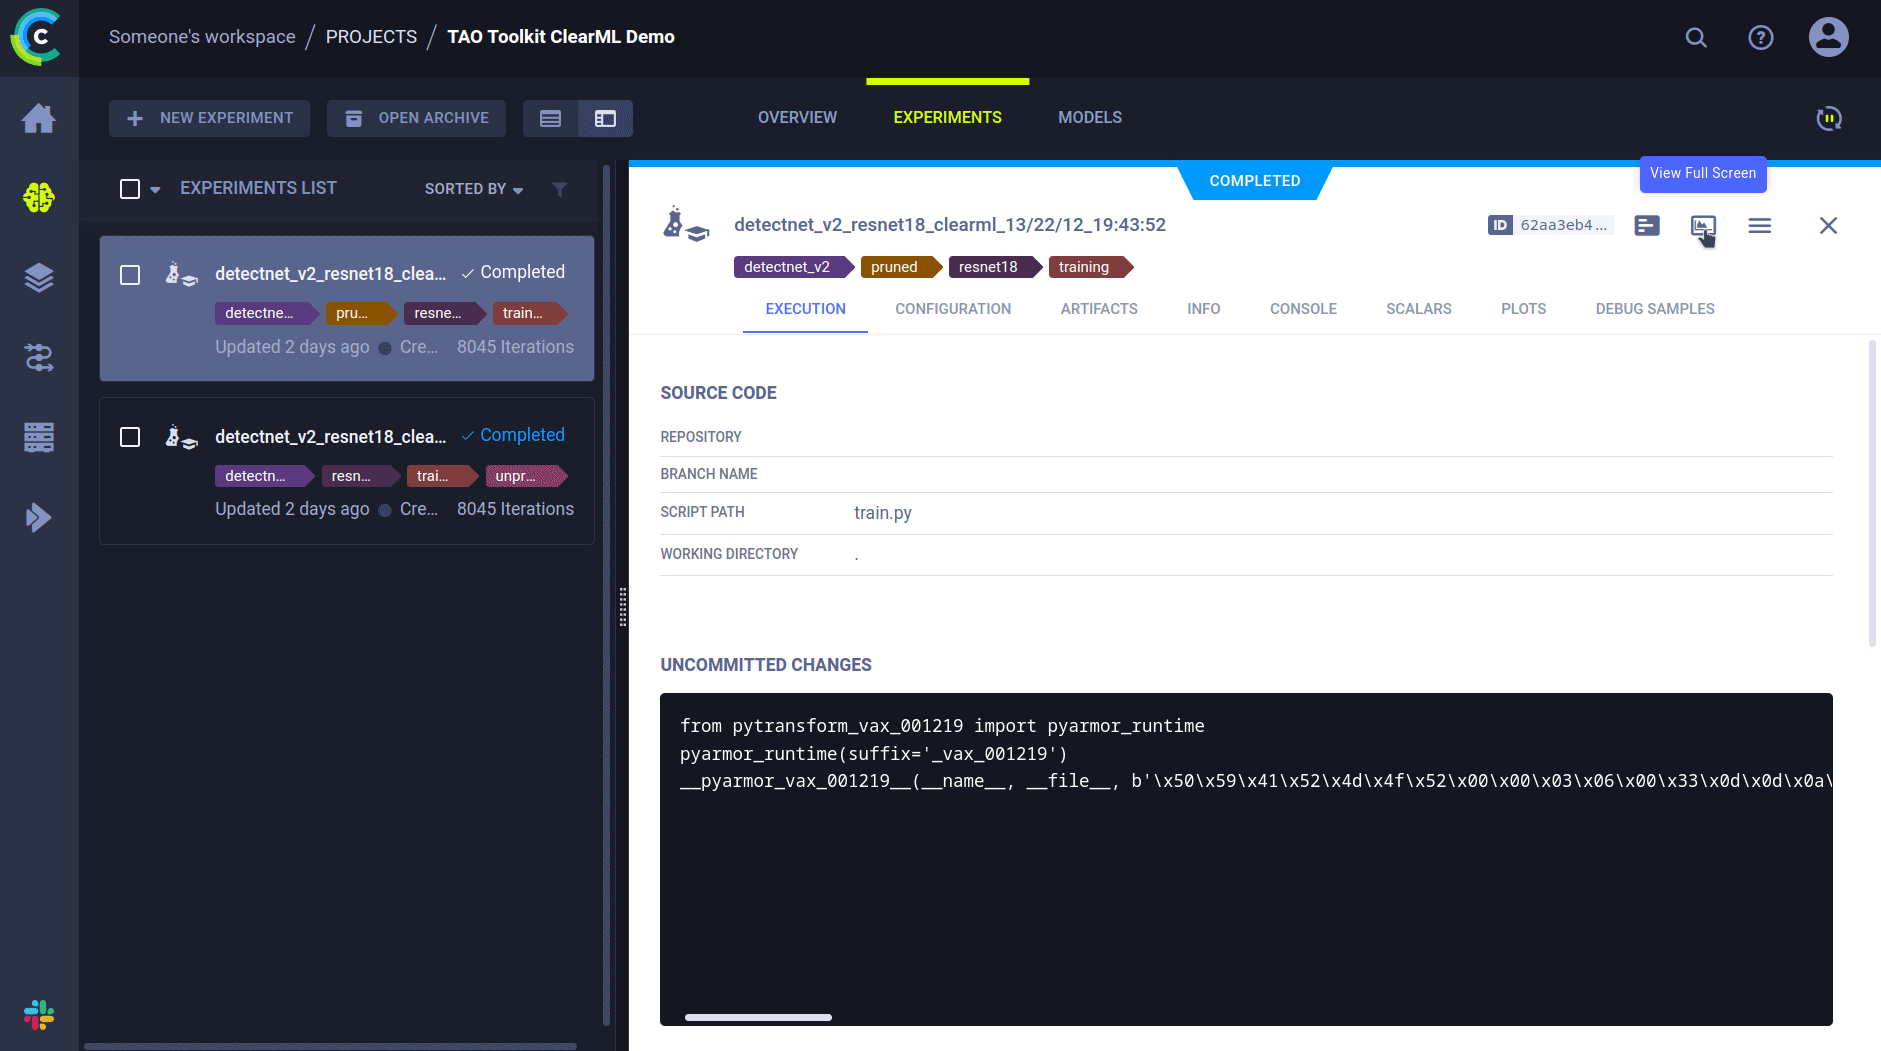
Under configuration, you’ll find which configfile was used at the time of training, as well as several other parameters.
In the artifacts tab, you’ll find both the input models that were used to finetune from and the output models, which are the file that are the most interesting.
Naturally, you’ll also have general info and console logs in here that can be interesting for debugging.
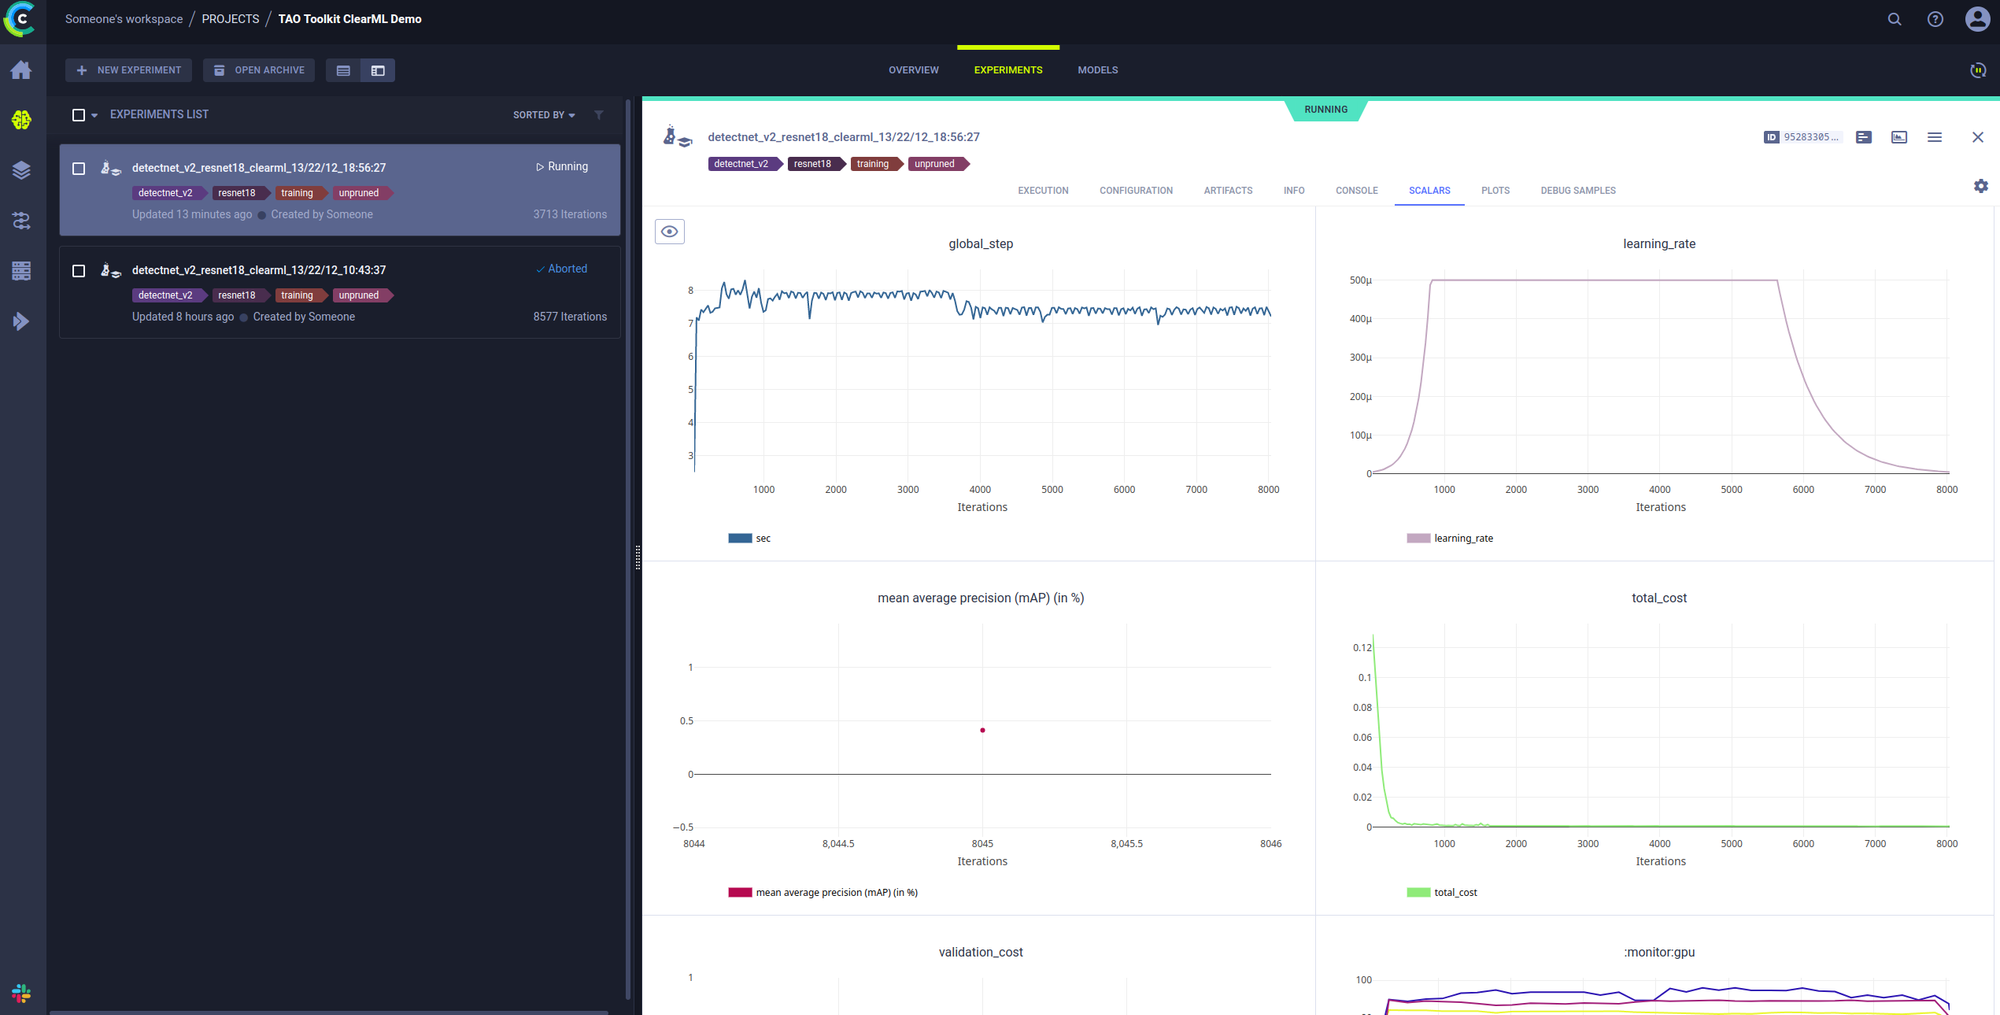
The scalars tab will show you the different metrics that were captured by TAO and plot them. On the left you can choose to hide or reveal individual scalars.
The plots section consists of a series of 3 dimensional histogram plots of the beta, gamma and weights distributions over time.
Finally, there are debug samples to show you visually how progress is going!
Comparison
Finally, you can use the webUI to easily compare multiple different experiments. Simply select 2 or more experiments and click “Compare” in the bottom ribbon. Now you can browse through the differences between them and learn what effect changes in parameters will have on the final metrics.
Conclusion and Next Steps
As you can see it is very easy to enable ClearML integration into NVIDIA TAO Toolkit. You can get a lot more insight into your training process and it allows you to analyse your model more in-depth and faster.
Combined with the out-of-the-box powerhouse that is TAO Toolkit, there is nothing stopping you now from creating amazing machine learning models!
The example notebook will allow you to train an initial, large model, then prune it and then retrain it again to make up for the lost performance due to pruning. ClearML will capture both training runs.
Next to training though, the notebook also allows you to export models in a format that’s ready for deployment using NVIDIA Triton inference server. ClearML Serving is based on NVIDIA Triton and extends it with more MLOps, production focused features. A good next step is to take the model you trained in this notebook and deploy it using ClearML Serving powered by NVIDIA Triton.
You’ll find more in depth tutorials about ClearML on our YouTube channel here and we also have a very active Slack channel, if you need any help.