Settings Page
Use the Settings page to manage your ClearML account and configure your workspace settings.
To navigate to the Settings page, click the ![]() button in the top right corner of the web UI screen, then click Settings.
button in the top right corner of the web UI screen, then click Settings.
The Settings page consists of the following sections:
- User Settings:
- Profile - You basic user information
- Configuration - Control general system behavior settings and input storage access credentials
- Workspace
- ClearML credentials - Create client credentials for ClearML and ClearML Agent to use
- Configuration vault (ClearML Enterprise Server) - Define global ClearML client settings that are applied to all ClearML and ClearML Agent instances (which use the workspace's access credentials)
- Administrator Settings:
- Administrator Vaults (ClearML Enterprise Server) - Manage user-group level configuration vaults to apply ClearML client settings to all members of the user groups
- Users & Groups - Manage the users that have access to a workspace
- Access Rules (ClearML Enterprise Server) - Manage per-resource access privileges
- Identity Providers (ClearML Enterprise Server) - Manage server identity providers
- Usage & Billing (ClearML Hosted Service) - View current usage information and billing details
Profile
The profile tab presents user information.
To edit the username:
- Hover over the username
- Click

- Change the name
- Click
 button
Configuration
Customizing UI Behavior
Under USER PREFERENCES, users can set a few web UI options:
- Show Hidden Projects - Show ClearML infrastructure projects alongside your own projects. Disabled by default. When
enabled, these projects are labeled with
 .
. - Don't show ClearML Examples - Hide the preloaded ClearML example content (project, pipeline, dataset, etc.)
- HiDPI browser scale override - Adjust scaling on High-DPI monitors to improve the web UI experience. Enabled by default.
- Don't show pro tips periodically - Stop showing ClearML usage tips on login. Disabled by default.
- Hide specific container arguments - Specify which Docker environment variable values should be hidden in logs.
When printed, the variable values are replaced with
********. By default,CLEARML_API_SECRET_KEY,CLEARML_AGENT_GIT_PASS,AWS_SECRET_ACCESS_KEY, andAZURE_STORAGE_KEYvalues are redacted.
The self-hosted ClearML Server has an additional option to enable sharing anonymous telemetry data with the ClearML engineering team.
Browser Cloud Storage Access
Provide cloud storage access, so the browser will be able to display your cloud stored data, such as debug samples.
In the Web App Cloud Access section, enter the following credentials:
- Bucket - The name of a Cloud bucket.
- Key - The access key.
- Secret / SAS - The secret key or shared access signature if required.
- Region - The region for AWS S3.
- Host (Endpoint) - The host for non-AWS S3 servers.
Workspace
Multiple Workspaces
Multiple workspaces is only available on the ClearML Hosted Service
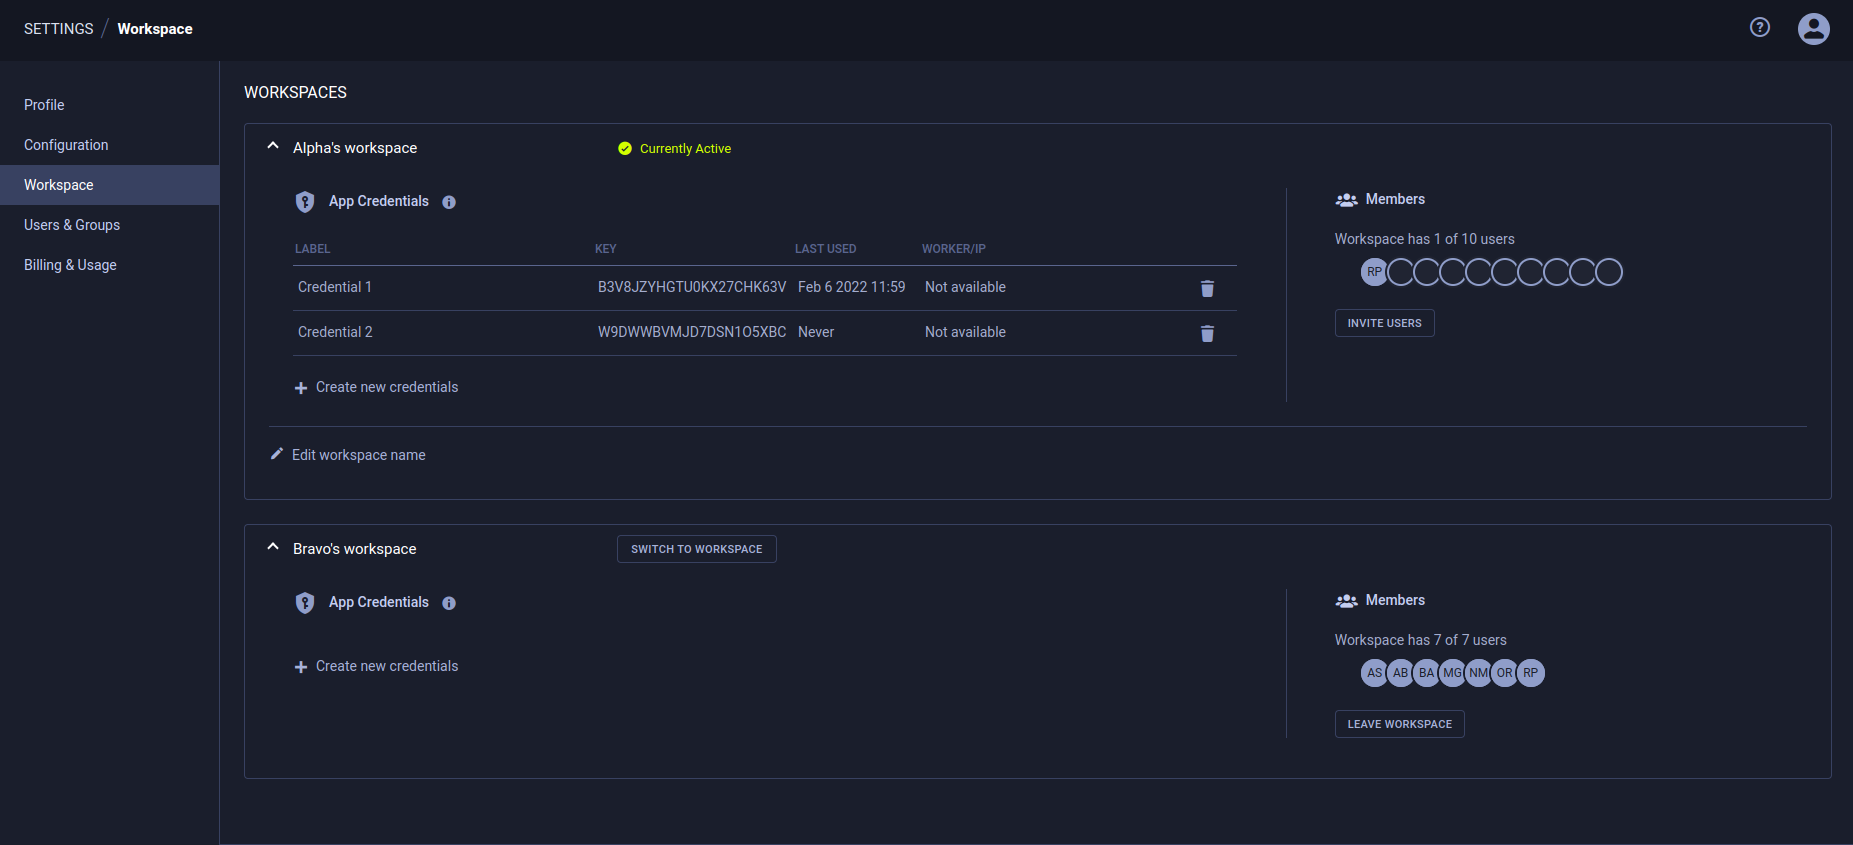
ClearML Hosted Service users can be members of multiple workspaces, which are listed under WORKSPACE.
To switch to another workspace, click on the SWITCH TO WORKSPACE button next to the name of the workspace you want to switch to.
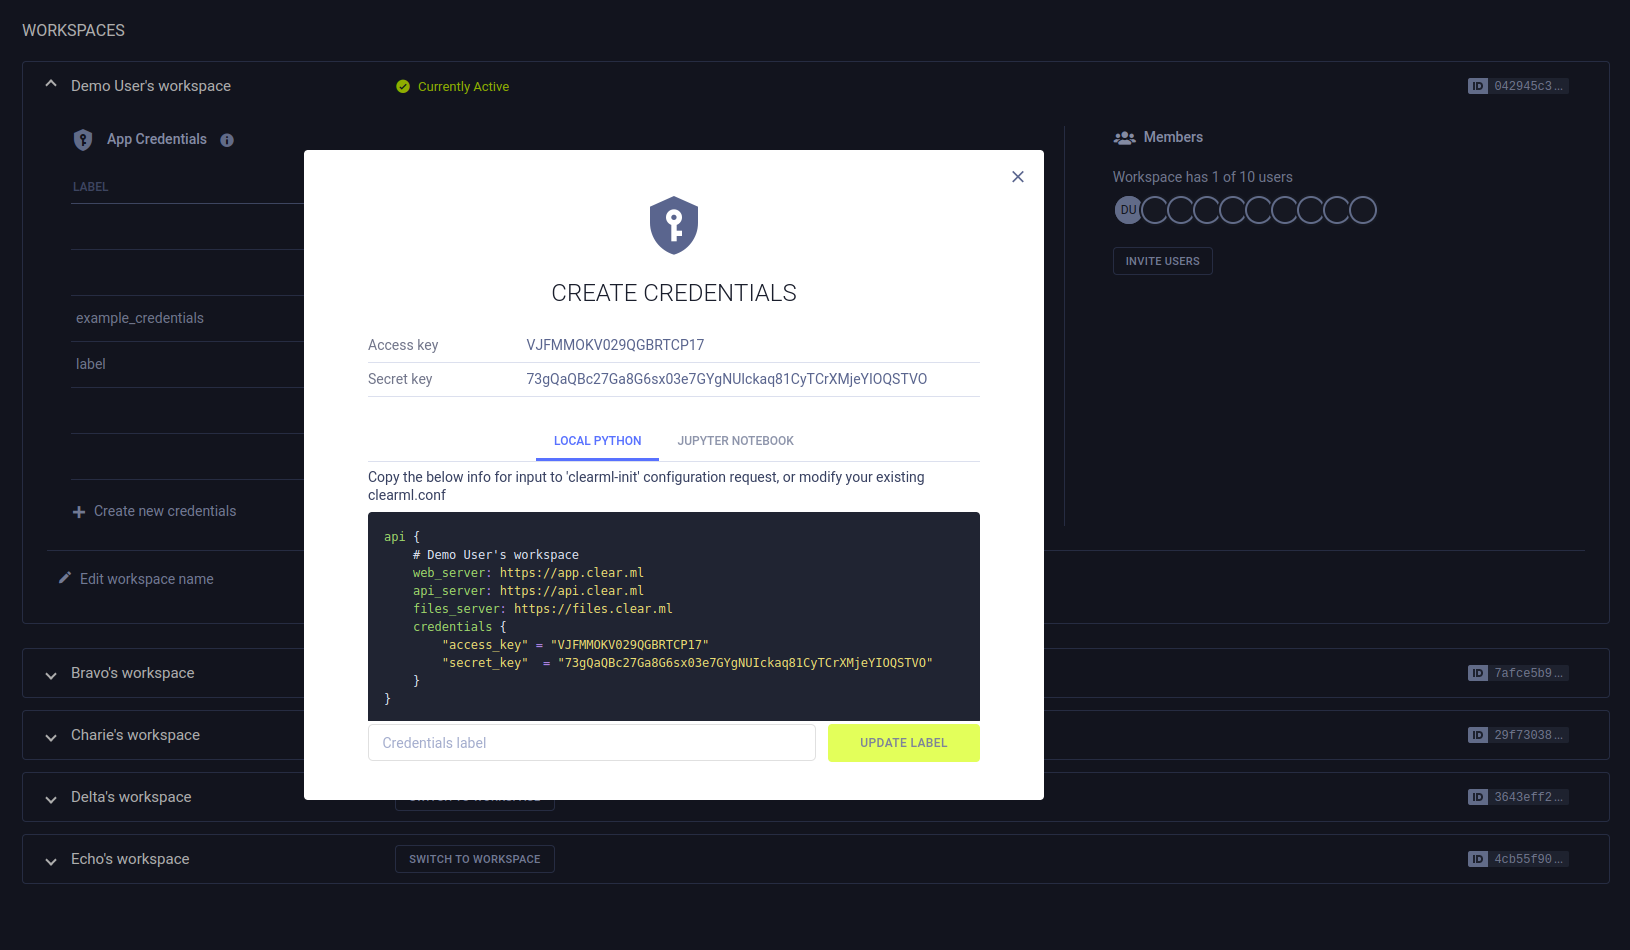
ClearML Credentials
Generate ClearML credentials, made up of an access and secret key pair, and insert them into your configuration file or Jupyter Notebook to grant the ClearML SDK and the ClearML Agent API access to the server.
You can create credentials for any workspace that you are a member of.
To create ClearML credentials:
In WORKSPACE, expand the desired workspace's panel (self-deployed ClearML Server users have one workspace)
In App Credentials, click + Create new credentials
In the dialog that pops up, you can input a label for the new credentials
The dialog displays new credentials, formatted as a ready-to-copy configuration file section (including server configuration information).
You can edit the labels of credentials in your own workspace, or credentials that you created in other workspaces.
To edit the credentials label: hover over the desired credentials, and click ![]()
You can revoke any credentials in your own workspace, or credentials that you created in other workspaces. Once revoked, these credentials cannot be recovered.
To revoke ClearML credentials: hover over the desired credentials, and click ![]()
Changing Your Workspace Name
To change the name of your own workspace, click Edit workspace name ![]() (under App credentials) > modify the name > click
(under App credentials) > modify the name > click ![]() .
.
Adding Users to Your Workspace
To invite a user to your workspace, in the MEMBERS section:
- Press the INVITE USERS button
- Input the email in the dialog that pops up
- Click ADD
A dialog box will appear with an invitation link to send to the invited users. Existing members will receive an in-app notification informing them that they can join your workspace.
After inviting users, the page will redirect to the Users & Groups section, where the pending invitations are displayed.
Leaving a Workspace
You can leave any workspace you've previously joined (except your personal workspace).
When leaving a workspace, you lose access to its resources (tasks, models, etc.) and your previously created access credentials to that workspace are revoked. Tasks and associated artifacts that you logged to that workspace will remain in that workspace. You can rejoin the workspace only if you are re-invited.
To leave a workspace:
- In WORKSPACE, expand the desired workspace's panel
- In Members > Click LEAVE WORKSPACE.
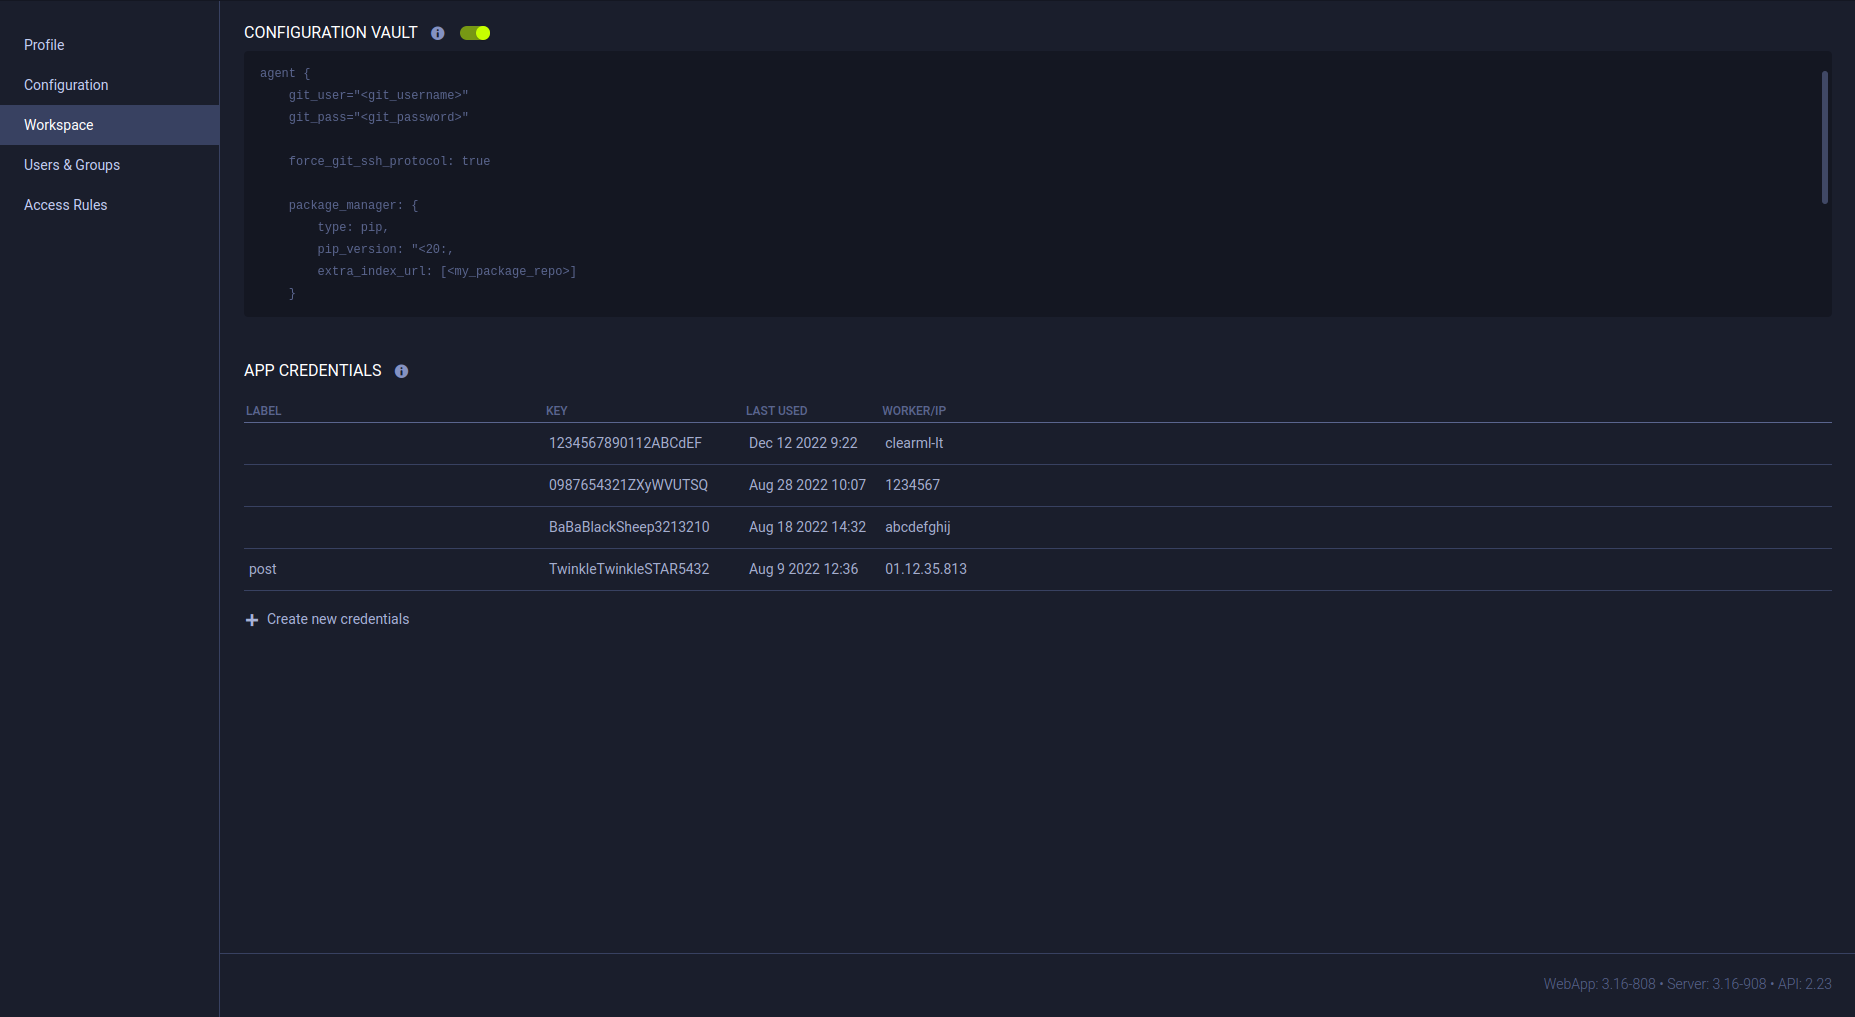
Configuration Vault
This feature is available under the ClearML Enterprise plan
Use the configuration vault to store global ClearML configuration entries that can extend the ClearML configuration file of any ClearML Agents or the ClearML SDK running with your credentials. Productivity tip: Keep the vault disabled while you edit your configuration, and enable it when the configuration is ready.
New entries will extend the configuration in the ClearML configuration file, and existing file entries will be overridden by the vault values.
Fill in values using any of ClearML supported configuration formats: HOCON / JSON / YAML.
To edit vault contents:
- Click EDIT or double-click the vault box
- Insert / edit the configurations in the vault
- Press OK
To apply vault contents:
- Click the toggle atop the vault to enable / disable the configurations
- Once enabled, the configurations will be merged to the configuration file during ClearML and ClearML Agent usage
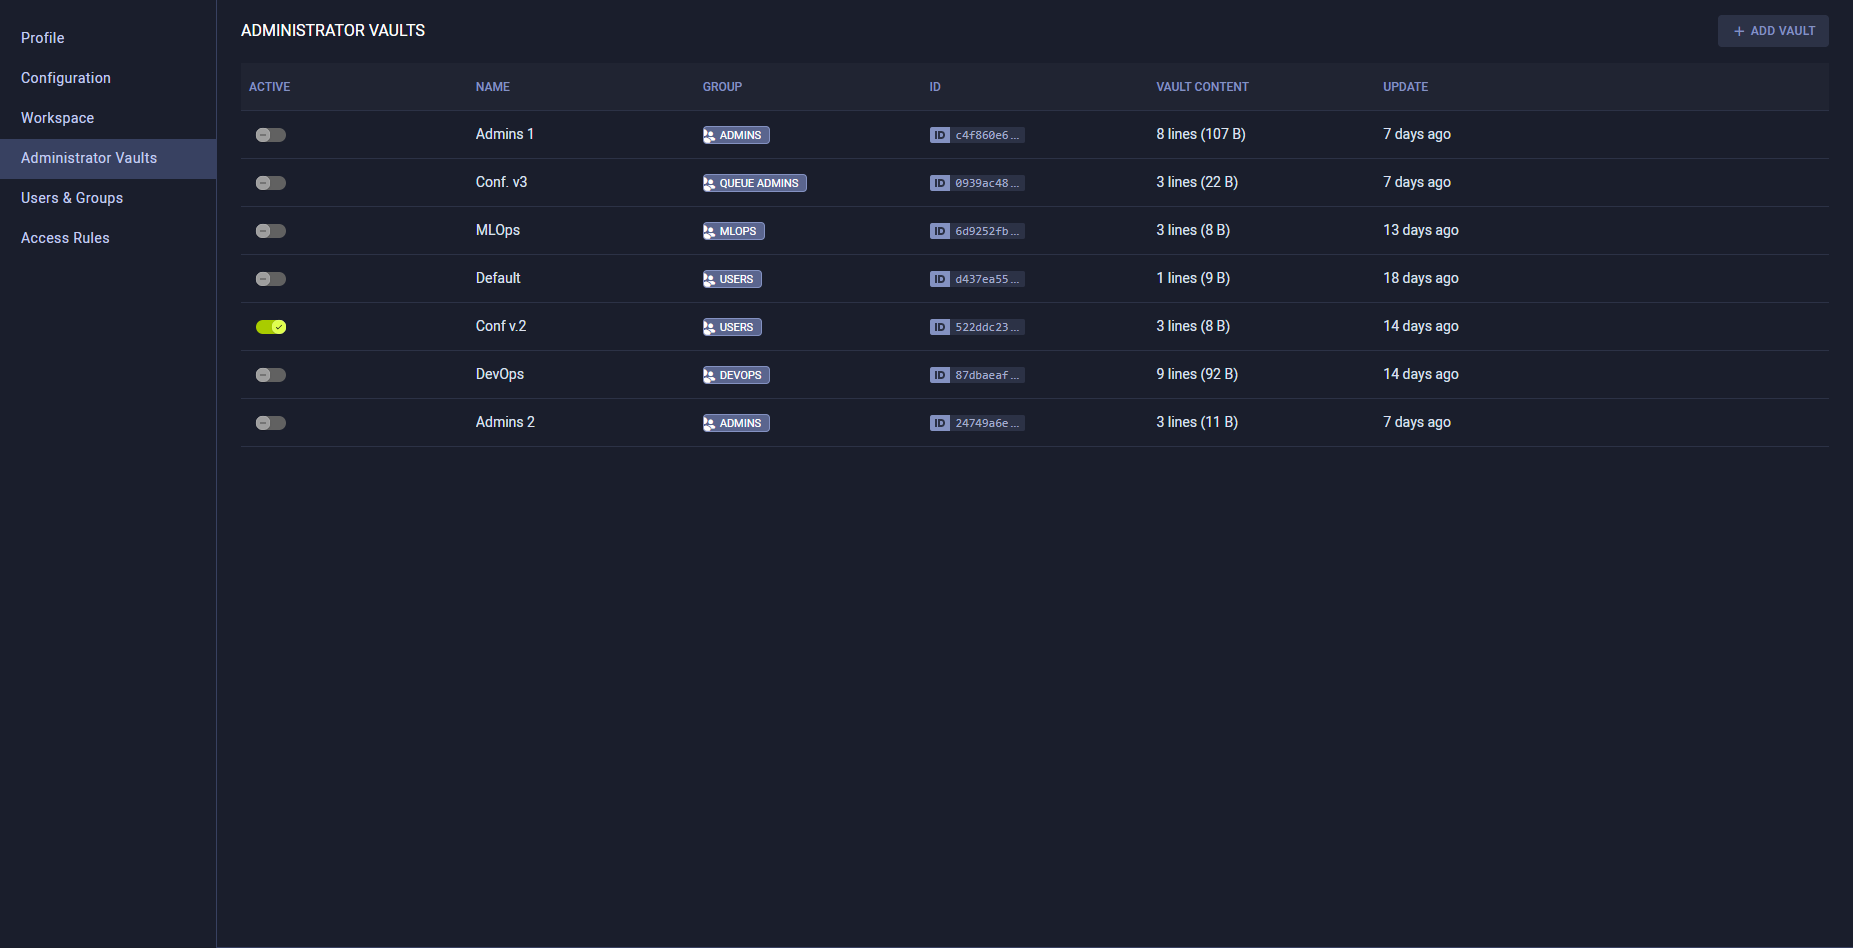
Administrator Vaults
This feature is available under the ClearML Enterprise plan
Administrators can define multiple configuration vaults which will each be applied to designated user groups. Use configuration vaults to extend and/or override entries in the local ClearML configuration file where a ClearML task is executed. Configuration vault values will be applied to tasks run by members of the designated user groups.
To apply its contents, a vault should be enabled. New entries will extend the configuration in the local ClearML configuration file. Most existing configuration file entries will be overridden by the vault values.
The following configuration values are machine and/or agent specific, so they can't be set in a configuration vault:
agent.cuda_versionagent.cudnn_versionagent.default_pythonagent.worker_idagent.worker_nameagent.debug
To create a vault:
- Click + Add Vault
- Fill in vault details:
- Vault name - Name that appears in the Administrator Vaults table
- User Group - Specify the User Group that the vault affects
- Format - Specify the configuration format: HOCON / JSON / YAML.
- Fill in the configuration values (click
 to view configuration file reference). To import and existing configuration file, click
  .
. - Click Save
The Administrator Vaults table lists all currently defined vaults, and the following details:
- Active - Toggle to enable / disable the vault
- Name - Vault name
- Group - User groups to apply this vault to
- ID - Vault ID (click to copy)
- Vault Content - Vault content summary
- Update - Last update time
Hover over a vault in the table to Download, Edit, or Delete a vault.
Users & Groups
ClearML Hosted Service users can add users to their workspace.
Inviting new teammates is only available on the ClearML Hosted Service
Users
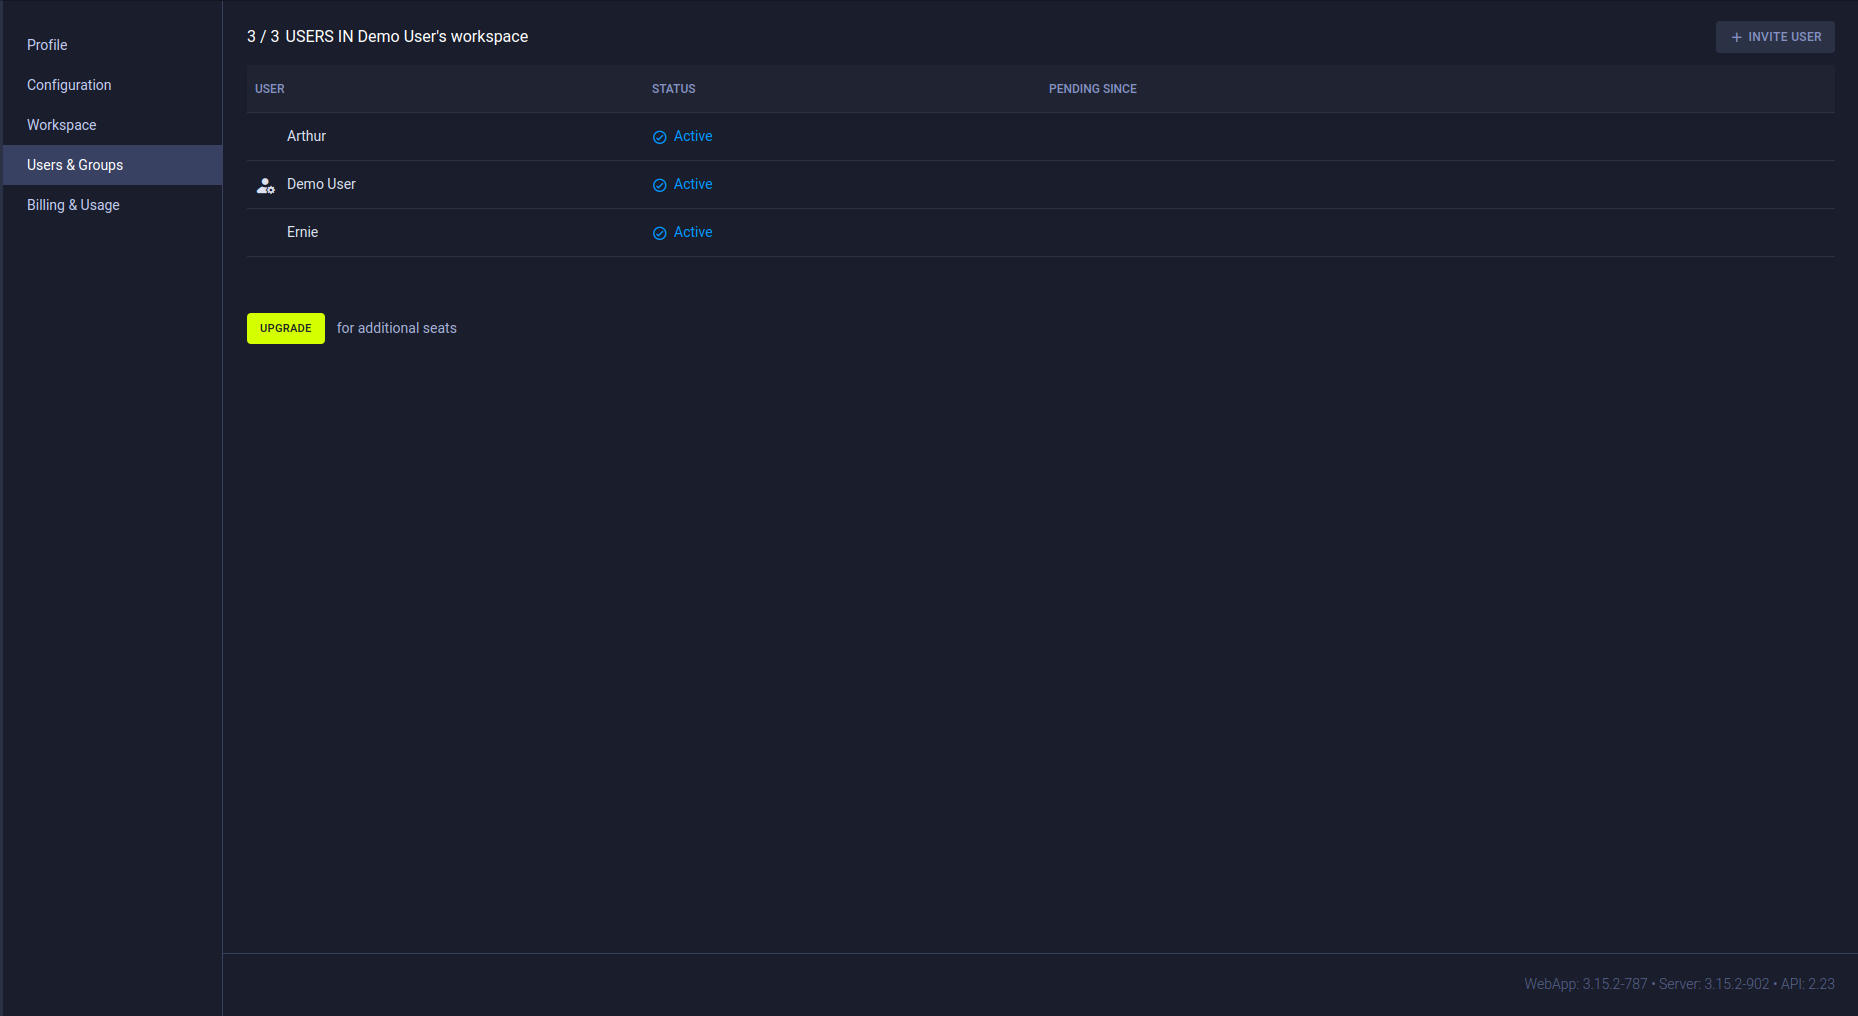
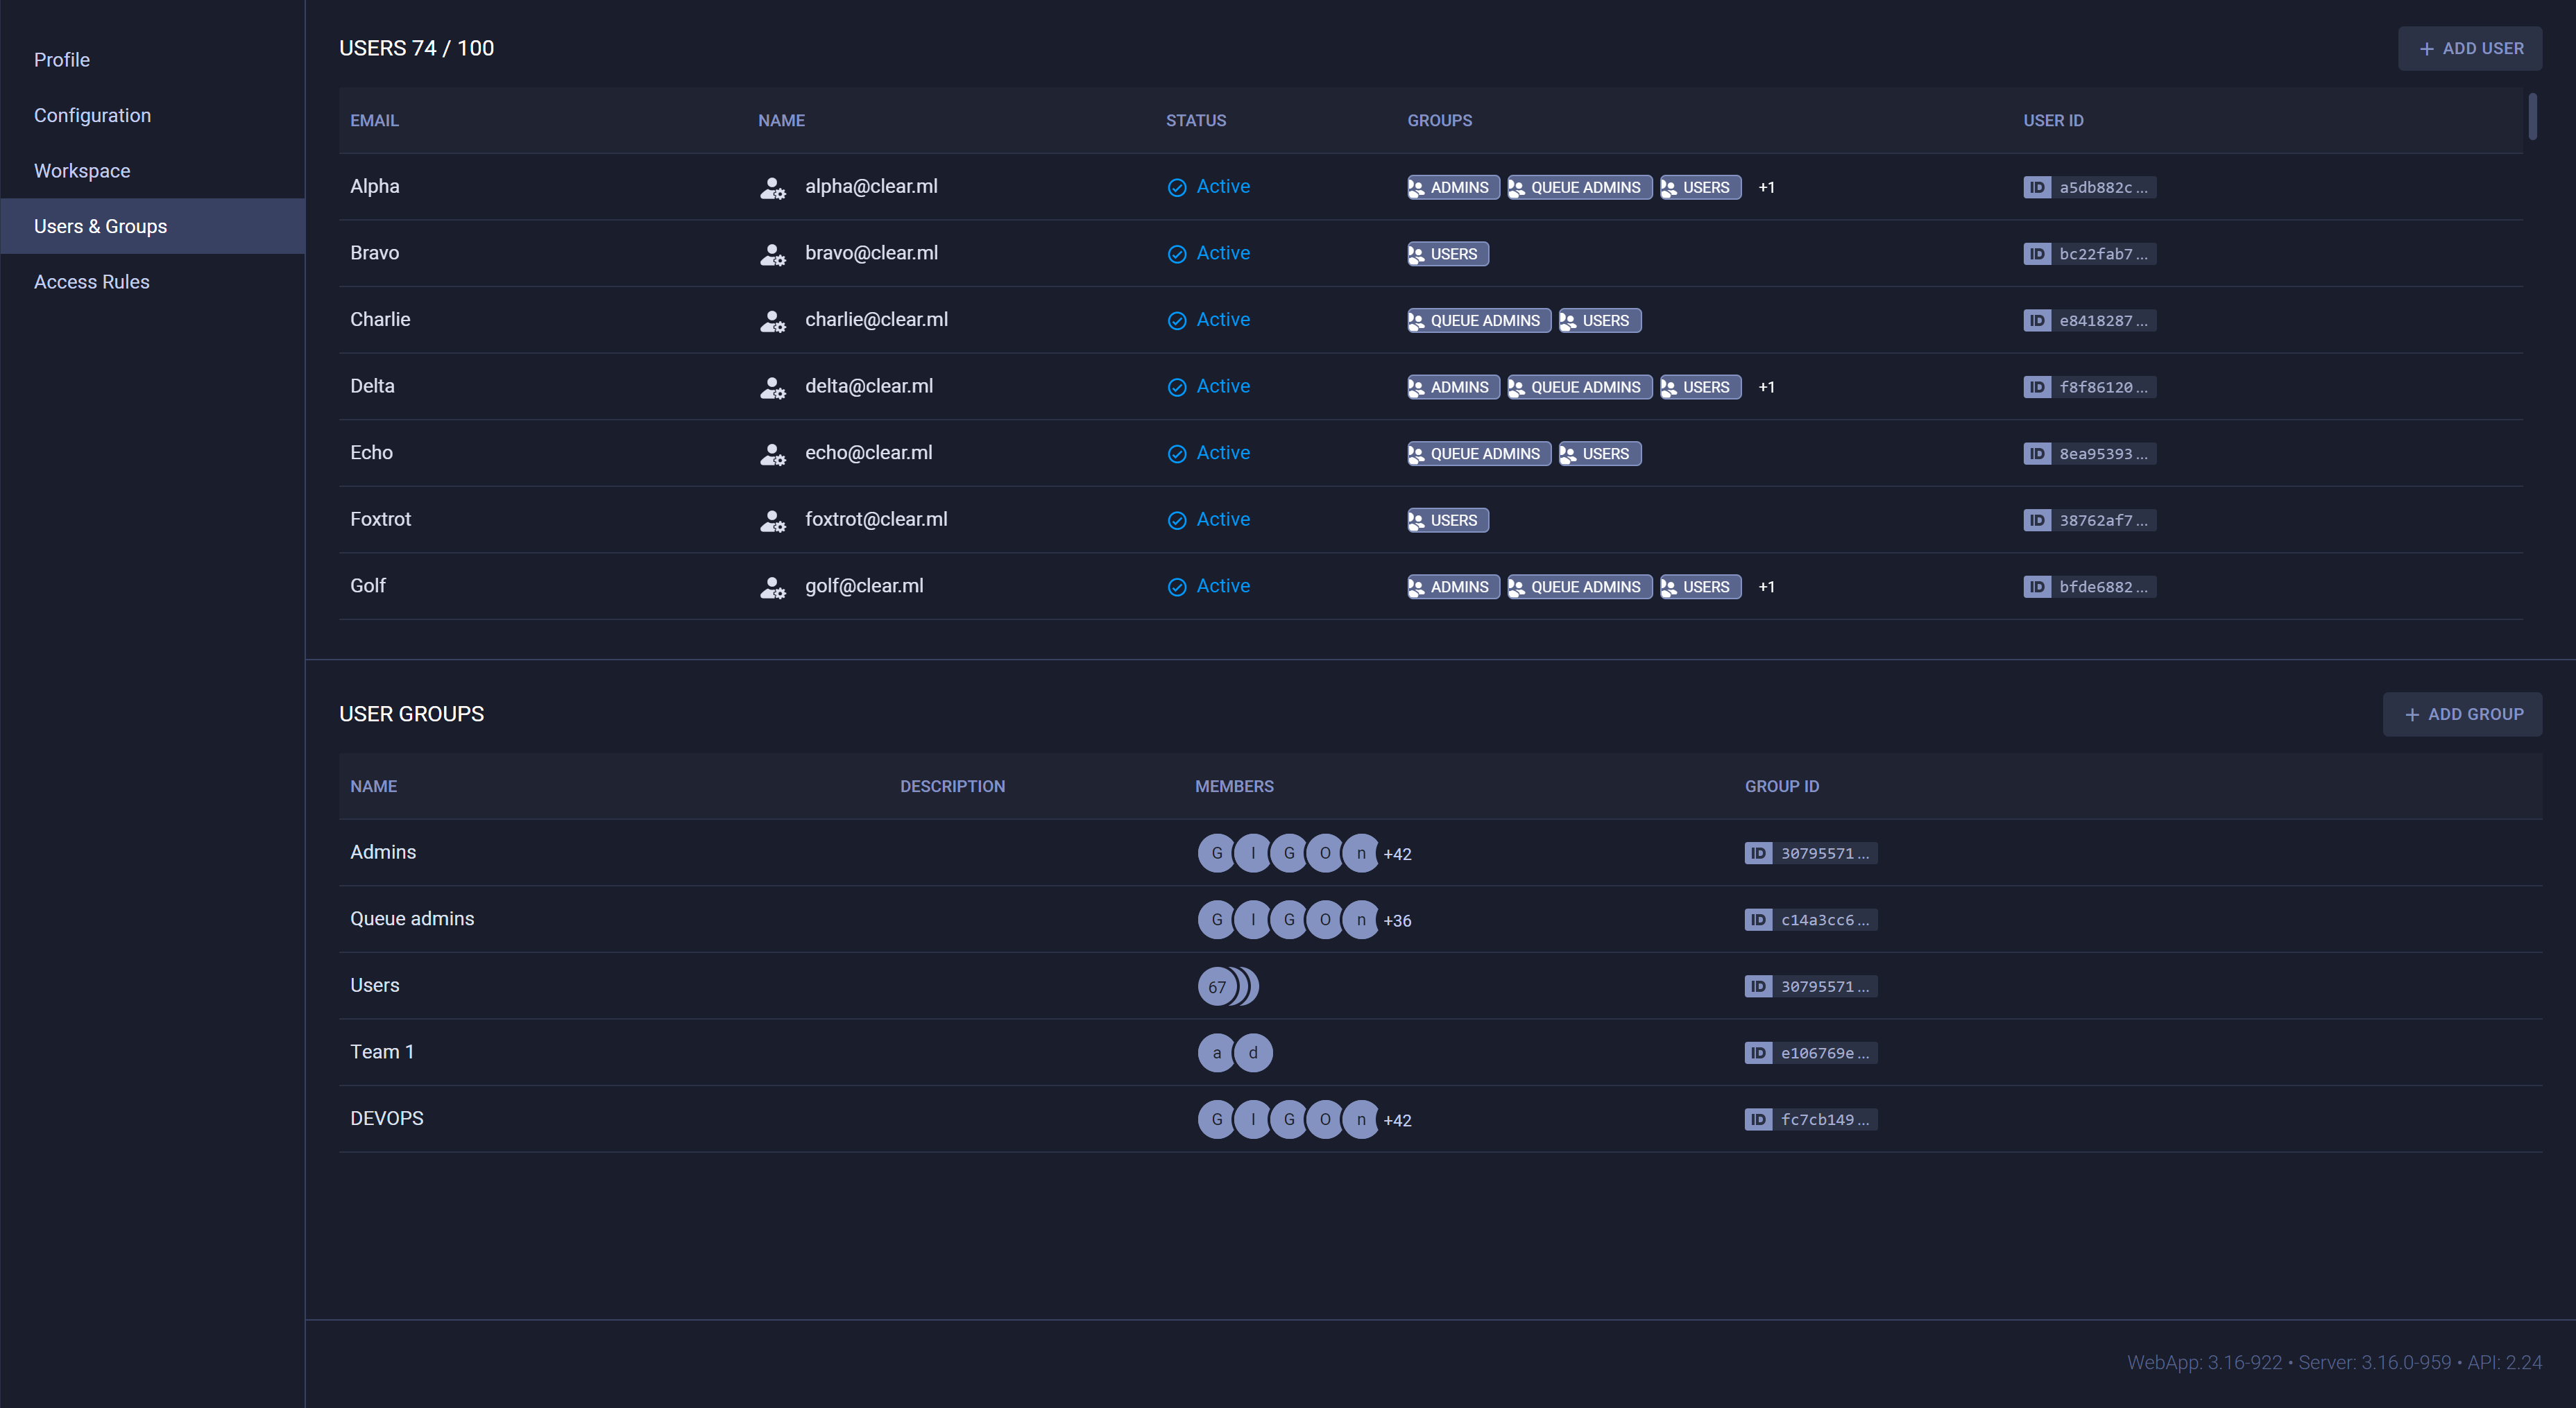
The USERS table lists workspace members and shows whether the maximum number of members has been reached. Each row of the table includes:
- Username
- User status (
ActiveorPending) - If the user's invitation is pending, the date the user was added
- User groups (ClearML Enterprise feature)
Inviting New Teammates
To invite a user to your workspace, press the + INVITE USER button, and input the email in the dialog that pops up. Once invited, the added users can immediately access your workspace.
Removing Teammates
To remove a user from a workspace:
- Hover over the user's row on the table
- Click the
 button
Removed users lose access to your workspace's resources (tasks, models, etc.) and their existing access credentials are revoked. Tasks and associated artifacts logged to your workspace by a removed user will remain in your workspace. The user can only rejoin your workspace when you re-invite them.
Service Accounts
This feature is available under the ClearML Enterprise plan.
Service accounts are ClearML users that provide services with access to the ClearML API, but not the UI. Administrators can create access credentials for service accounts to use them for different ClearML Agents, automations, and more.
A service account has all the privileges of a normal user in ClearML, with the following limitations:
- Service accounts cannot be used to access the UI
- Service accounts can be used to facilitate running tasks under the identity of each task's owner ("Impersonation").
- Used to run an agent using the command-line, this will allow you to specify the
--use-owner-tokenoption. - Used to run the ClearML Agent Helm Chart, this will allow you to specify
values.agentk8s.useOwnerToken: trueoption. - Used to run an Autoscaler application, this will allow you to make use of the
Apply Task Owner Vault Configurationoption.
- Used to run an agent using the command-line, this will allow you to specify the
When access controls are provisioned, they apply to service accounts the same as for ClearML users. Therefore, in order to use a service account to run an agent in daemon mode, the service account must have access to the queue the agent will service.
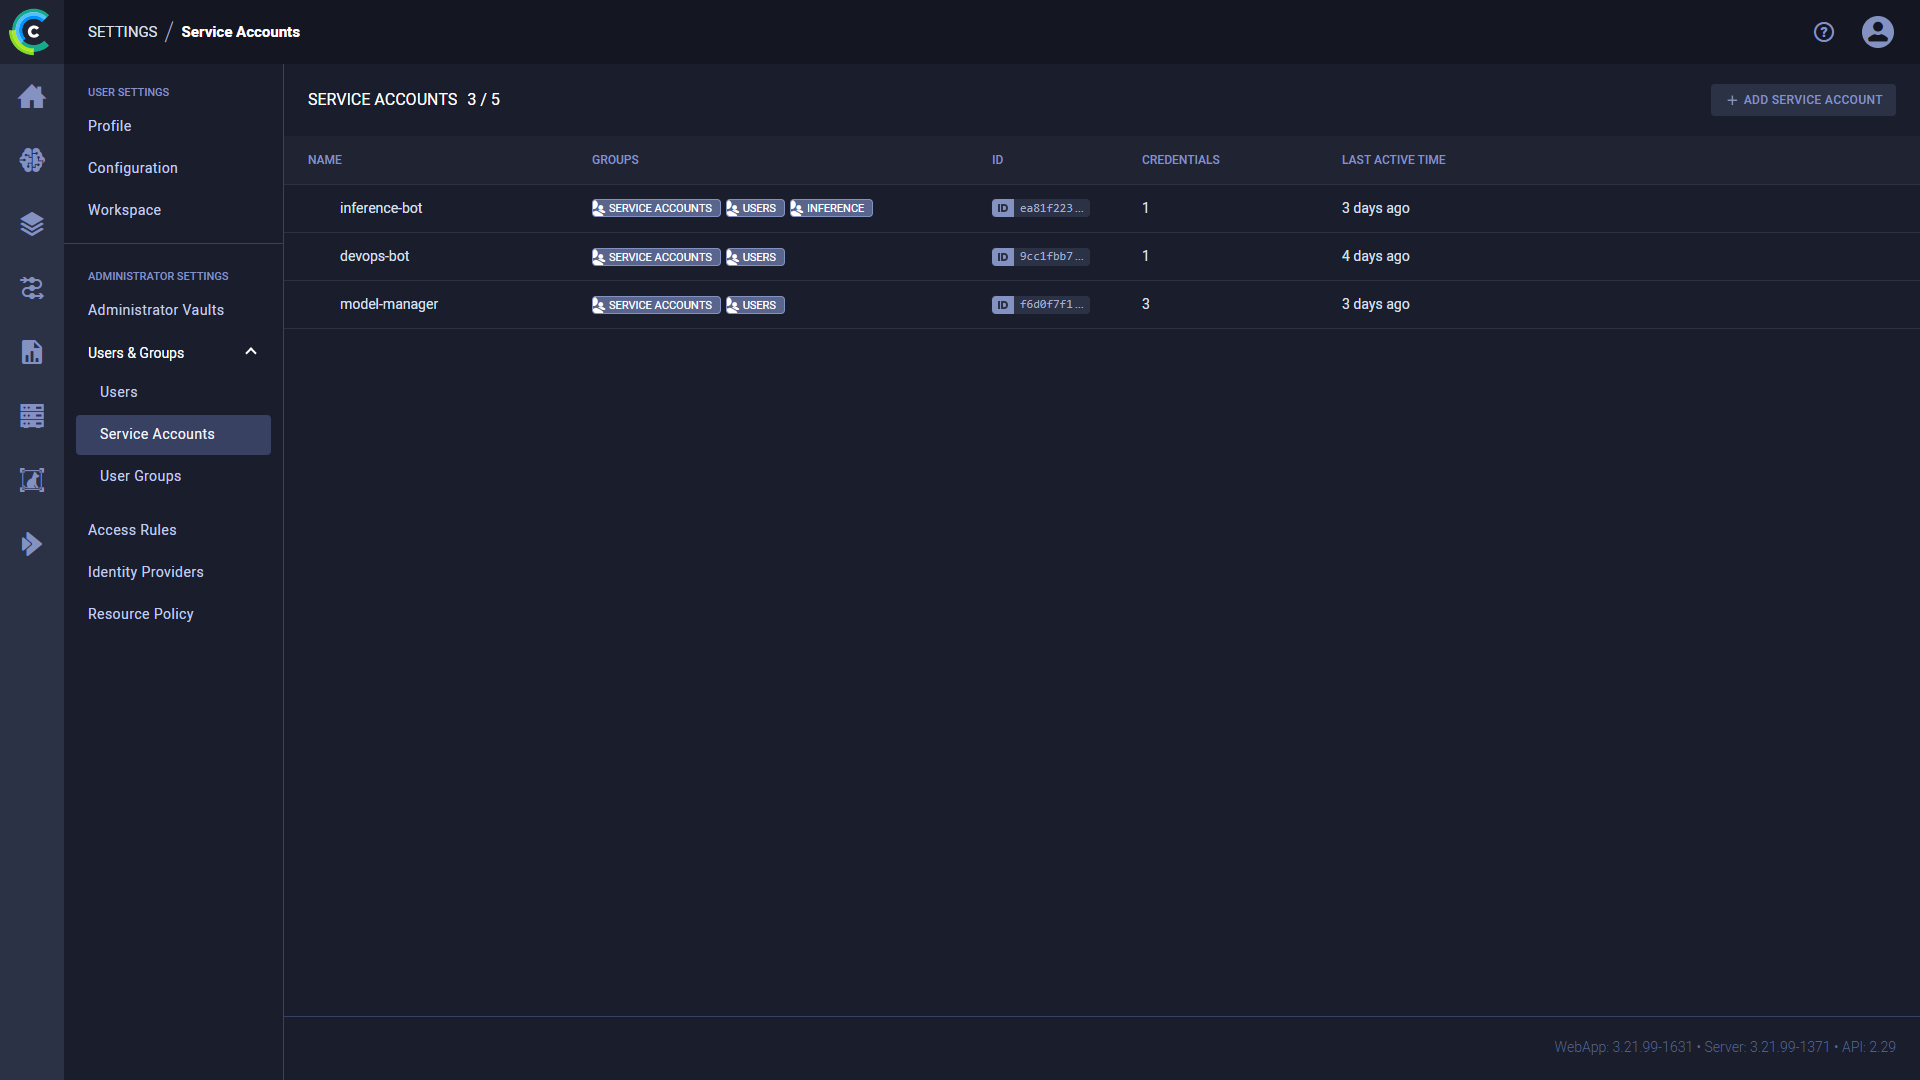
The SERVICE ACCOUNTS table lists workspace service accounts. Each row of the table includes:
- Name - Service account name
- User groups
- User ID
- Credentials - Number of credentials currently available to the account
- Last active time
Hover over a service account in the table to Edit or Delete it.
Creating a Service Account
To create a service account:
- Click + ADD SERVICE ACCOUNT
- In the ADD SERVICE ACCOUNT modal input a name for the new account. Select
Allow impersonationto allow the service account to assume the identity of a task owner - Click Save
Service accounts are members of the Users group, meaning they can access the resources available to all users. When
impersonation is enabled, a task run by the service account (i.e. by an agent or autoscaler using the service accounts'
credentials) is executed as if by the owner of the task, meaning it will have access to the task owner's configuration
vaults and to the resources that the task owner has access to. Impersonating an admin user does not mean the task's code
will have admin privileges.
In case impersonation is not enabled:
- If you run an agent with
--use_owner_tokenthen the agent will fail. - If you run an agent without
--use_owner_token, the task will run with the service account's access rules, so make sure the account uses resources it has access to
When a service account is created, an initial set of credentials is automatically generated. The dialog displays new credentials, formatted as a ready-to-copy configuration file section.
Service Account Credentials
To generate new credentials for a service account:
- Hover over the account's row on the table
- Click the button, which
opens the editing panel
- Click Create new credentials
The dialog displays new credentials, formatted as a ready-to-copy configuration file section.
To revoke a set of credentials:
- In the editing panel, hover of the relevant credential's row
- Click the button
Deleting Service Account
Deleting a service account will revoke its credentials, causing agents using the account's credentials to fail. Tasks and associated artifacts logged to your workspace by a service account will remain in your workspace.
To delete a service account:
- Hover over the account's row on the table
- Click the button
User Groups
This feature is available under the ClearML Enterprise plan, as part of the Access Rules feature.
Administrators can define user groups, which can be used for access privilege management. Users can be assigned to multiple user groups.
The system includes three pre-configured groups that can't be removed:
Users- All users (including service accounts). Can't be modifiedAdmins- Have RW access to all resources (except queue modification), and can grant users / user groups access permissions to workspace resourcesQueue admins- Can create / delete / rename queues
The user group table lists all the active user groups. Each row includes a group's name, description, member list, and ID.
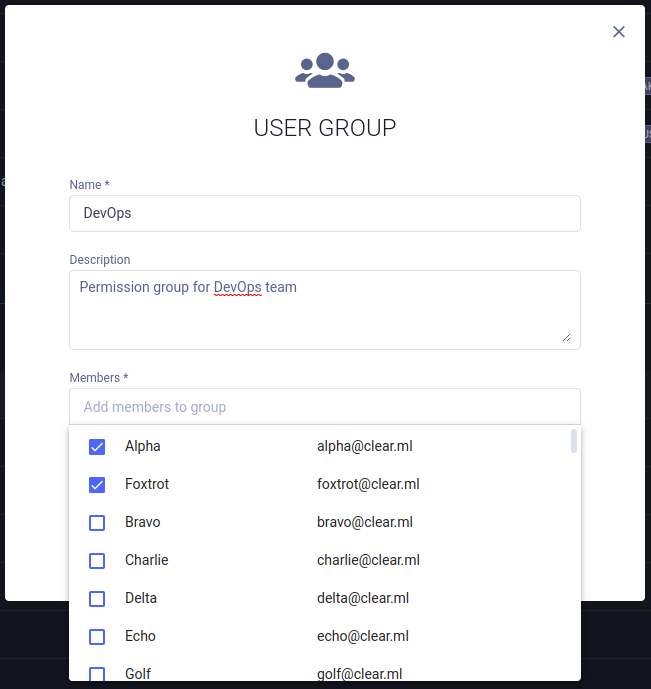
To create a user group:
- Click + ADD GROUP
- In the dialog, add a group name and description
- Add members to the group. When clicking the input box, a list of workspace members appears, from which group members
can be selected. Filter the list by typing part of the username. To remove a member, Hover over a user's row and click
the button
- Click SAVE
To edit a user group:
- Hover over the user group's row on the table
- Click the button
- Edit the group's name and/or description
- Edit group members (see details here)
- Click Save
To delete a user group:
- Hover over the user group's row on the table
- Click the button
When a user group is deleted, its members will lose the access privileges that had been granted to the group (unless otherwise provided individually or to another group they are members of).
Access Rules
This feature is available under the ClearML Enterprise plan
Workspace administrators can use the Access Rules page to manage workspace permissions, by specifying which users, service accounts, and/or user groups have access permissions to the following workspace resources:
By default, all users have READ & MODIFY access to all resources.
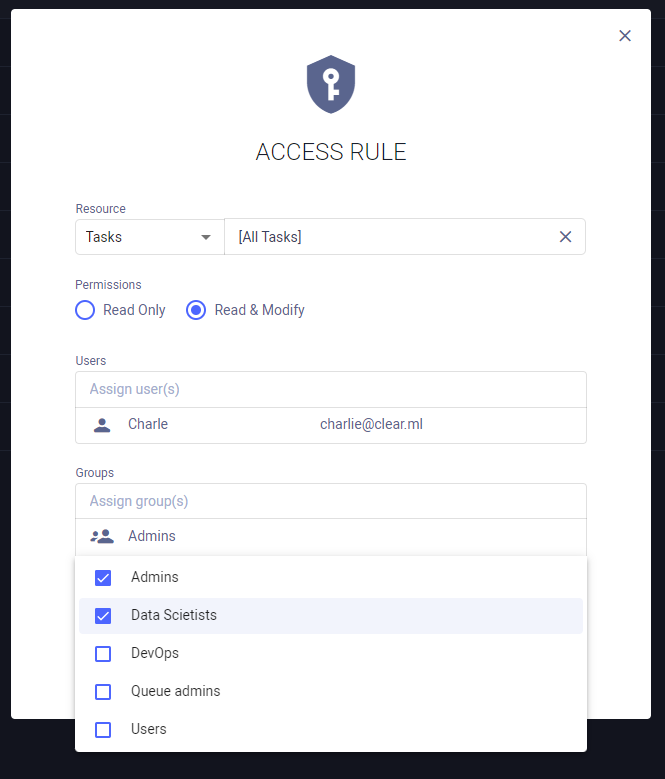
Creating Access Rules
Access privileges can be viewed, defined, and edited in the Access Rules table.
- Click + ADD RULES to access the rule creation dialog
- Select the resource to grant privileges to. To select a specific resource object (e.g. a specific project or task), click the input box, and select the object from the list that appears. Filter the list by typing part of the desired object name
- Select the permission type - Read Only or Read & Modify
- Assign users, service accounts, and/or user groups to be given access. Click the
desired input box, and select the users / service accounts / groups from the list that appears. Filter the list by
typing part of the desired object name. To revoke
access, hover over a user's, service account's, or group's row and click the
button
- Click SAVE
Access is inherited according to resource hierarchy. For example, if a user is given access to a project, the user will also have access to the project's contents (tasks, models, etc.). A user who is granted access to a specific task will not have access to another task in the project, unless explicitly granted.
Editing Access Rules
- Hover over the access rule's row on the table
- Click the button
- Change the resource, resource object, and permission type as desired
- Edit access rule users / service accounts / groups (see details here)
- Click SAVE
Deleting Access Rules
- Hover over the access rule's row on the Access Rules table
- Click the button
All users, service accounts, and user groups who had been assigned to the deleted access rule, will lose the access privileges granted by that rule (unless otherwise provided by a different rule).
Filtering Access Rules Table
The access rules table can be filtered by resource type and by target resource and users / groups.
- To filter by resource, click the View dropdown menu and select the desired resource
- To filter by target resource or users / groups / service accounts, click
 on the respective column and select the users / groups / service accounts to view from the list that appears.
Identity Providers
This feature is available under the ClearML Enterprise plan
Administrators can connect identity service providers to the server: configure an identity connection, which allows ClearML to communicate with your identity provider, retrieve user information, authenticate users, and more. Once an identity provider connection is configured and enabled, the option appears in your server login page.
To create a new connection:
Click + New Connection
In the New Provider Connection modal, select a protocol (OIDC or SAML) and a provider
- OIDC providers:
- Auth0
- AWS Cognito
- Keycloak
- Microsoft AD
- Microsoft Azure
- Okta
- Ping
- Custom
- SAML providers
- Duo
- Jumpcloud
- Microsoft AD
- Custom
- OIDC providers:
Click Next
Provide the Provider Connection Configuration. Note that some of the information, such as the
Client ID,Client Secret, and theAuthorization Endpoint, must be obtained from your identity provider's ClearML App settings and copied to the relevant field.- ClearML WebApp URL - The external URL for the ClearML WebApp. Used to construct the Callback URL used by the identity provider
- Callback URL - Copy the field's content into the
Callback URLfield in your provider's ClearML App / integration (sometimes the field is calledRedirect URL). Used by the identity provider to redirect the session back to the ClearML Server. - Display name - Unique name to be used in the ClearML Login screen. Make sure no two connections have the same name.
- Client ID - The Client ID of your identity provider's ClearML App. Copy this value from your identity provider's ClearML App settings
- Client Secret - The client secret generated by your identity provider for the ClearML App. Copy this value from your identity provider's ClearML App settings
- Authorization Endpoint - Used to authorize each user login. Copy this value from your identity provider's ClearML App settings
- Access Token Endpoint - Used to obtain an access token as part of the login process. Copy this value from your identity provider's ClearML App settings
- Revocation Endpoint - Used to revoke an access token. Copy this value from your identity provider's ClearML App settings
- Obtain user information from Identity Token - Select to retrieve user information from the identity token generated by the provider. If not selected, provide a User Info Endpoint which is used to obtain additional user information as part of the login process. Copy this value from your identity provider's ClearML App settings
- Email verification - Only allow signup/login to users with a verified email address. If selected, make sure that
your identity provider returns an
email_verifiedclaim in generated tokens. - Create new users on first login - Select to automatically create a ClearML user for new users logging in using this connection. If not selected, only existing ClearML users or users who were invited using their email address can log in using this connection.
- Verify token signature - Select to verify
signatures for tokens returned by the identity provider. This requires the
JWKS URIto be configured. Make sure your identity provider's ClearML App is set up to sign tokens. - Additional Settings
- Code challenge method - Select one of the methods from the dropdown menu (
None,Plain, orS256). This setting should match the one defined in your identity provider's ClearML App settings - Standard Userinfo scopes - Comma-separated list of scopes. Used to control access to user information. In case
you need to add another scope, use the
Additional scopesfield below. - Additional scopes - Comma-separated list of any additional scopes required by your identity provider
- Code challenge method - Select one of the methods from the dropdown menu (
- Claims mappings - Maps ClearML claim names to the names defined in your identity provider's ClearML App settings
- user id - The user's unique ID
- email - The user's email address
- name - The user's full name
- given name - The user's given name (optional if name is specified)
- family name - The user's family name (surname, optional if name is specified)
- picture - The user's avatar or picture URL
- User Groups Synchronization - Supports synchronizing group membership. If enabled, and the groups claim is returned by the provider, the server will attempt to match each group to an existing ClearML group and assign the ClearML user to the matched ClearML group. The server will also make sure the ClearML user is removed from the group if a previous membership has been revoked.
ClearML Webapp URL - The external URL for the ClearML WebApp. This is used to construct the Callback URL used by the identity provider
Reply/ACS URL - Copy this field's content into the
Assertion Consumer Service URLfield in your provider's ClearML App. Used by the identity provider to redirect the session back to the ClearML Server.Display name - Unique name to be used in the ClearML Login screen. Make sure no two connections have the same name.
Entity ID - The Entity ID of your identity provider's ClearML App. Copy this value from your identity provider's ClearML App settings
IDP metadata file - Provided by the identity provider and contains SAML configuration details used by the ClearML Server to set up the connection. Download this from your identity provider's ClearML App settings.
Security Settings
Require signed assertions - Assume IDP assertions or responses are signed by the identity provider. If enabled, make sure your identity provider's ClearML App is configured to sign assertions or responses.
Sign client requests - The ClearML Server will sign requests sent to the identity provider. Make sure your identity provider's ClearML App is configured to accept signed client requests and its Client Certificate section there is set up with the same value for the Public Key.
Sign requests sent to the identity provider. Use the following shell commands to generate a public/private key pair:
openssl genrsa -out server.key 2048
chmod 600 server.key
openssl req -new -key server.key -out server.csr
openssl x509 -req -days 3650 -in server.csr -signkey server.key -out server.cer
Paste the content of the
server.cerfile into thePublic Keyfield below and the content of theserver.keyfile into thePrivate Keyfield below. Make sure your identity provider's ClearML App is configured to accept signed client requests and itsClient Certificatesection there is set up with the same value for thePublic Key.
Claims mappings - Maps ClearML Claim names to the names defined in your identity provider's ClearML App settings
- user id - The user's unique ID
- email - The user's email address
- name - The user's full name
- given name - The user's given name (optional if name is specified)
- family name - The user's family name (surname, optional if name is specified)
- picture - The user's avatar or picture URL
User Groups Synchronization - Supports synchronizing group membership. If enabled, and the groups claim is returned by the provider, the server will attempt to match each group to an existing ClearML group and assign the ClearML user to the matched ClearML group. The server will also make sure the ClearML user is removed from the group if a previous membership has been revoked.
Click Test Provider to make sure that the connection is working. This calls the identity provider, and displays the returned information, so you can verify that the information was mapped correctly. An error will be displayed, if the provider fails to connect.
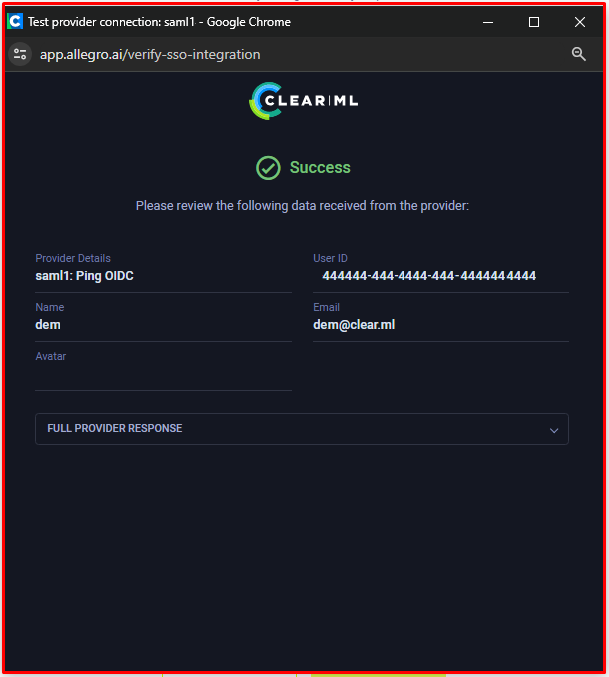
Click Save
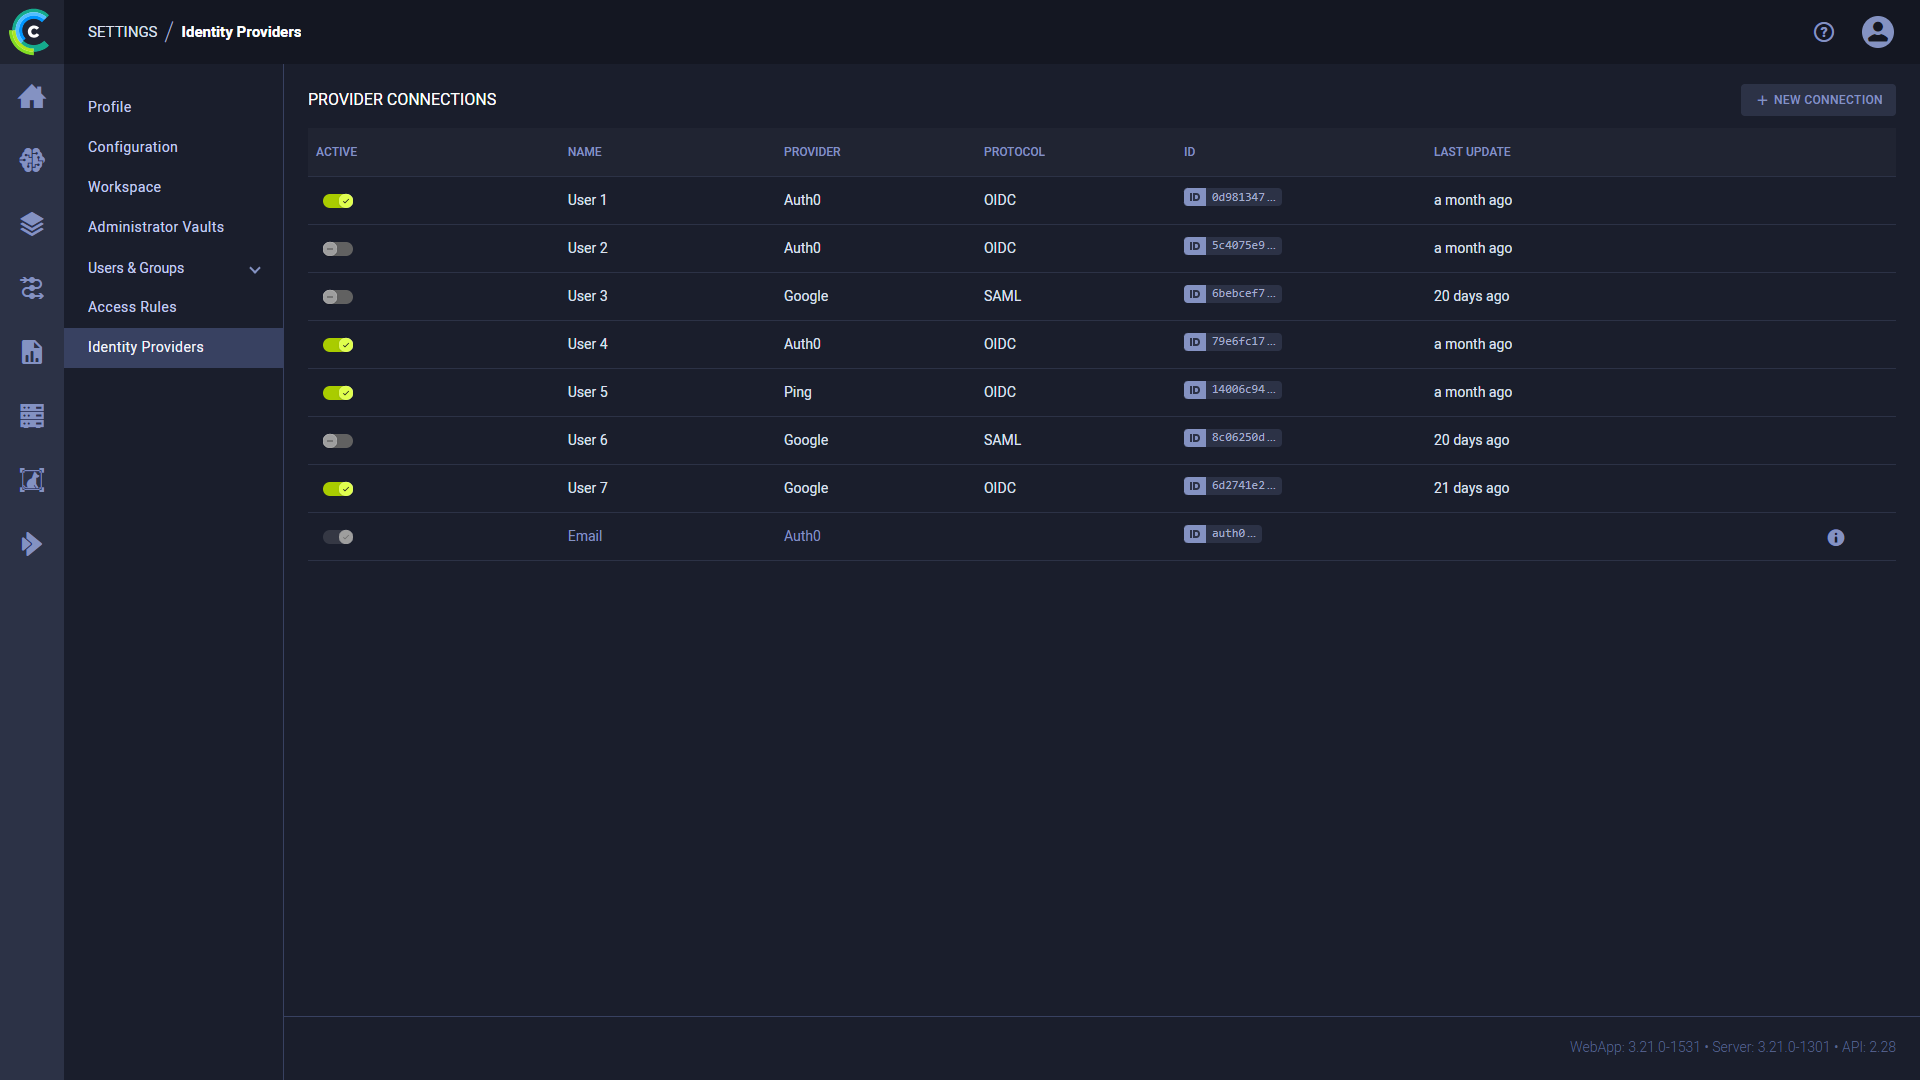
The Provider Connections table lists all currently defined connections, and the following details:
- Active - Toggle to enable / disable the provider connection
- Name - Connection name
- Provider - Connection's provider
- Protocol - Connection's protocol
- ID - Connection's ID (click to copy)
- Last Update - Last update time
Hover over a connection in the table to Edit or Delete it.
Usage & Billing
The USAGE & BILLING section displays your ClearML workspace usage information including:
- Number of workspace users
- Available storage
- Number of monthly API calls
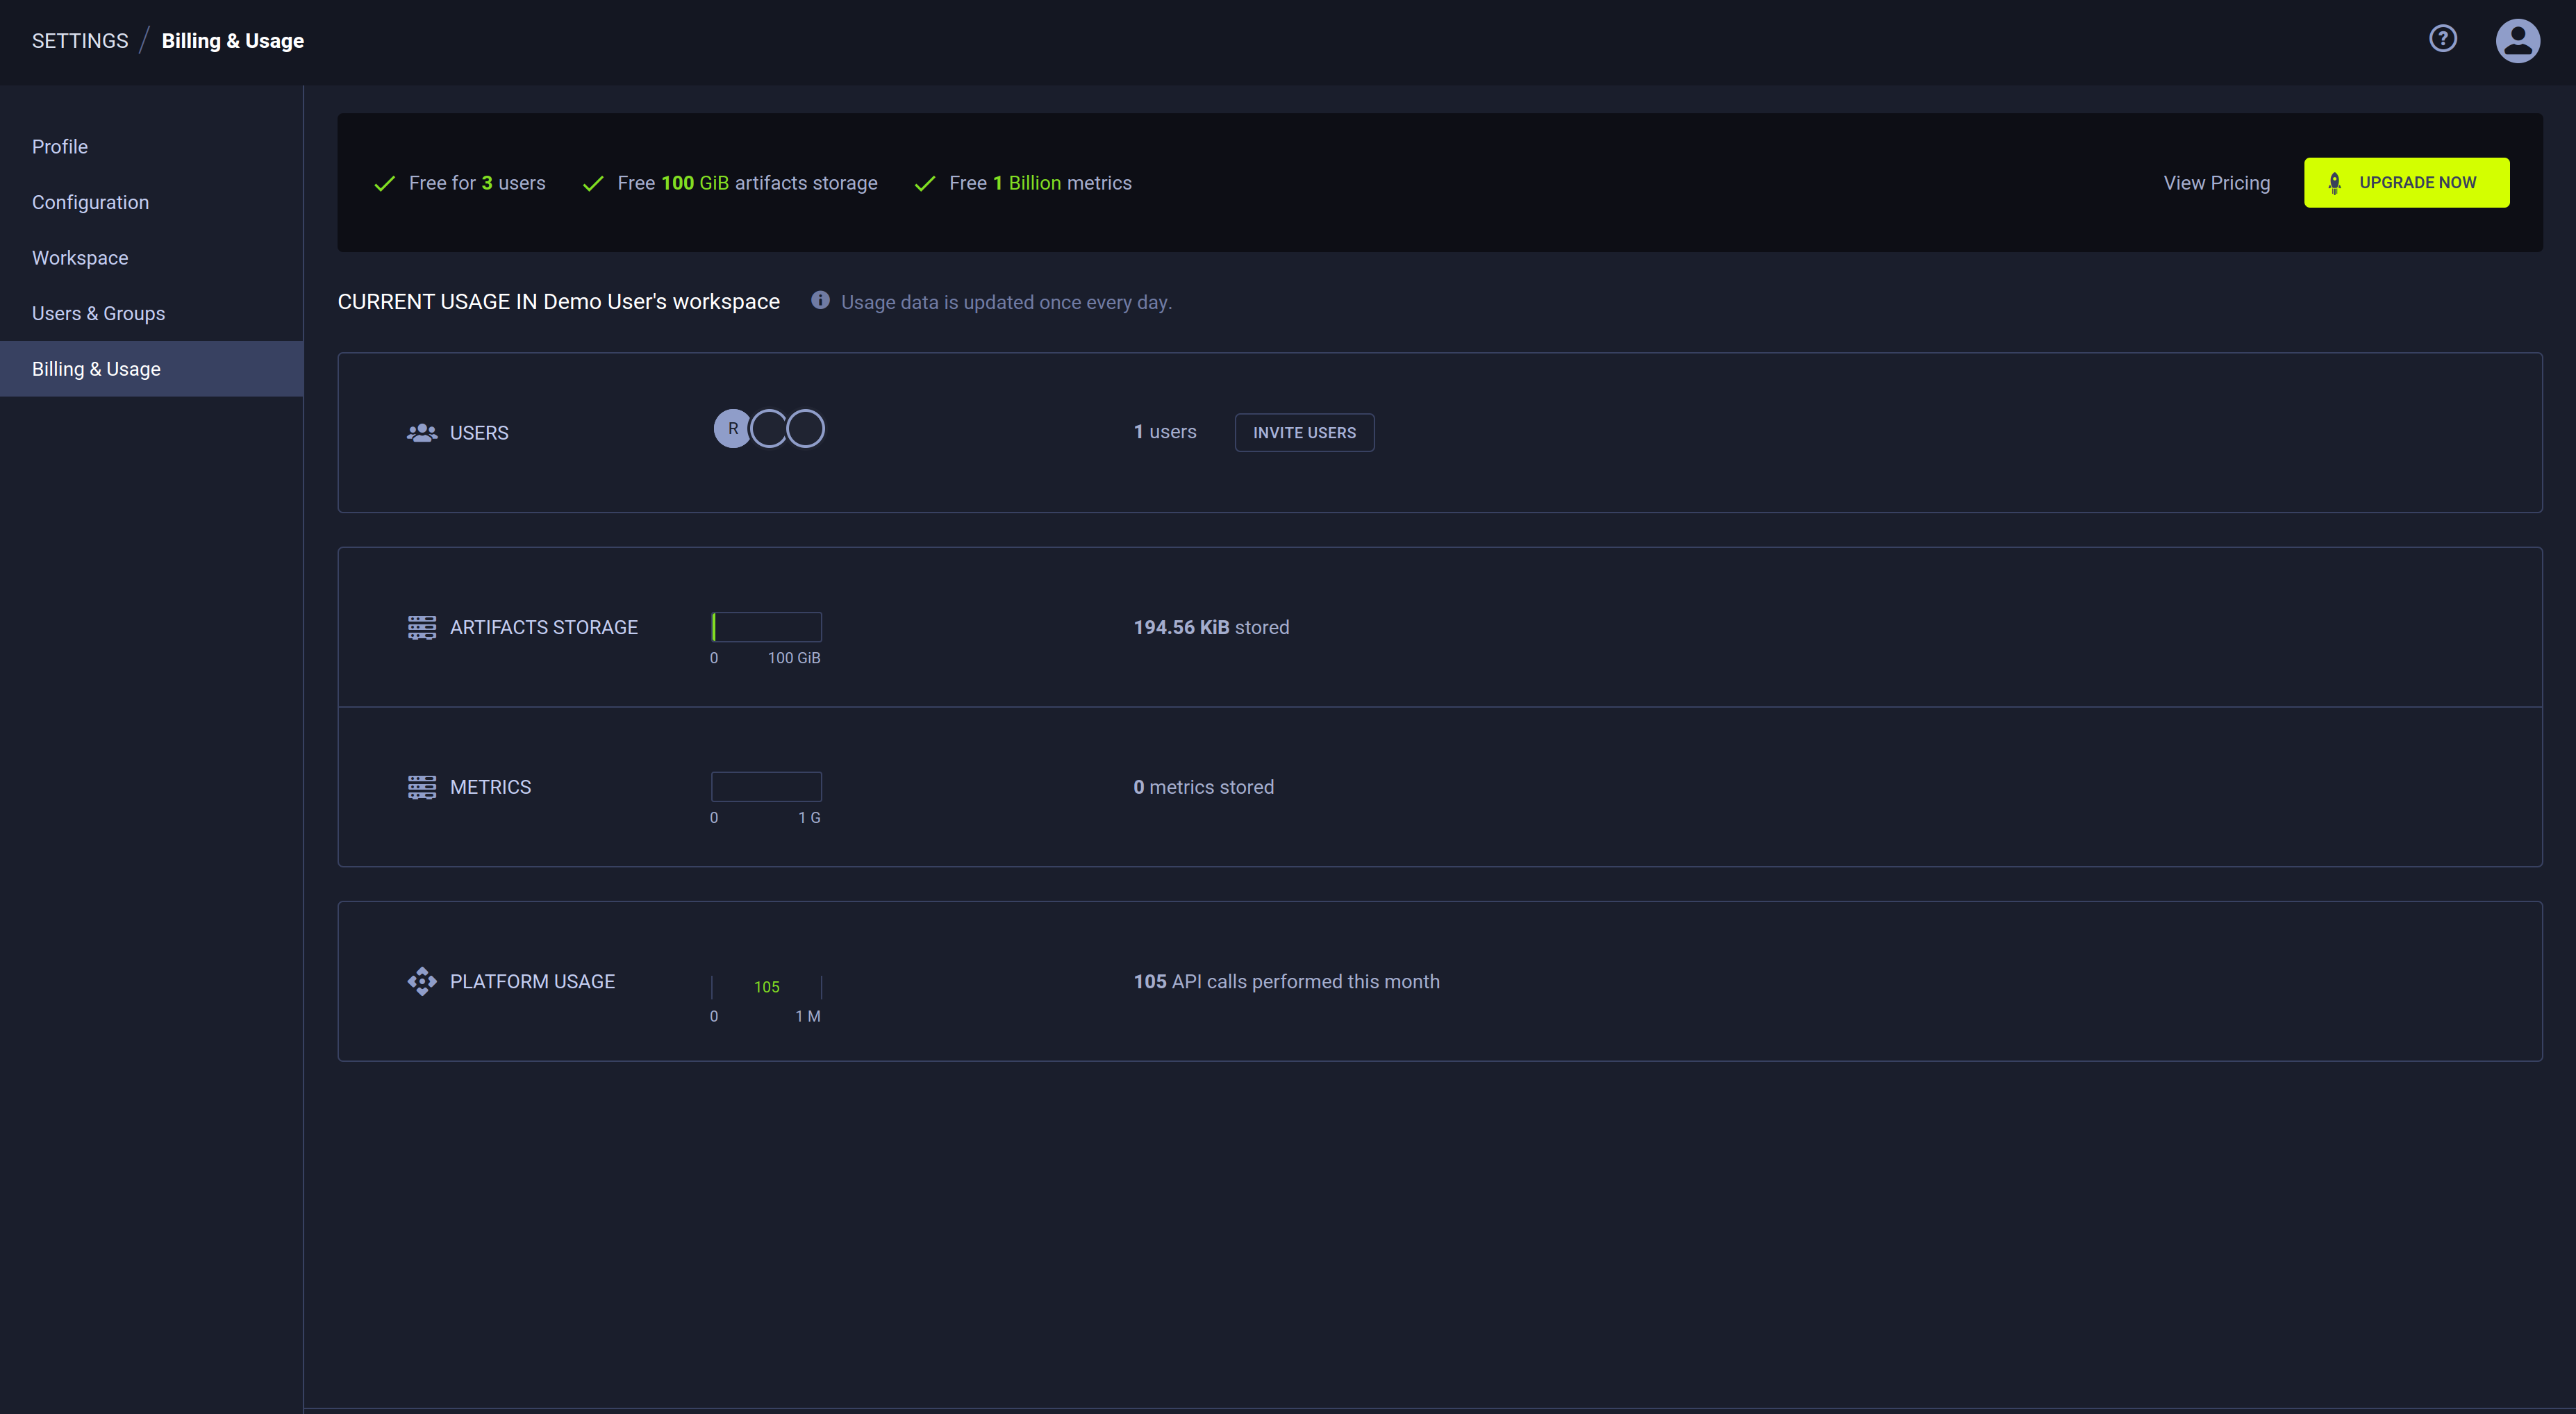
To add users to your workspace, click INVITE USERS in the USERS section. This will redirect you to the USER MANAGEMENT page, where you can invite users (see details here).
ClearML Pro
If you use up your free resources, consider upgrading your account! See the ClearML pricing page for additional plans information.
With the ClearML Pro plan, the USAGE & BILLING page additionally shows estimated charges for the current billing period and provides access to billing information.
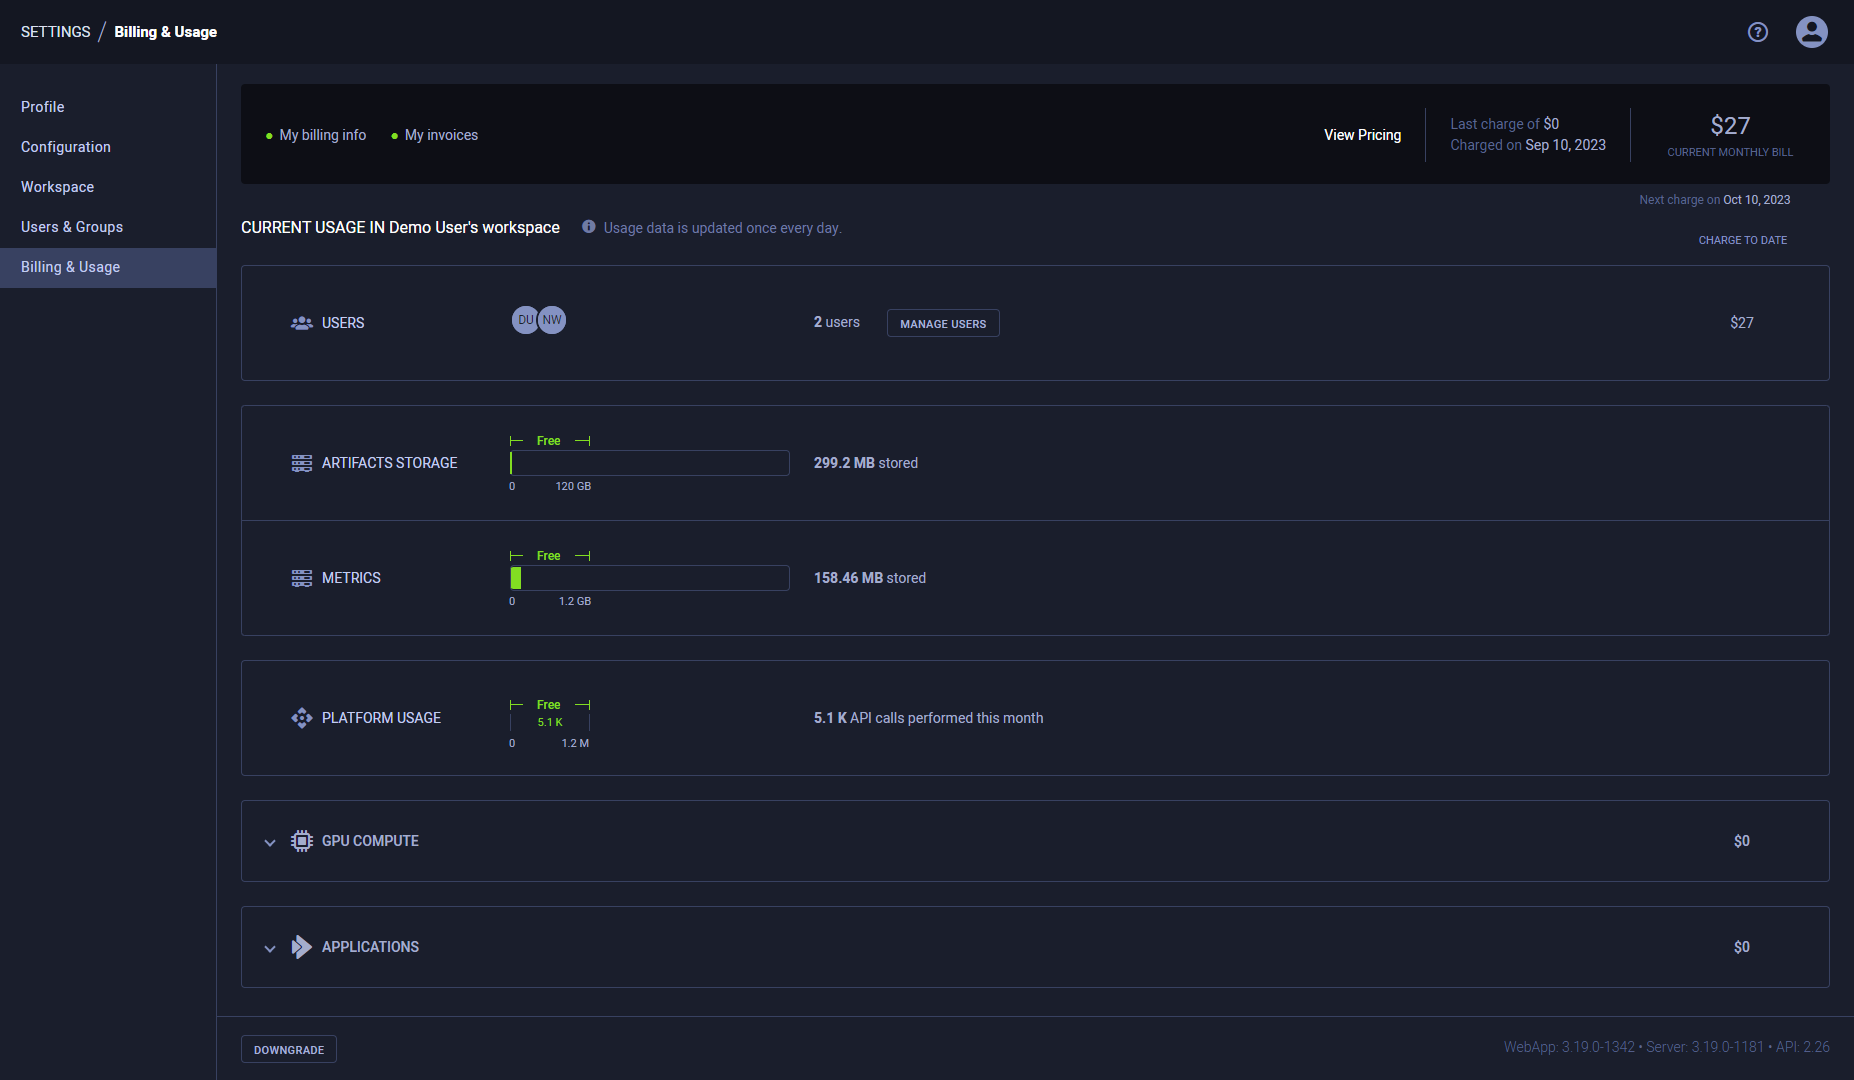
To Upgrade your account to ClearML Pro, click UPGRADE in the top right corner of the page. This will open a wizard where you will be able to read the terms and conditions and input your billing information.
To update your billing information:
- Click My billing info in the top left of the page, which will open a dialog with your current information
- Click Update payment methods, which will open a window where you can update your information
Access all of your previous invoices by clicking My invoices in the top left of the page. This will open the PAYMENT HISTORY window, where you can download any of your invoices. Click EMAIL INVOICES to receive details of your past transactions, licenses and downloads to your email.