Dataset Versions
Use the Dataset versioning WebApp (UI) features for viewing, creating, modifying, and deleting Dataset versions.
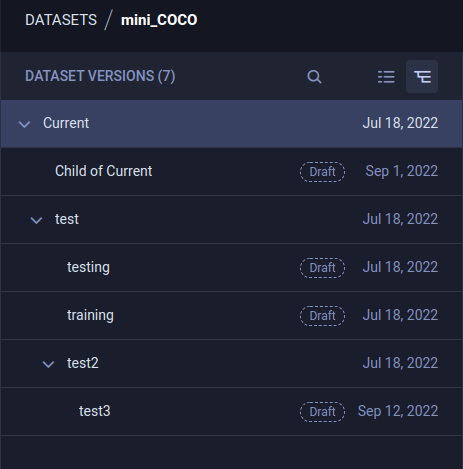
Dataset Version History
The WebApp (UI) presents your dataset version structure in list view ![]() or tree view
or tree view ![]() .
.
The list view lists the dataset's versions chronologically by last update time.

The tree view shows the lineage of the dataset's versions.
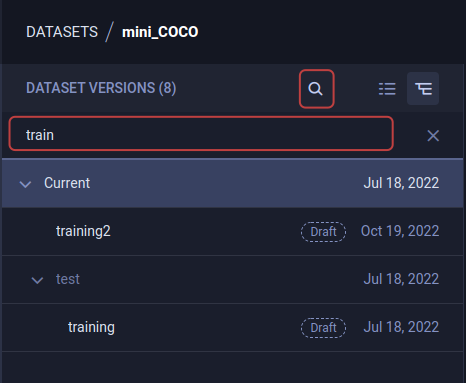
Use the search bar to find specific versions. You can query by version name, version description, or version ID. The search returns all versions that match the query.
In tree view, parent versions that do not match the query where a child version does appear in a muted color.
Version Actions
Access dataset version actions, by right-clicking a version, or through the menu button ![]() (available on hover).
(available on hover).
- Rename - Change the version's name
- Create New Version - Creates a child version of a Published dataset version. The new version is created in a draft state, and inherits all the parent version's frames
- Delete - Delete the version. Only Draft versions can be deleted.
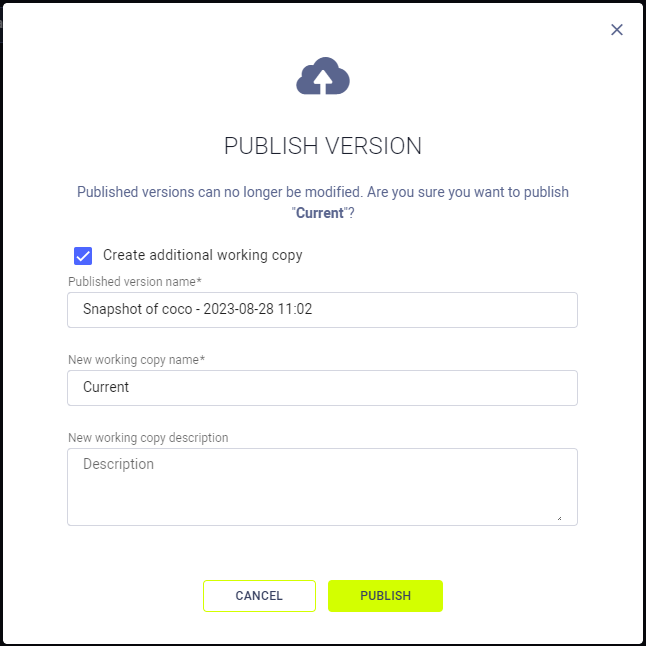
- Publish - Make a Draft version read-only to preserve its contents.
When publishing a version, you can create an additional working copy. The new version is created in a draft state, and inherits all the published version's frames.
Version Data
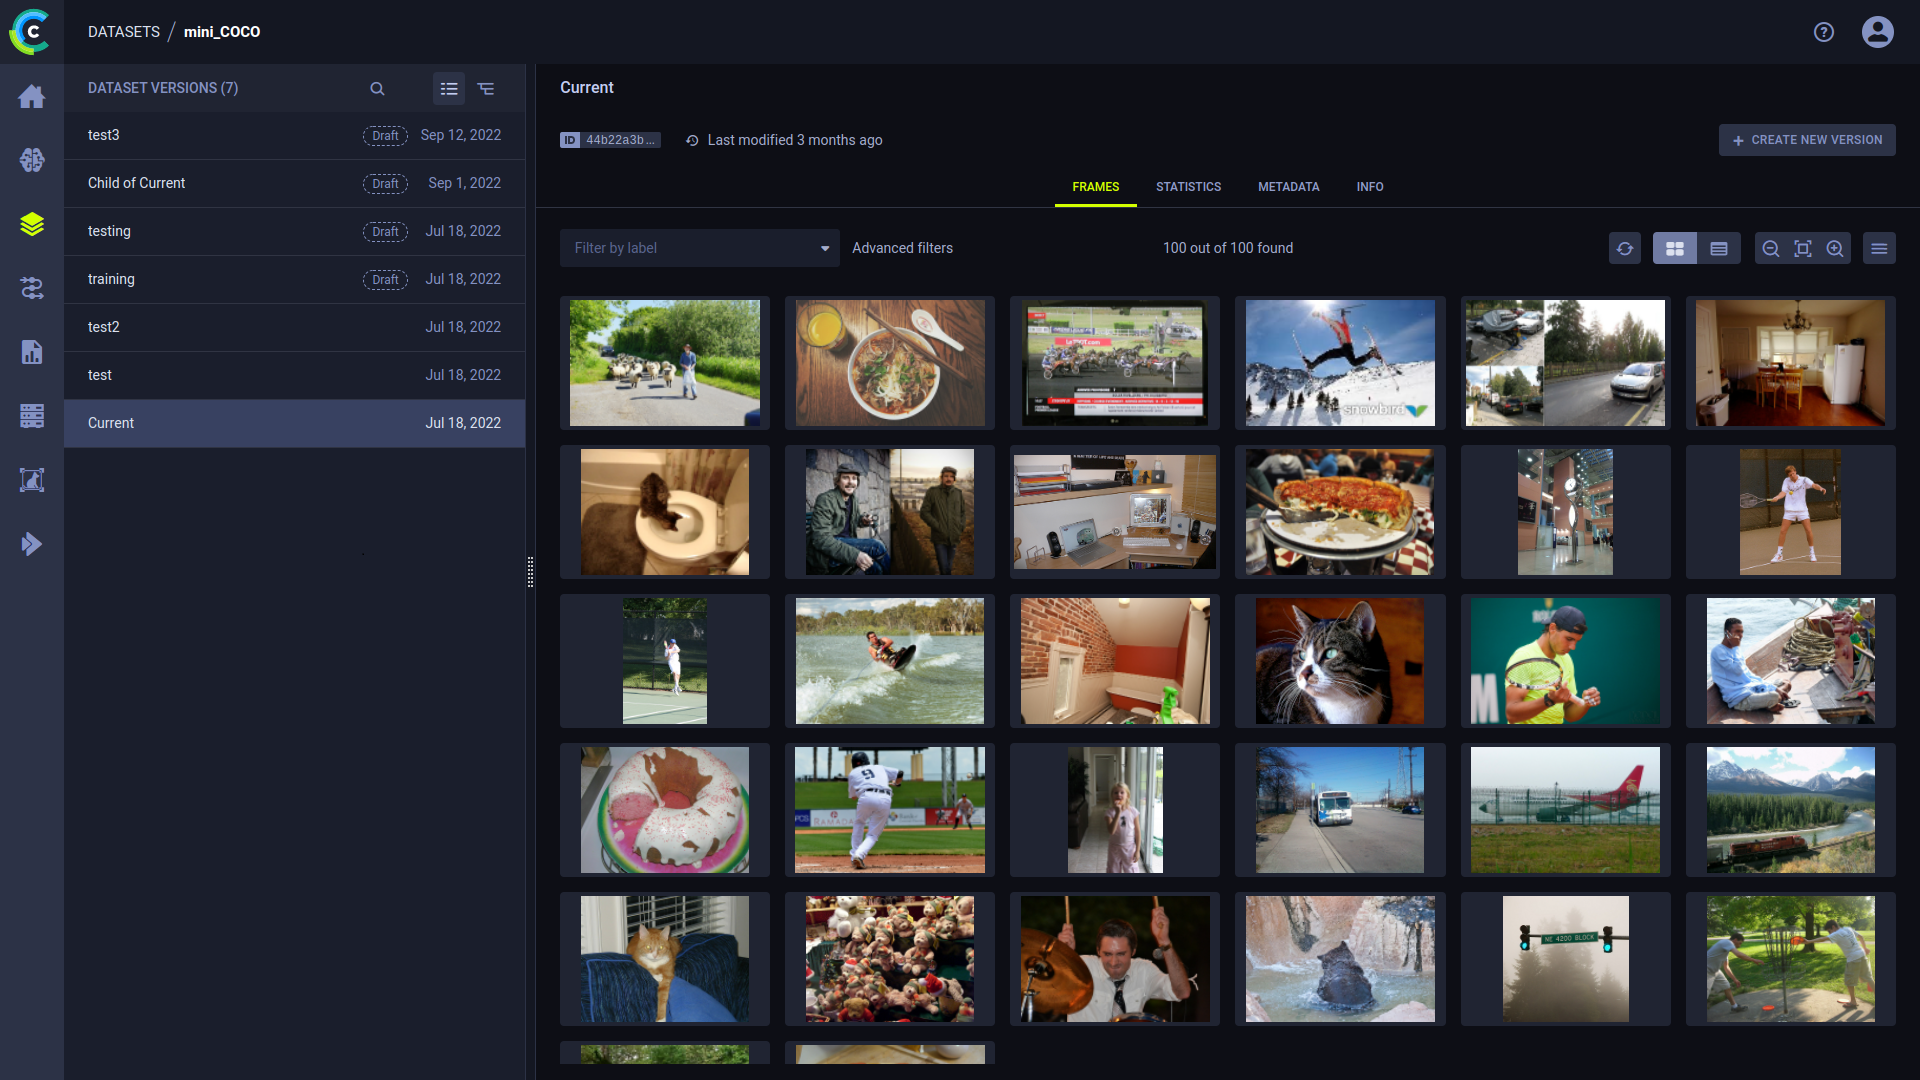
A selected dataset version's information and contents are presented on the main section of the page, to the right of the dataset's version list.
The version information is presented in the following tabs:
Frames
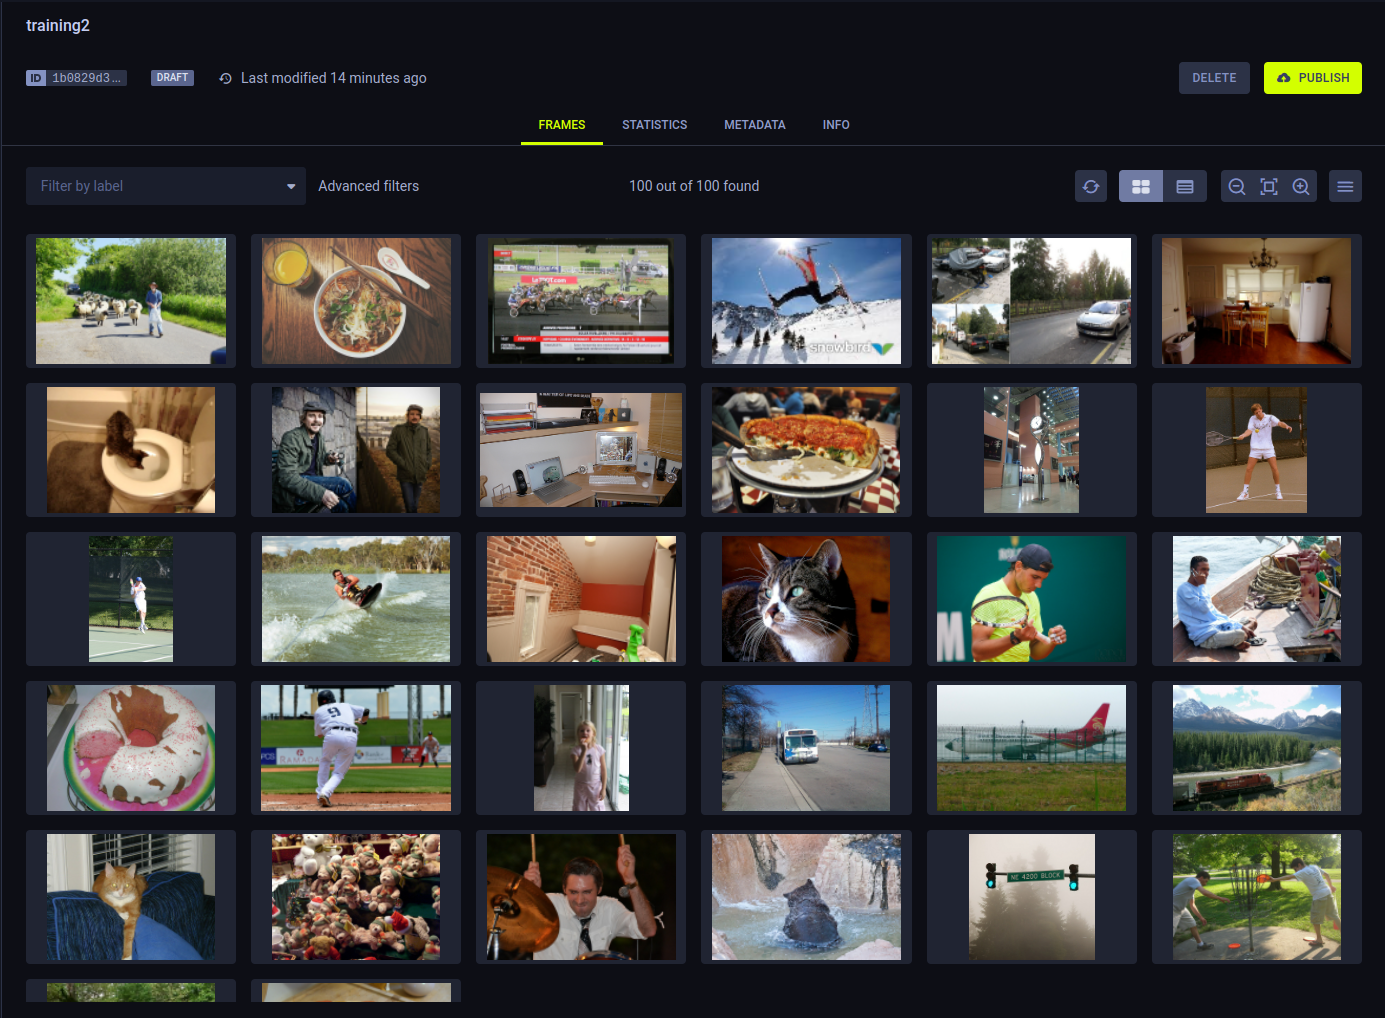
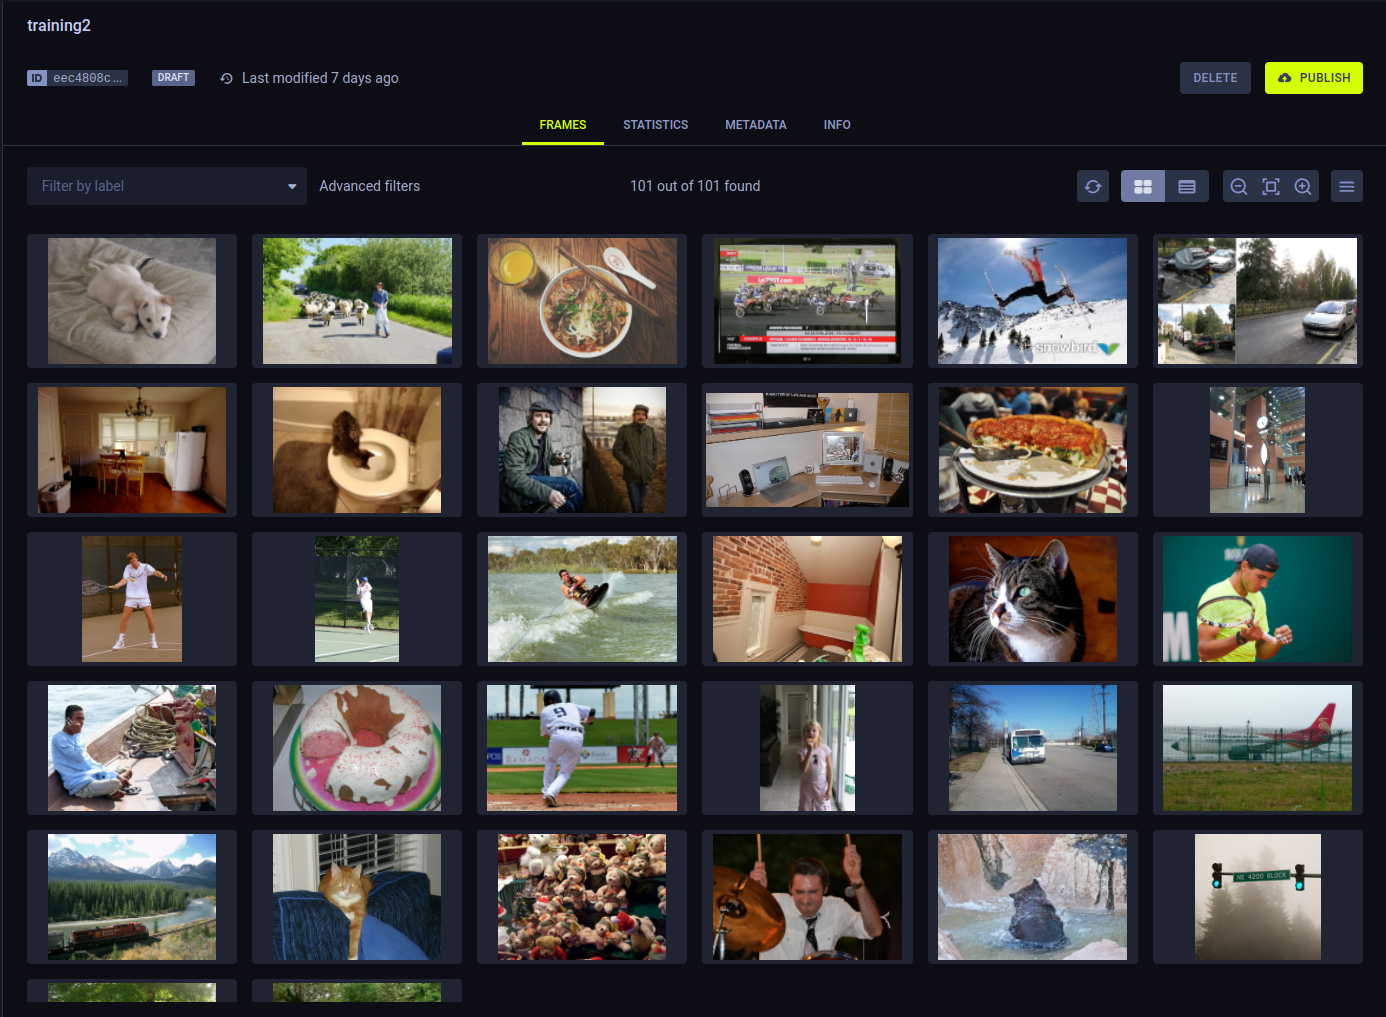
The Frames tab displays the contents of the selected dataset version.
View the version's frames as thumbnail previews or in a table. Use the view toggle to switch between thumbnail
view ![]() and
table view
and
table view ![]() .
.
Use the thumbnail view for a visual preview of the version's frames. You can increase ![]() and decrease
and decrease ![]() the size of
the previews.
the size of
the previews.
Use the table view to list the version's frames in a customizable table. Click ![]() for column customization options.
for column customization options.
The dataset version's frames can be filtered by multiple criteria. The resulting frames can be exported as a JSON file.
To view the details of a specific frame, click on its preview, which will open the Frame Viewer.
Simple Frame Filtering
Simple frame filtering returns frames containing at least one annotation with a specified label.
To apply a simple frame filter, select a label from the LABEL FILTER list.
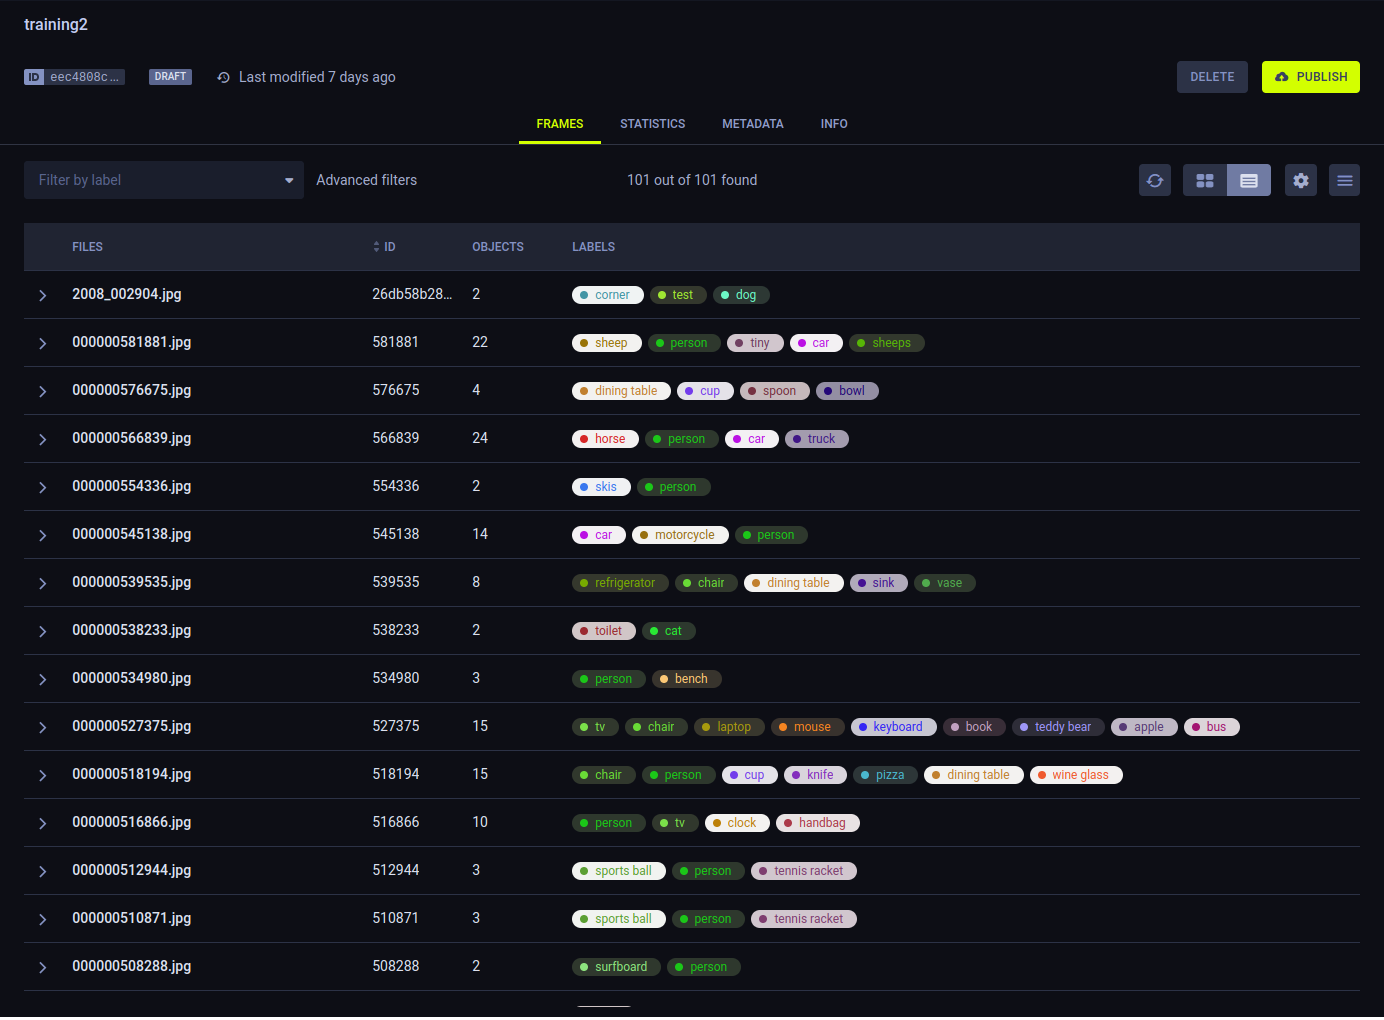
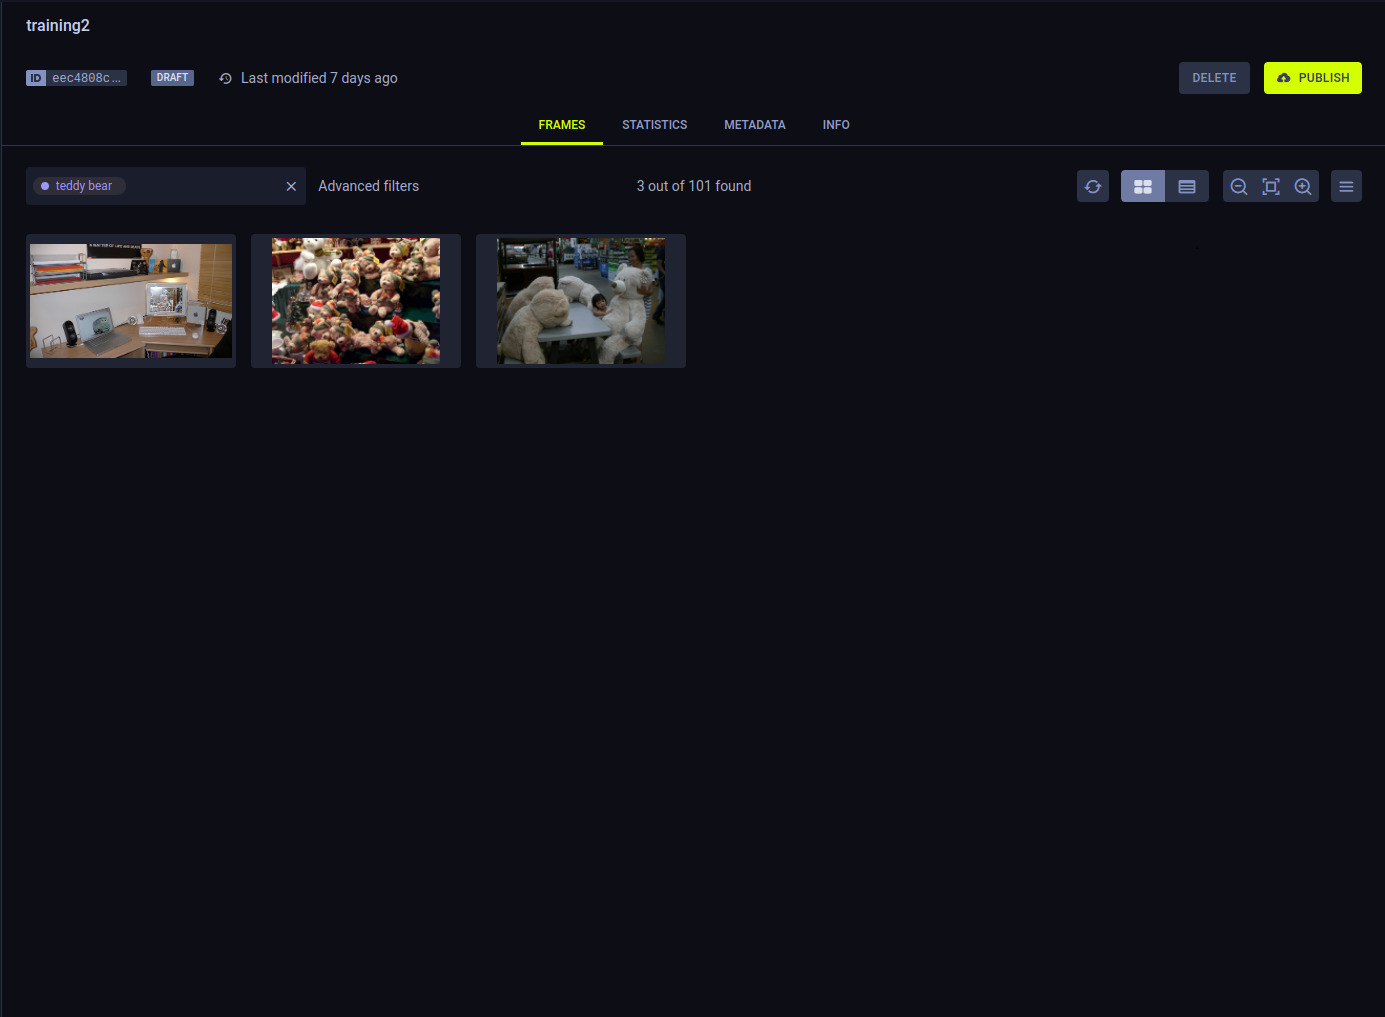
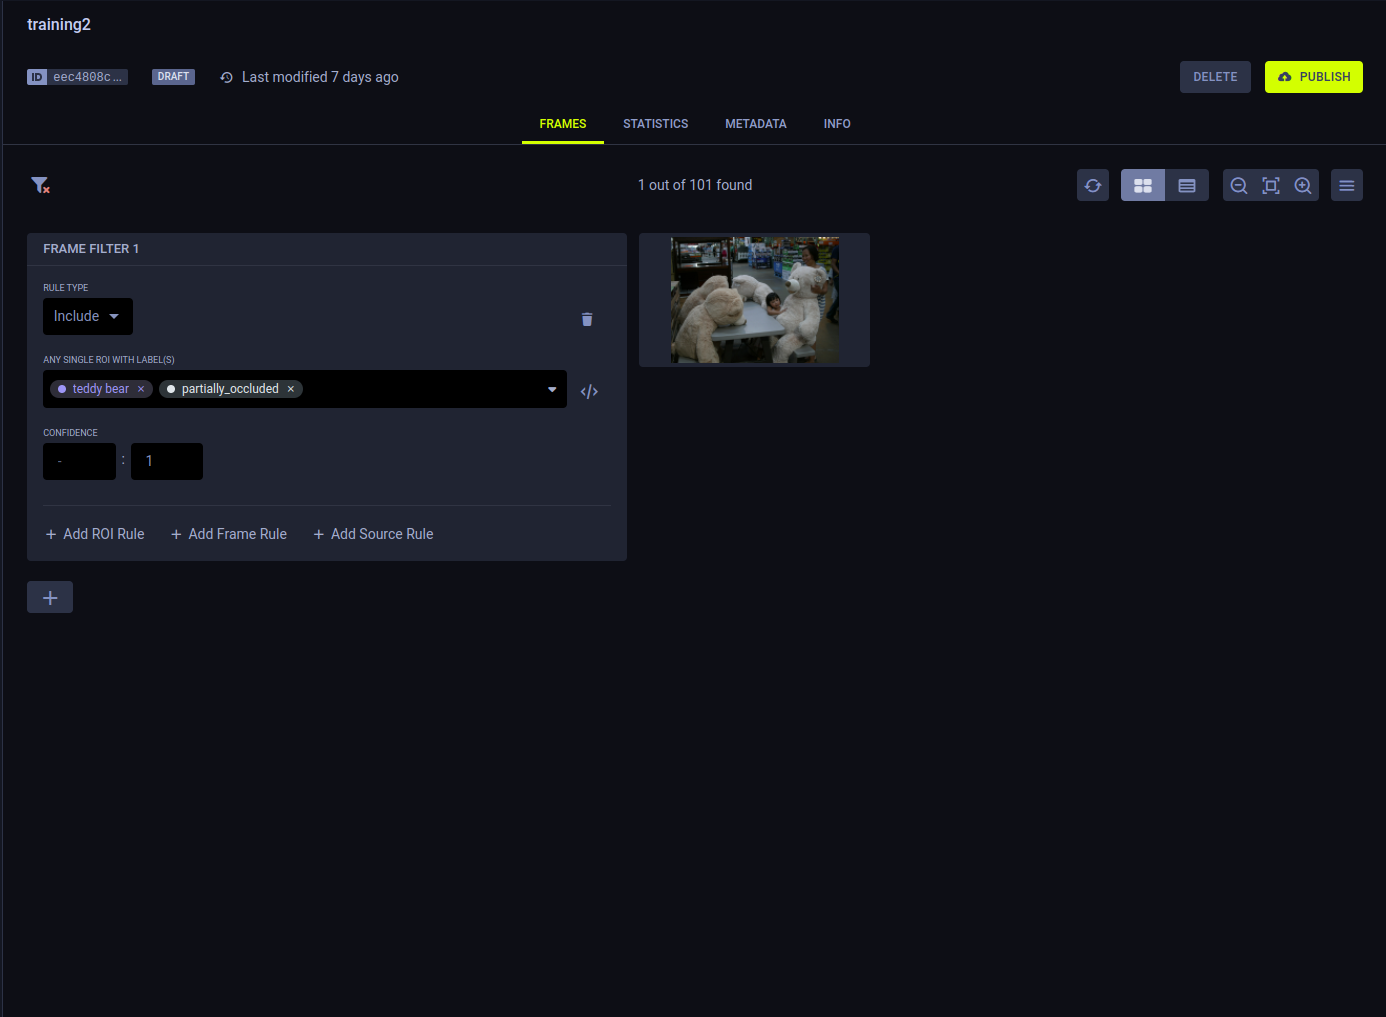
- The FRAMES tab in the image below contains 101 frames.
- A simple label filter for
teddy bearshows three frames, each containing at least one ROI labeledteddy bear.
Advanced Frame Filtering
Alternatively, a combination of ROI, frame, and source rules can be specified to apply more elaborate and specific filters.
To apply advanced filters:
- In the FRAMES tab, click Advanced filters.
- In a FRAME FILTER, create one of the following rules:
- ROI rule - Use "Include" and "Exclude" conditions to match frames by ROI label; frames match the rule when
containing at least one annotation object (ROI) with all labels in the rule. Click
 to explicitly specify your rule with Lucene
 - Frame rule - Query frame metadata. Enter a Lucene query of frame metadata fields in the format
meta.<key>:<value>(can use AND, OR, and NOT operators). - Source rule - Query frame source information. Enter a Lucene query of frame metadata fields in the format
sources.<key>:<value>(can use AND, OR, and NOT operators).
- ROI rule - Use "Include" and "Exclude" conditions to match frames by ROI label; frames match the rule when
containing at least one annotation object (ROI) with all labels in the rule. Click
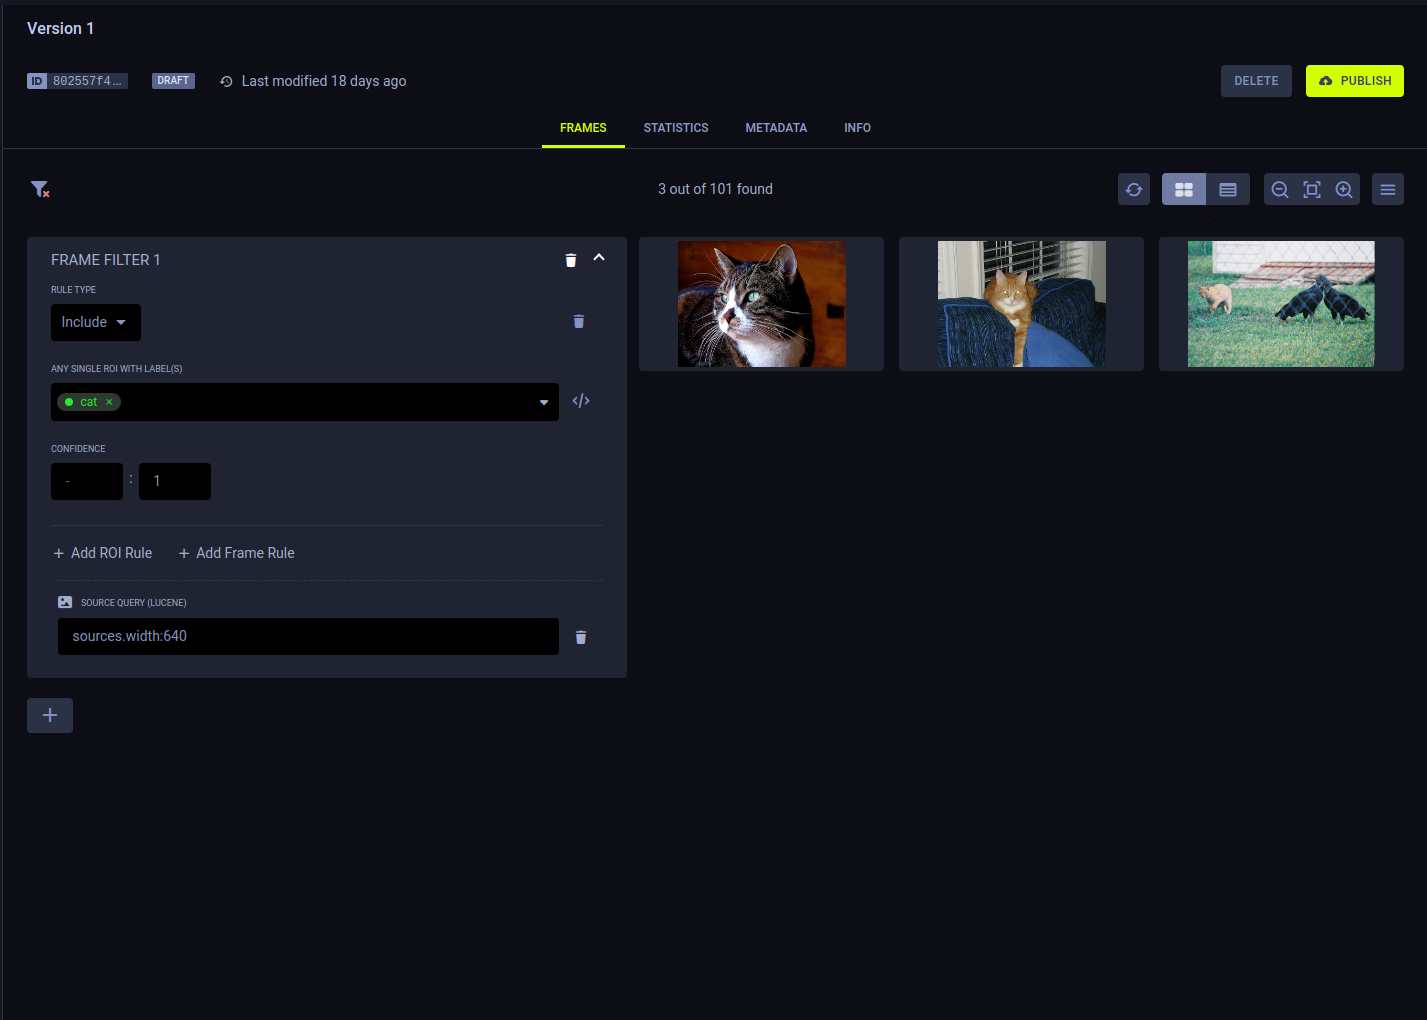
A frame filter can contain a number of rules. For each frame filter, the rules are applied with a logical AND operator. For example, the dataset version in the image below has one filter. “Frame Filter 1” has two rules:
- ROI rule - the frame must include an ROI with the
catlabel - Source rule - the frames must be 640 pixels wide.
The returned frames are those that match the first rule AND the second rule within the frame filter.
Create additional frame filters by clicking ![]() .
Multiple frame filters are applied with a logical OR operator.
.
Multiple frame filters are applied with a logical OR operator.
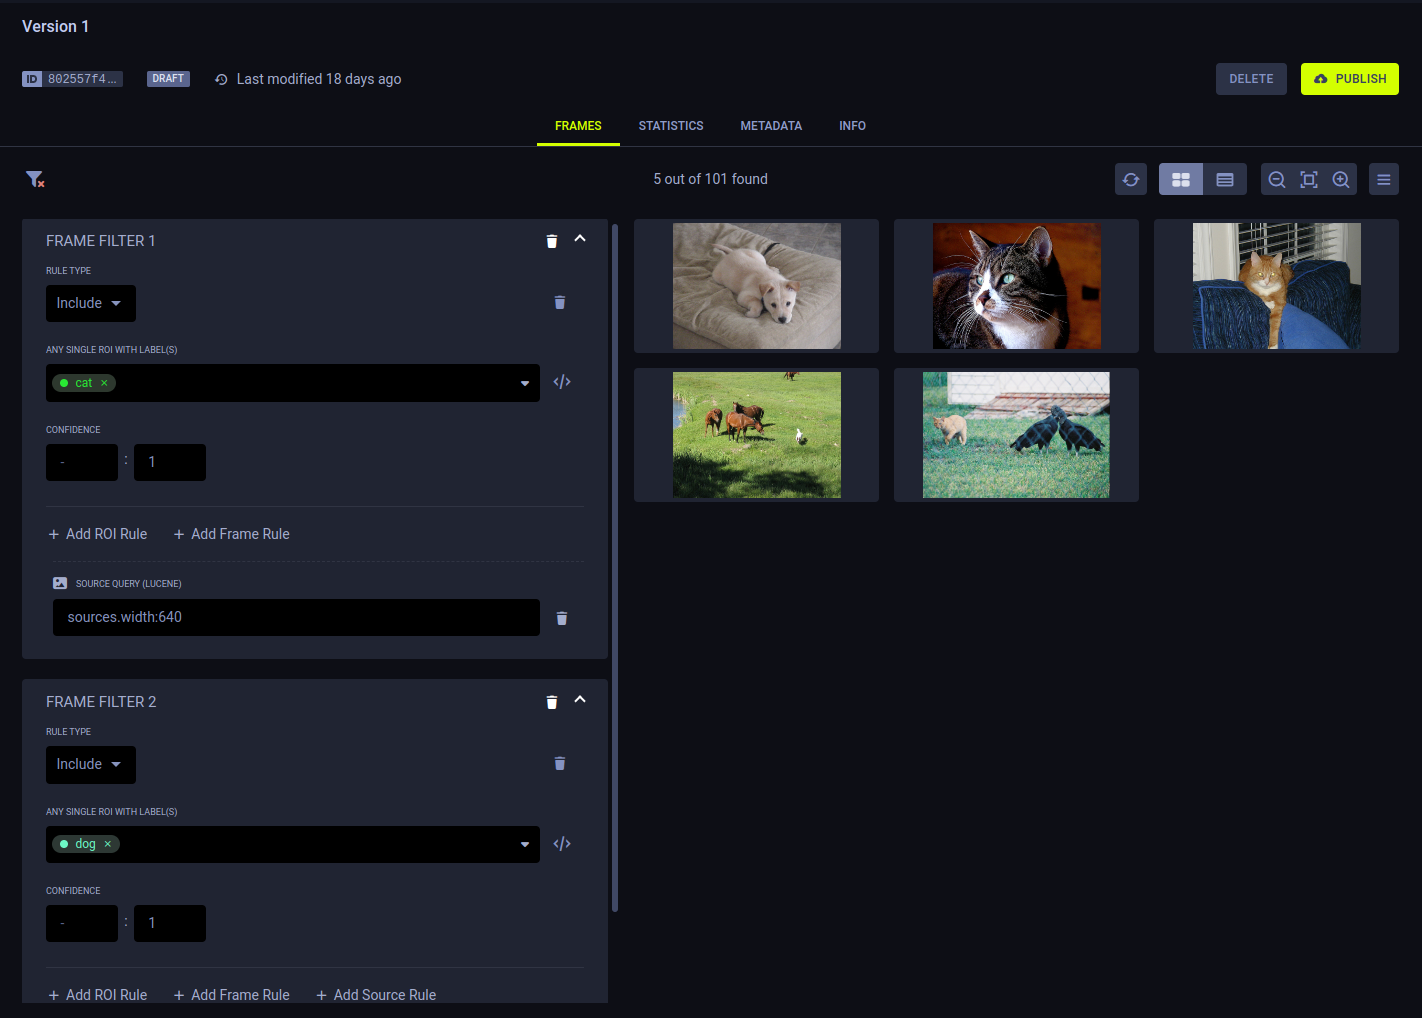
For example, the dataset version in the image below has two frame filters. "Frame Filter 1" has the same two rules
described in the example above. "Frame Filter 2" specifies an ROI rule for the frame to contain an ROI with the label
dog. So the frames returned are those that match ALL of Frame Filter 1's rules OR ALL of Frame Filter 2's rules.
To clear all filters click ![]() .
.
Filtering Examples
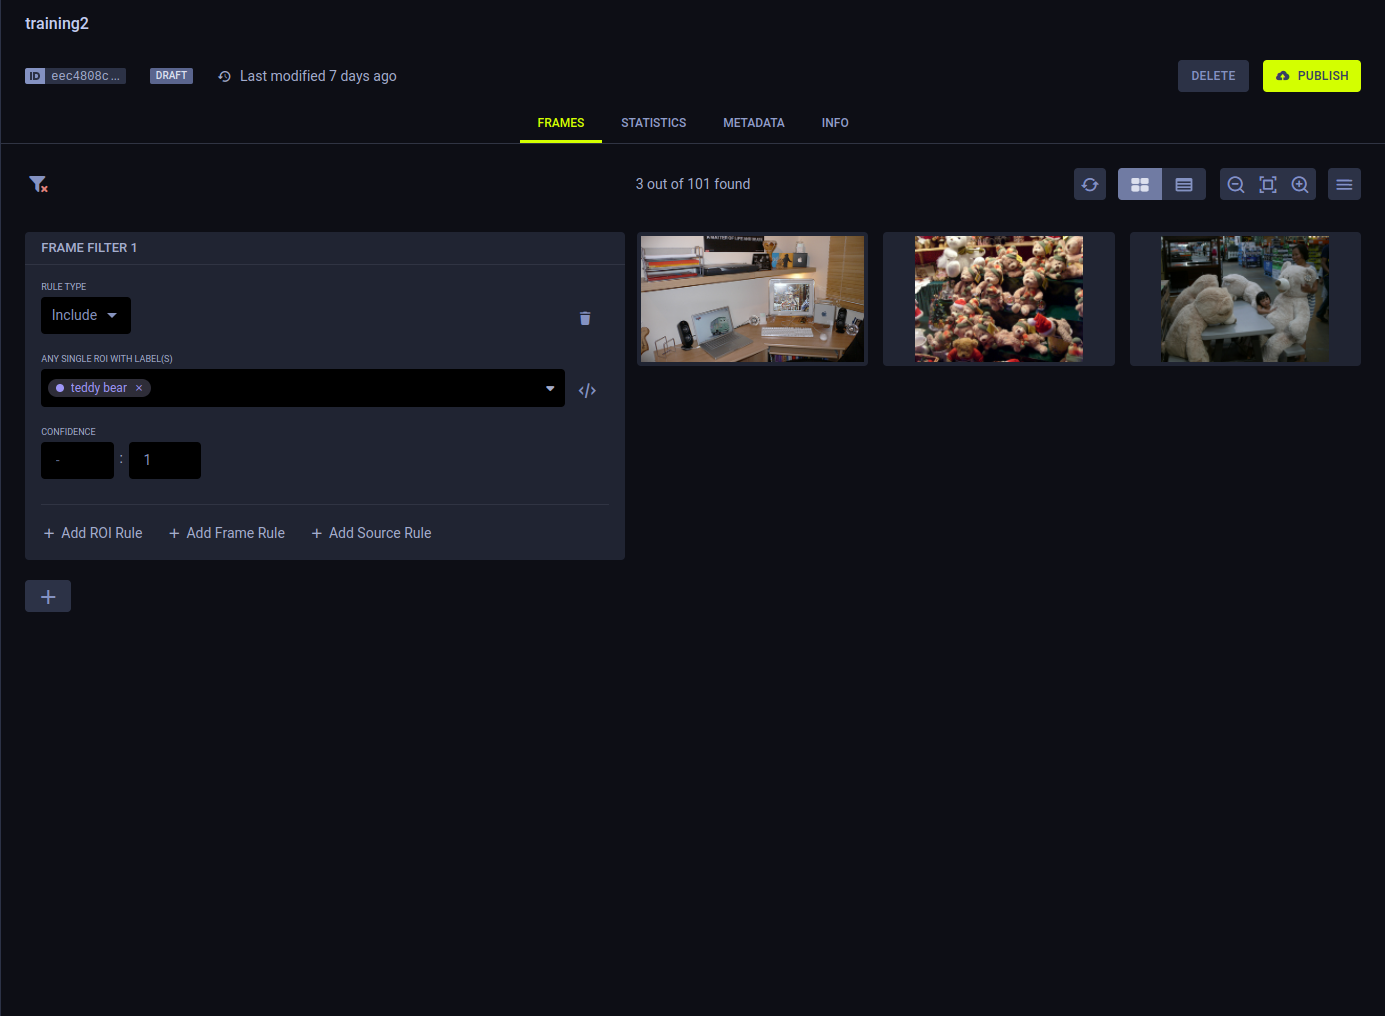
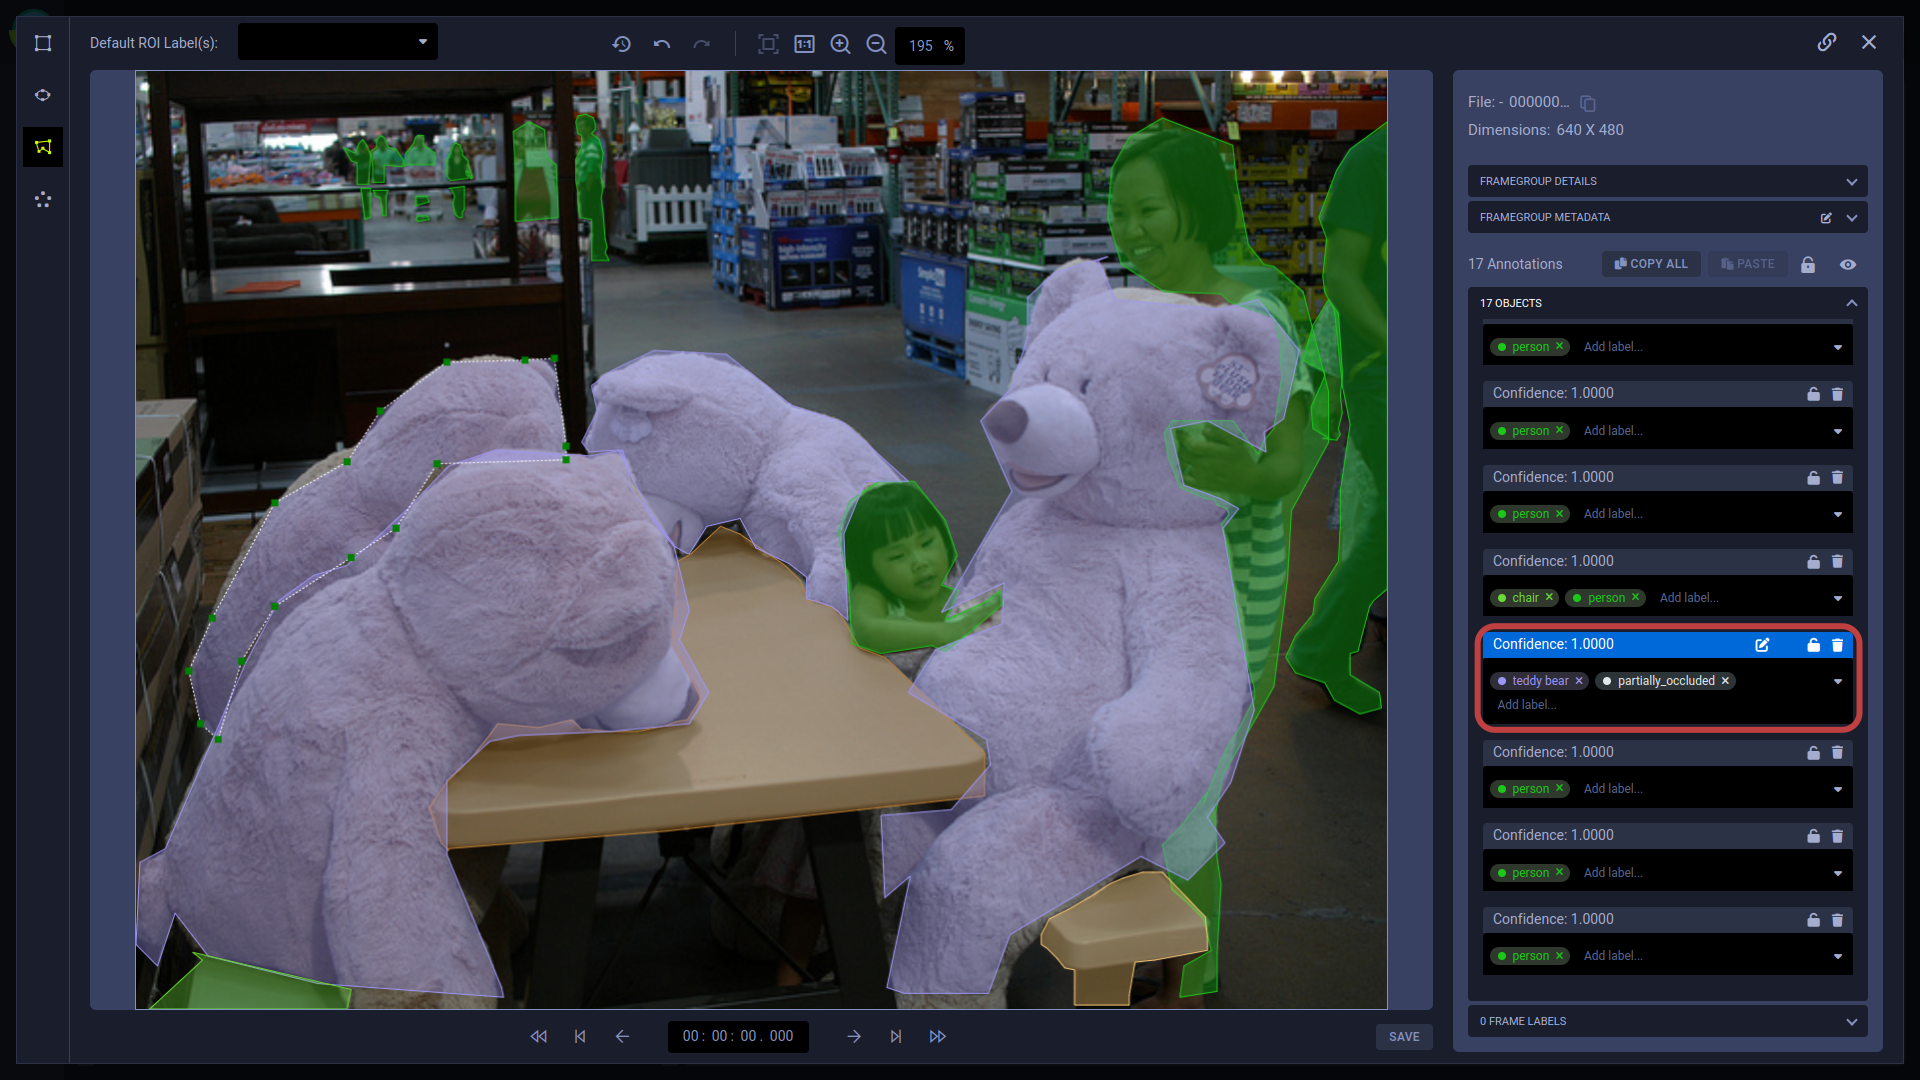
- Create one ROI rule for the
teddy bearlabel, which shows the same three frames as the simple frame filter (above).
- In the ROI rule, add a second label. Add
partially_occluded. Only frames containing at least one ROI labeled as bothteddy bearandpartially_occludedmatch the filter.
- By opening a frame in the frame viewer, you can see an ROI labeled with both.
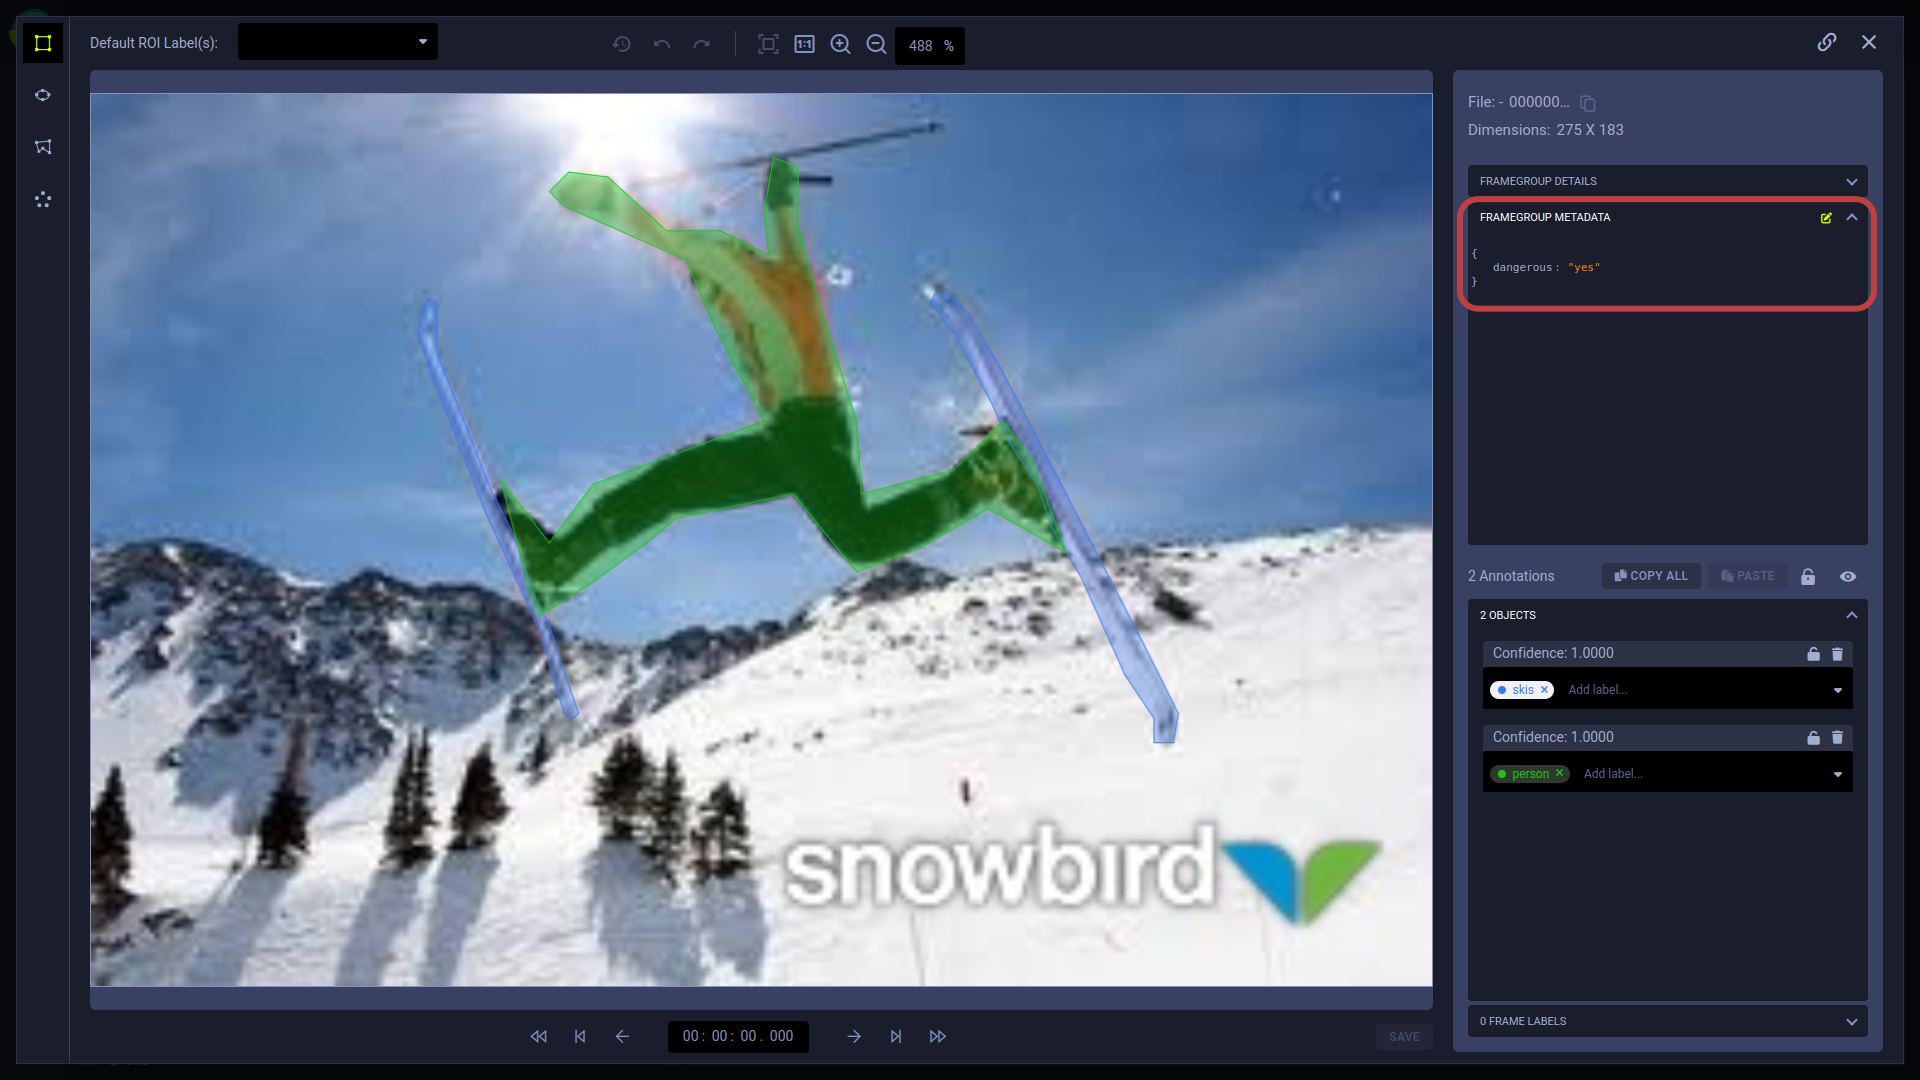
Filter by metadata using Lucene queries.
- Add a frame rule to filter by the metadata key
dangerousfor the value ofyes.

- Open a frame in the frame viewer to see its metadata.
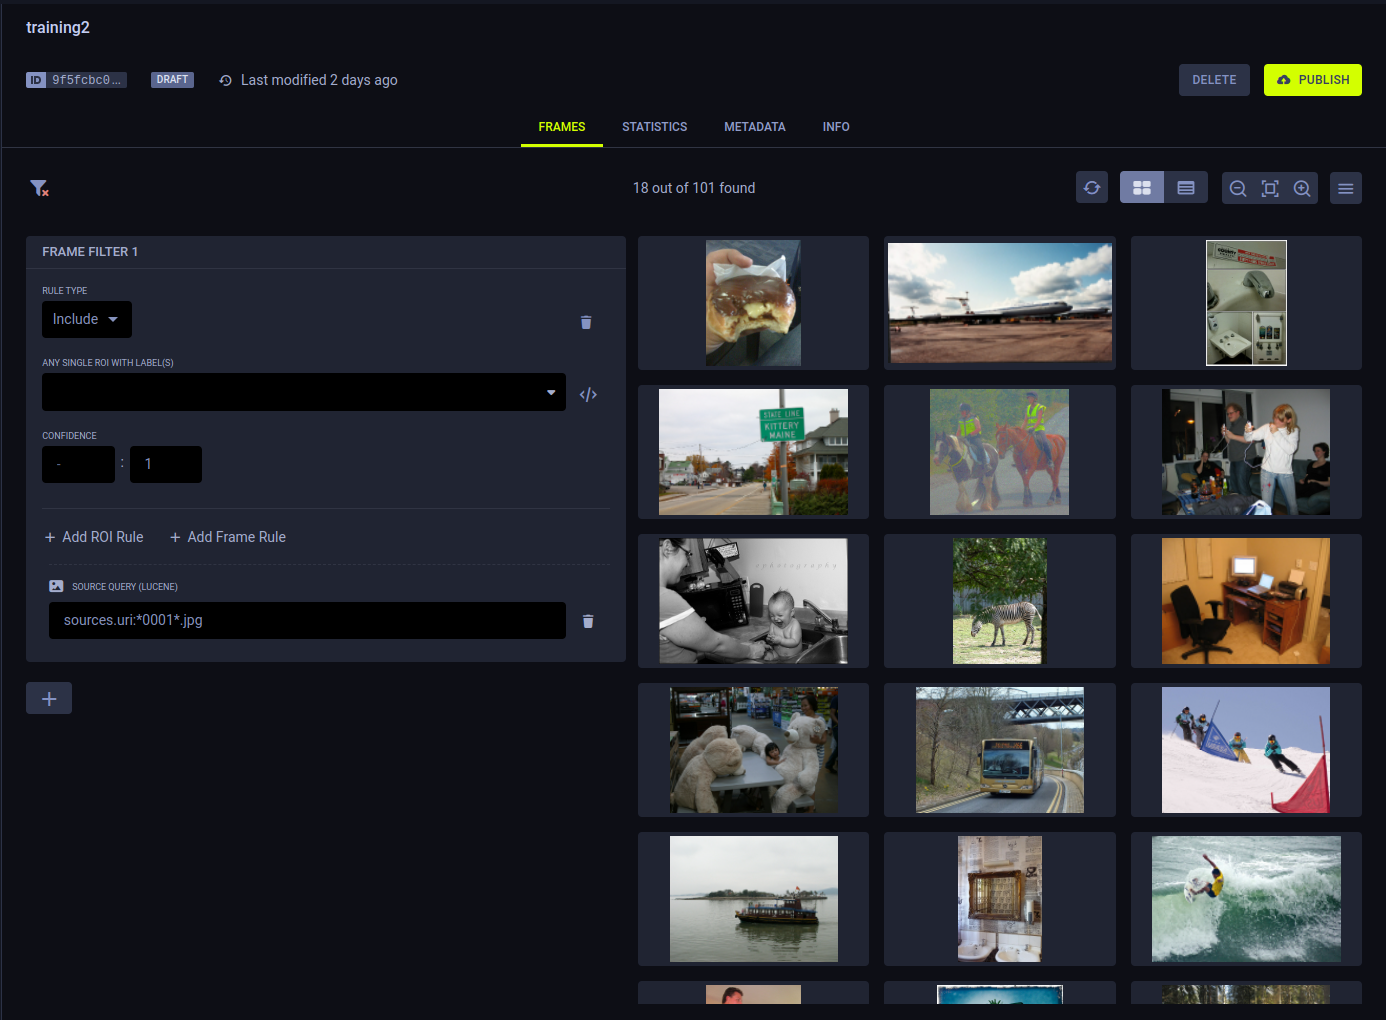
Filter by sources using Lucene queries.
- Add a source rule to filter for sources URIs with wildcards.
Lucene queries can also be used in ROI label filters and frame rules.
Exporting Frames
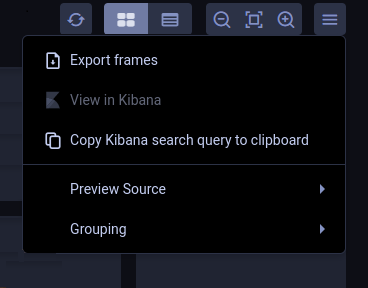
To export (download) the filtered frames as a JSON file, click ![]() > EXPORT FRAMES.
> EXPORT FRAMES.
Frame Browser Configuration
Click ![]() to open the
frame browser configuration settings.
to open the
frame browser configuration settings.
Grouping Previews
FrameGroups or SingleFrames can share the same context_id (URL). For example, users can set the same context_id
to multiple FrameGroups that represent frames in a single video.
Use the Grouping menu to select one of the following options:
- Split Preview - Show separate previews for each individual FrameGroup, regardless of shared context.
- Group by URL - Show a single preview for all FrameGroups with the same context
Preview Source
When using multi-source FrameGroups, users can choose which of the FrameGroups' sources will be displayed as the preview.
Select a source from the PREVIEW SOURCE menu.
Choose the Default preview source option to present the first available source.
If a FrameGroup doesn't have the selected preview source, the preview displays the "Source not available" message.
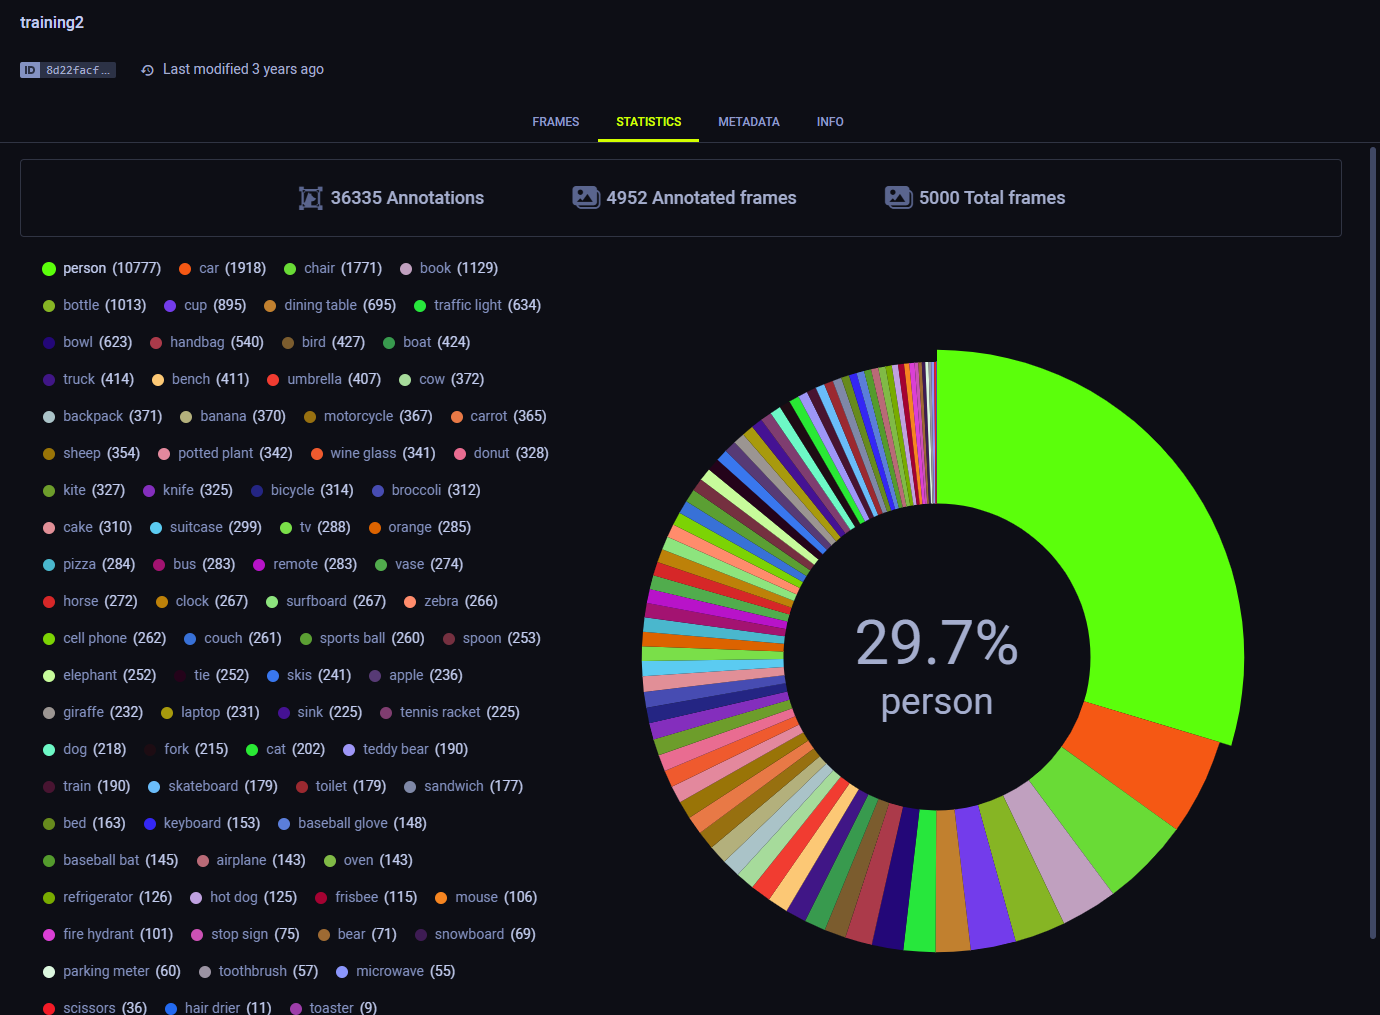
Statistics
The Statistics tab displays a dataset version's label usage stats.
- Dataset total count - number of annotations, annotated frames, and total frames
- Each label is listed along with the number of times it was used in the version
- The pie chart visualizes these stats. Hover over a chart slice and its associated label and usage percentage will appear at the center of the chart.
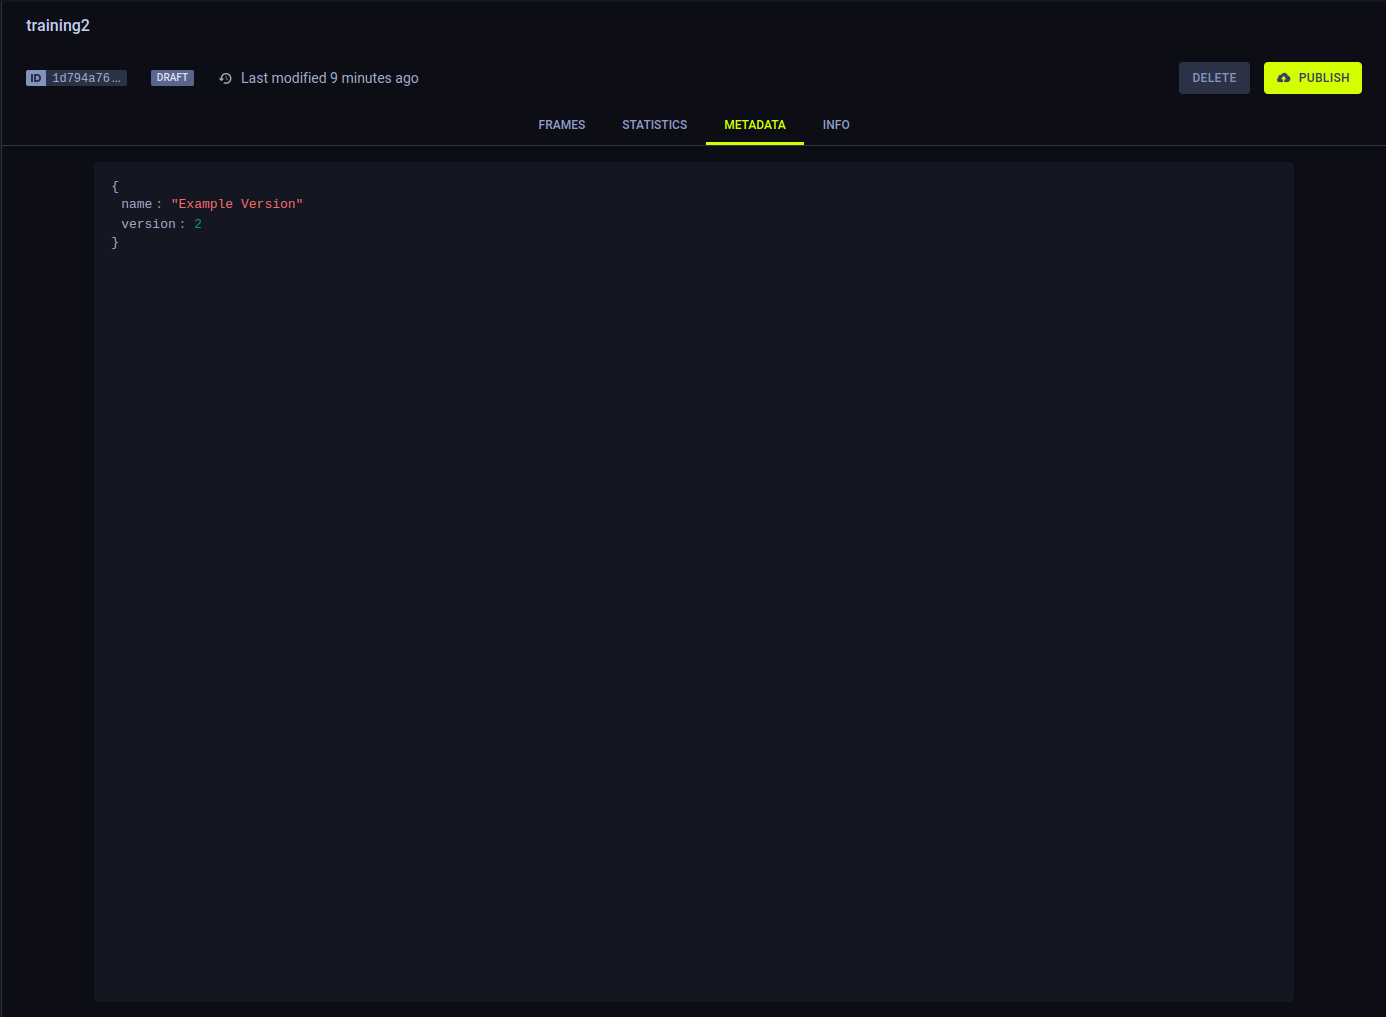
Metadata
The Metadata tab presents any additional metadata that has been attached to the dataset version.
To edit a version's metadata,
- Hover over the metadata box and click on the EDIT button
- Edit the section contents (JSON format)
- Click OK
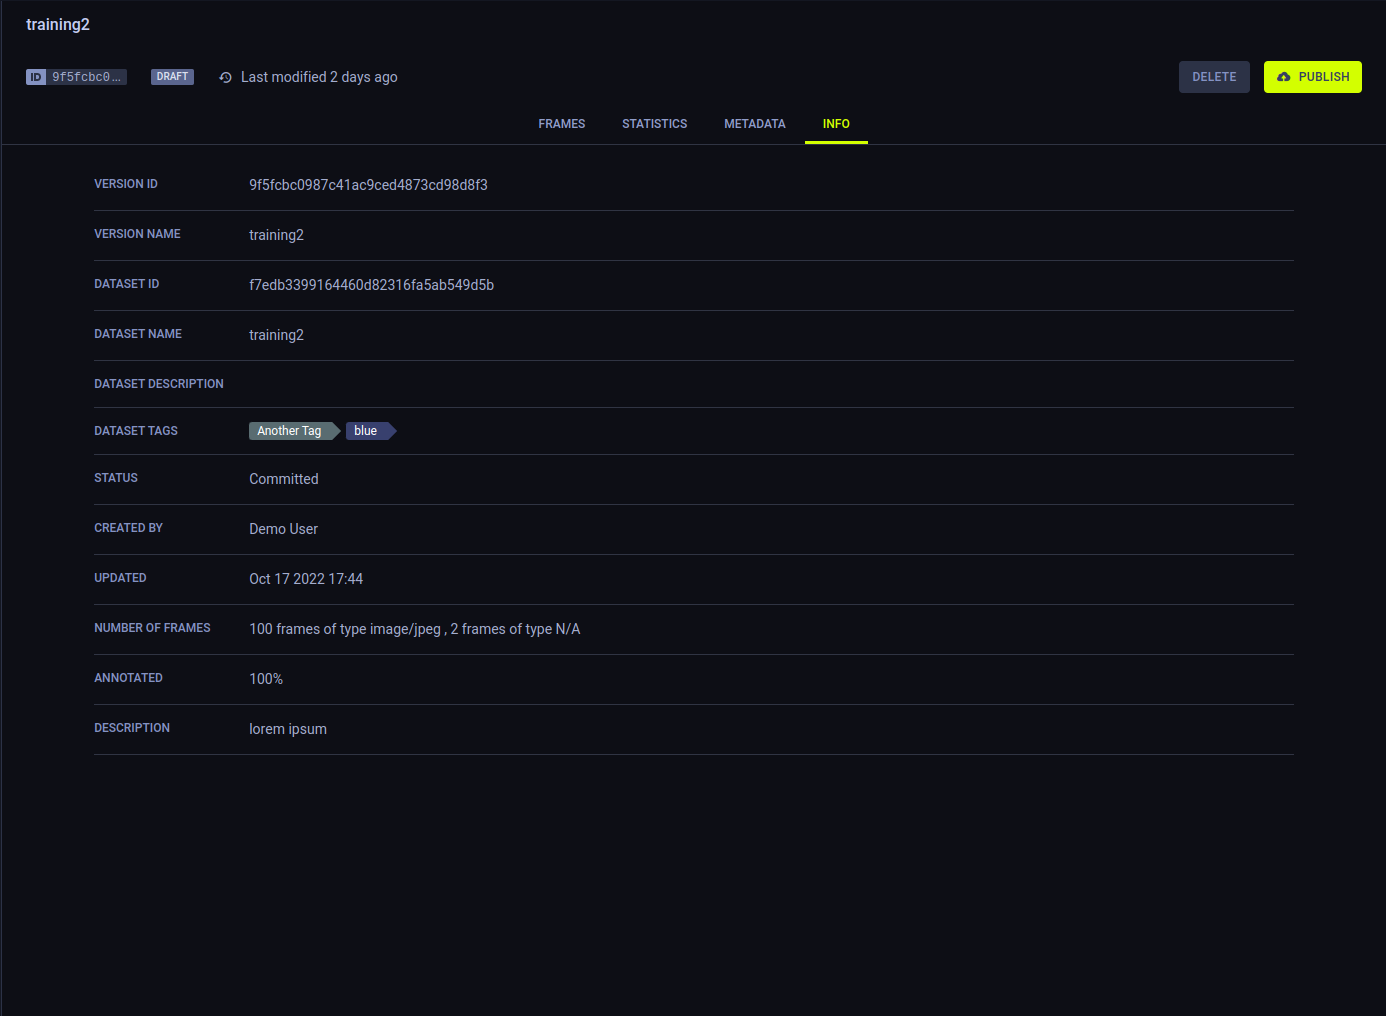
Info
The Info tab presents a version's general information:
- Version ID
- Version name
- Dataset ID
- Dataset name
- Dataset description
- Dataset tags
- Status (Draft or Published)
- Creating user
- Version update time
- Number of frames
- Percentage of annotated frames
- Version description (editable, hover over element and click
 )
)