FAQ
General Information
Models
- How can I sort models by a certain metric?
- Can I store more information on the models?
- Can I store the model configuration file as well?
- I am training multiple models at the same time, but I only see one of them. What happened?
- Can I log input and output models manually?
- Models are not accessible from the UI after I migrated ClearML Server to a new address. How do I fix this?
- Models are not accessible from the UI after I moved them (different bucket / server). How do I fix this?
Experiments
- I noticed I keep getting the message "warning: uncommitted code". What does it mean?
- I do not use argparse for hyperparameters. Do you have a solution?
- I noticed that all of my experiments appear as "Training". Are there other options?
- Sometimes I see experiments as running when in fact they are not. What's going on?
- My code throws an exception, but my experiment status is not "Failed". What happened?
- CERTIFICATE_VERIFY_FAILED - When I run my experiment, I get an SSL Connection error. Do you have a solution?
- How do I modify experiment names once they have been created?
- Using Conda and the "typing" package, I get the error "AttributeError: type object 'Callable' has no attribute '_abc_registry'". How do I fix this?
- My ClearML Server disk space usage is too high. What can I do about this?
- Can I change the random seed my experiment uses?
- In the Web UI, I can't access files that my experiment stored. Why not?
- I get the message "ClearML Monitor: Could not detect iteration reporting, falling back to iterations as seconds-from-start". What does it mean?
- Can I control what ClearML automatically logs?
- Can I run a ClearML Task while working offline?
Graphs and Logs
- The first log lines are missing from the experiment console tab. Where did they go?
- How do I create a graph comparing hyperparameters vs model accuracy?
- I want to add more graphs, not just with TensorBoard. Is this supported?
- How can I report more than one scatter 2D series on the same plot?
GIT and Storage
- Is there something ClearML can do about uncommitted code running?
- I read there is a feature for centralized model storage. How do I use it?
- When using PyCharm to remotely debug a machine, the Git repo is not detected. Do you have a solution?
- Debug images and/or artifacts are not loading in the UI after I migrated ClearML Server to a new address. How do I fix this?
Remote Debugging (ClearML PyCharm Plugin)
Jupyter
scikit-learn
ClearML Configuration
- How do I explicitly specify the ClearML configuration file to be used?
- How can I override ClearML credentials from the OS environment?
- How can I track OS environment variables with experiments?
ClearML Hosted Service
ClearML Server Deployment
- How do I deploy ClearML Server on:
- How do I restart ClearML Server?
- Can I create a Helm Chart for ClearML Server Kubernetes deployment?
- My Docker cannot load a local host directory on SELinux?
ClearML Server Configuration
- How do I configure ClearML Server for subdomains and load balancers?
- Can I add web login authentication to ClearML Server?
- Can I modify non-responsive task settings?
ClearML Server Troubleshooting
- I did a reinstall. Why can't I create credentials in the WebApp (UI)?
- How do I fix Docker upgrade errors?
- Why is web login authentication not working?
- How do I bypass a proxy configuration to access my local ClearML Server?
- Trains is failing to update ClearML Server. I get an error 500 (or 400). How do I fix this?
- Why is my Trains WebApp (UI) not showing any data?
- Why can't I access my ClearML Server when I run my code in a virtual machine?
ClearML Agent
ClearML API
General Information
How do I know a new version came out?
Starting with ClearML v0.9.3, ClearML issues a new version release notification, which appears in the log and is output to the console, when a Python experiment script is run.
For example, when a new ClearML Python Package version is available, the notification is:
CLEARML new package available: UPGRADE to vX.Y.Z is recommended!
When a new ClearML Server version is available, the notification is:
CLEARML-SERVER new version available: upgrade to vX.Y is recommended!
How do I find out ClearML version information?
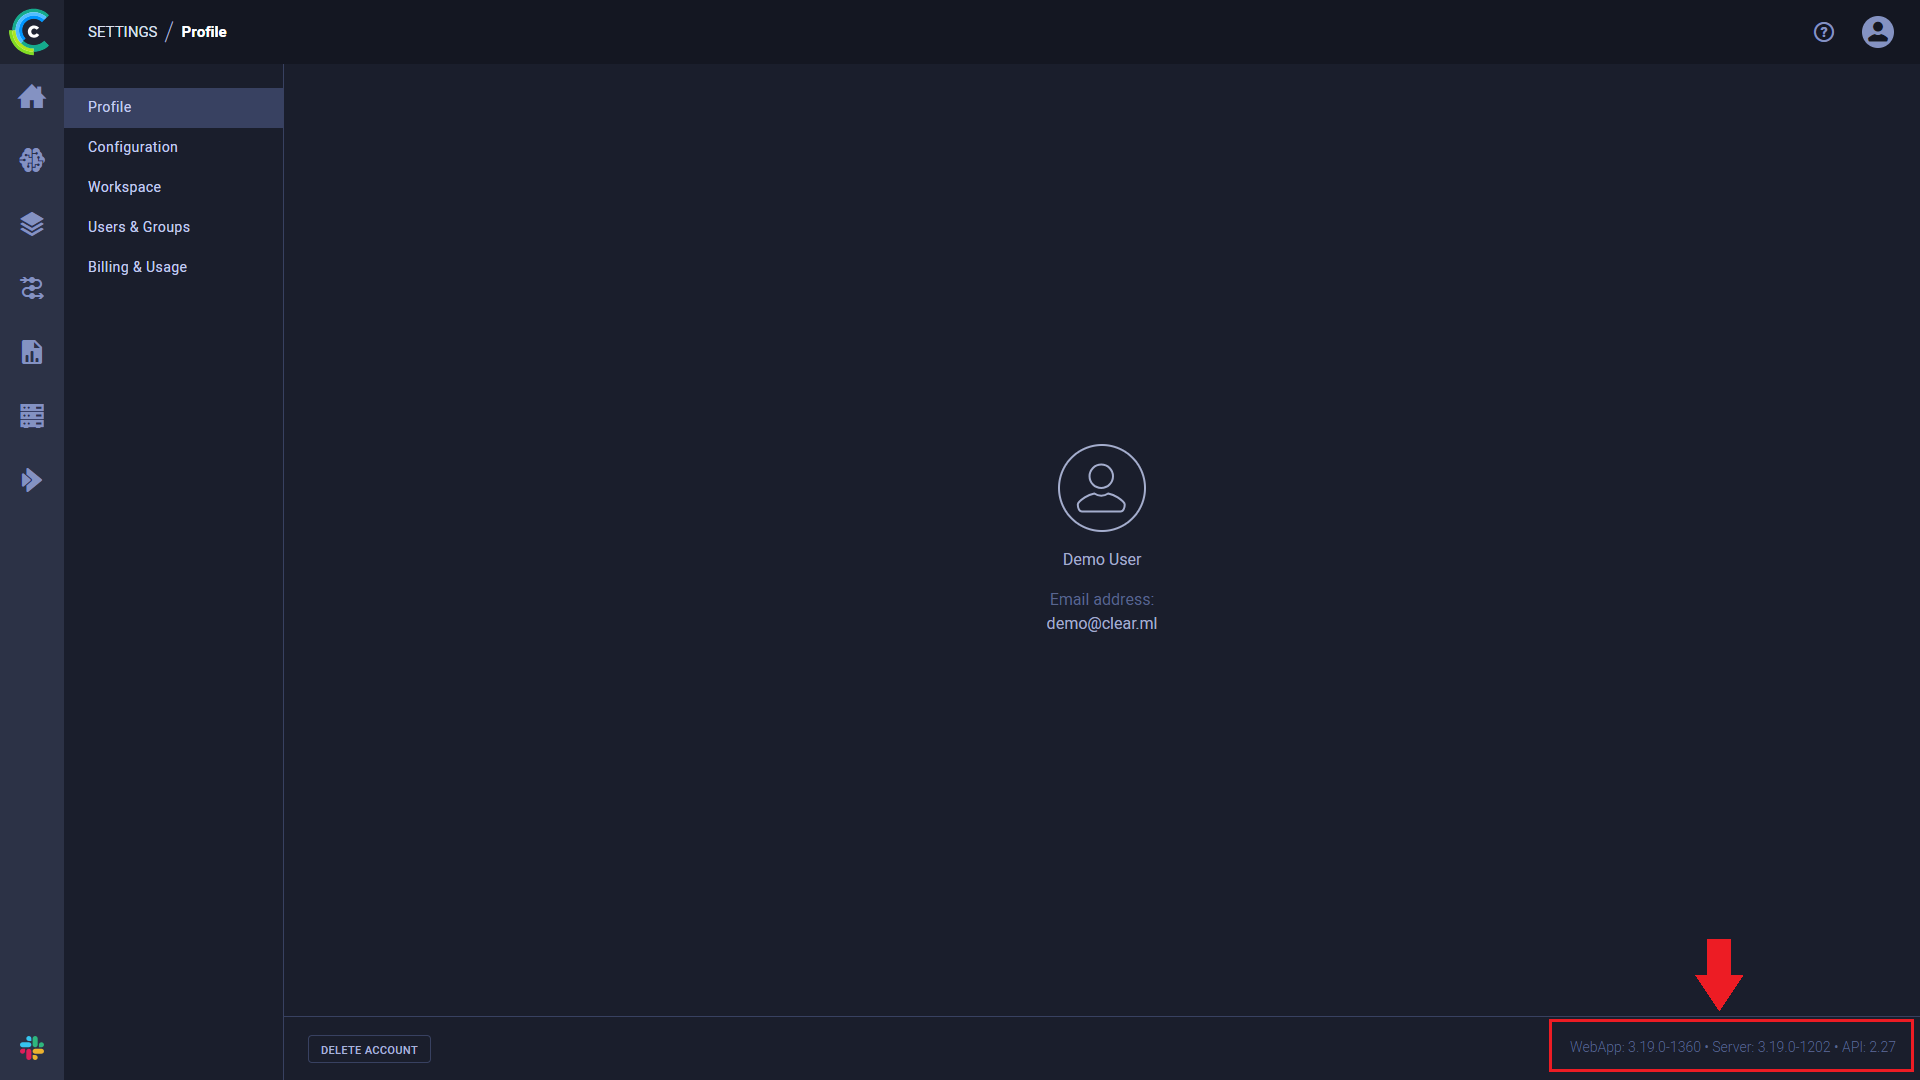
ClearML server version information is available in the ClearML WebApp Settings page. On the bottom right of the page, the following numbers are displayed:
- Web application version
- API server version
- API version
ClearML python package information can be obtained by using pip freeze.
For example:
pip freeze|grep clearml
should return something like this:
clearml==1.0.3rc1
clearml-agent==1.0.0
clearml-session==0.3.2
Models
How can I sort models by a certain metric?
To sort models by a metric, in the ClearML Web UI, add a custom column in the models table and sort by that metric column. Available custom column options depend upon the models in the table and the metrics that have been attached to them (see Logging Metrics and Plots).
ClearML associates models with the experiments that created them, so you can also add a custom column in an experiments table and sort by that metric column.
Can I store more information on the models?
Yes! For example, you can use Task.set_model_label_enumeration()
to store label enumeration:
Task.current_task().set_model_label_enumeration( {"label": int(0), } )
For more information about Task class methods, see the Task Class reference page.
Can I store the model configuration file as well?
Yes! Use Task.connect_configuration()
method:
Task.current_task().connect_configuration("a very long text with the configuration file's content")
I am training multiple models at the same time, but I only see one of them. What happened?
This issue was resolved in ClearML Server v1.0.0.
See server upgrade instructions for any of the available formats:
Can I log input and output models manually?
Yes! Use InputModel.import_model()
and Task.connect() to connect an input model. Use
OutputModel.update_weights()
to connect a model weights file.
input_model = InputModel.import_model(link_to_initial_model_file)
Task.current_task().connect(input_model)

OutputModel(Task.current_task()).update_weights(link_to_new_model_file_here)
For more information about models, see InputModel and OutputModel classes.
Models are not accessible from the UI after I migrated ClearML Server to a new address. How do I fix this?
This can happen if your models were uploaded to the ClearML files server, since the value registered was their full URL
at the time of registration (e.g. https://files.<OLD_ADDRESS>/path/to/model).
To fix this, the registered URL of each model needs to be replaced with its current URL.
To replace the URL of each model, execute the following commands:
Open bash in the mongo DB docker container:
sudo docker exec -it clearml-mongo /bin/bashCreate the following script inside the Docker shell (as well as the URL protocol if you aren't using
s3):cat <<EOT >> script.js
db.model.find({uri:{$regex:/^s3/}}).forEach(function(e,i) {
e.uri = e.uri.replace("s3://<old-bucket-name>/","s3://<new-bucket-name>/");
db.model.save(e);});
EOTMake sure to replace
<old-bucket-name>and<new-bucket-name>.Run the script against the backend DB:
mongo backend script.js
Models are not accessible from the UI after I moved them (different bucket / server). How do I fix this?
This can happen if your models were uploaded to the ClearML files server, since the value registered was their full URL
at the time of registration (e.g. https://files.<OLD_ADDRESS>/path/to/model).
To fix this, the registered URL of each model needs to be replaced with its current URL:
Open bash in the mongo DB Docker container:
sudo docker exec -it clearml-mongo /bin/bashCreate the following script inside the Docker shell:
cat <<EOT >> script.js
db.model.find({uri:{$regex:/^s3/}}).forEach(function(e,i) {
e.uri = e.uri.replace("s3://<old-bucket-name>/","s3://<new-bucket-name>/");
db.model.save(e);});
EOT
Make sure to replace
<old-bucket-name>and<new-bucket-name>, as well as the URL protocol prefixes if you aren't using S3.Run the script against the backend DB:
mongo backend script.js
Experiments
I noticed I keep getting the message "warning: uncommitted code". What does it mean?
This message is only a warning. ClearML not only detects your current repository and git commit, but also warns you if you are using uncommitted code. ClearML does this because uncommitted code means this experiment will be difficult to reproduce. You can see uncommitted changes in the ClearML Web UI, in the EXECUTION tab of the experiment info panel.
I do not use argparse for hyperparameters. Do you have a solution?
Yes! ClearML provides multiple ways to configure your task and track your parameters!
In addition to argparse, ClearML also automatically captures and tracks command line parameters created using:
ClearML also supports tracking code-level configuration dictionaries using Task.connect().
For example, the code below connects hyperparameters (learning_rate, batch_size, display_step,
model_path, n_hidden_1, and n_hidden_2) to a task:
# Create a dictionary of parameters
parameters_dict = { 'learning_rate': 0.001, 'batch_size': 100, 'display_step': 1,
                    'model_path': "/tmp/model.ckpt", 'n_hidden_1': 256, 'n_hidden_2': 256 }

# Connect the dictionary to your CLEARML Task
parameters_dict = Task.current_task().connect(parameters_dict)
For more task configuration options, see Hyperparameters.
I noticed that all of my experiments appear as "Training". Are there other options?
Yes! When creating experiments and calling Task.init(),
you can provide an experiment type. ClearML supports multiple experiment types. For example:
task = Task.init(project_name, task_name, Task.TaskTypes.testing)
Sometimes I see experiments as running when in fact they are not. What's going on?
ClearML monitors your Python process. When the process exits properly, ClearML closes the experiment. When the process crashes and terminates abnormally, it sometimes misses the stop signal. In this case, you can safely right-click the experiment in the WebApp and abort it.
My code throws an exception, but my experiment status is not "Failed". What happened?
This issue was resolved in Trains v0.9.2. Upgrade to ClearML by executing the following command:
pip install -U clearml
When I run my experiment, I get an SSL Connection error CERTIFICATE_VERIFY_FAILED. Do you have a solution?
Your firewall may be preventing the connection. Try one of the following solutions:
Direct python "requests" to use the enterprise certificate file by setting the OS environment variables CURL_CA_BUNDLE or REQUESTS_CA_BUNDLE. For a detailed discussion of this topic, see https://stackoverflow.com/questions/48391750/disable-python-requests-ssl-validation-for-an-imported-module.
Disable certificate verification
cautionFor security reasons, it is not recommended to disable certificate verification
Upgrade ClearML to the current version:
pip install -U clearmlCreate a new
clearml.confconfiguration file (see a sample configuration file), containing:api { verify_certificate = False }Copy the new
clearml.conffile to:- Linux -
~/clearml.conf - Mac -
$HOME/clearml.conf - Windows -
\User\<username>\clearml.conf``~/clearml.conf
- Linux -
How do I modify experiment names once they have been created?
An experiment's name is a user-controlled property, which can be accessed via the Task.name property. This lets you use meaningful naming schemes to easily filter and compare experiments.
For example, to distinguish between different experiments, you can append the task ID to the task name:
task = Task.init(project_name='examples', task_name='train')
task.name += ' {}'.format(task.id)
Or, append the Task ID post-execution:
tasks = Task.get_tasks(project_name='examples', task_name='train')
for t in tasks:
    t.name += ' {}'.format(task.id)
Another example is to append a specific hyperparameter and its value to each task's name:
tasks = Task.get_tasks(project_name='examples', task_name='my_automl_experiment')
for t in tasks:
    params = t.get_parameters()
    if 'my_secret_parameter' in params:
        t.name += ' my_secret_parameter={}'.format(params['my_secret_parameter'])
Use this experiment naming when creating automation pipelines with a naming convention.
Using Conda and the "typing" package, I get the error "AttributeError: type object 'Callable' has no attribute '_abc_registry'". How do I fix this?
Conda and the typing package may have some compatibility issues.
However, since Python 3.5, the typing package is part of the standard library.
To resolve the error, uninstall typing and rerun your script. If this does not fix the issue, create a new ClearML issue, including the full error, and your environment details.
My ClearML Server disk space usage is too high. What can I do about this?
To clear up space, you can delete ClearML objects (e.g. experiments, models, datasets, etc.).
To delete an object via the UI:
- Go to the relevant object table (e.g. Experiments Table, Models Table, etc.)
- Archive the object - Right-click the object in the table > click Archive
- Click Open Archive on the top of the table
- In the archive table, right-click the object > click Delete.
To delete an object programmatically, use the relevant method:
- Tasks -
Task.delete() - Models
- Datasets -
Dataset.delete()
You cannot undo the deletion of a ClearML object.
Can I change the random seed my experiment uses?
Yes! By default, ClearML initializes Tasks with an initial seed of 1337 to ensure reproducibility. To set a different
value for your task, use the Task.set_random_seed class method and
provide the new seed value, before initializing the task.
You can disable the deterministic behavior entirely by passing Task.set_random_seed(None).
In the Web UI, I can't access files that my experiment stored. Why not?
ClearML stores file locations. The machine running your browser must have access to the location where the machine
that ran the Task stored the file. This applies to debug samples and artifacts. If, for example, the machine running the browser does not have access, you may see Unable to load image, instead of the image.
I get the message "CLEARML Monitor: Could not detect iteration reporting, falling back to iterations as seconds-from-start". What does it mean?
If metric reporting begins within the first three minutes, ClearML reports resource monitoring by iteration. Otherwise, it reports resource monitoring by seconds from start, and logs a message:
CLEARML Monitor: Could not detect iteration reporting, falling back to iterations as seconds-from-start.
However, if metric reporting begins after three minutes and anytime up to thirty minutes, resource monitoring reverts to by iteration, and ClearML logs a message
CLEARML Monitor: Reporting detected, reverting back to iteration based reporting.
After thirty minutes, it remains unchanged.
Can I control what ClearML automatically logs?
Yes! ClearML lets you control automatic logging for frameworks, argument parsers, stdout, and stderr when
initializing a Task by calling Task.init().
Frameworks
To control a Task's framework logging, use the auto_connect_frameworks parameter. Turn off all automatic logging by setting the
parameter to False. For finer grained control of logged frameworks, input a dictionary, with framework-boolean pairs.
For example:
auto_connect_frameworks={
    'matplotlib': True, 'tensorflow': False, 'tensorboard': False, 'pytorch': True,
    'xgboost': False, 'scikit': True, 'fastai': True, 'lightgbm': False,
    'hydra': True, 'detect_repository': True, 'tfdefines': True, 'joblib': True,
    'megengine': True, 'catboost': True
}
Argument Parsers
To control a task's logging of parameters from supported argument parsers, use the auto_connect_arg_parser parameter.
Completely disable all automatic logging by setting the parameter to False. For finer grained control of logged
parameters, input a dictionary with parameter-boolean pairs. The False value excludes the specified parameter.
Unspecified parameters default to True.
For example, the following code will not log the Example_1 parameter, but will log all other arguments.
auto_connect_arg_parser={"Example_1": False}
To exclude all unspecified parameters, set the * key to False.
For example, the following code will log only the Example_2 parameter.
auto_connect_arg_parser={"Example_2": True, "*": False}
An empty dictionary completely disables all automatic logging of parameters from argument parsers:
auto_connect_arg_parser={}
stdout and stderr
To control the stdout, stderr, and standard logging, use the auto_connect_streams parameter.
To disable logging all three, set the parameter to False. For finer grained control, input a dictionary, where the keys are stout, stderr,
and logging, and the values are booleans. For example:
auto_connect_streams={'stdout': True, 'stderr': True, 'logging': False}
See Task.init.
Can I run ClearML Task while working offline?
Yes! You can use ClearML's Offline Mode, in which all the data and logs that a task captures from the code are stored in a local folder.
You can enable offline mode in one of the following ways:
- Before initializing a task, use the
Task.set_offlineclass method and set theoffline_modeargument toTrue - Before running a task, set
CLEARML_OFFLINE_MODE=1
Offline mode only works with tasks created using Task.init() and not with those created
using Task.create().
The task's console output displays the task ID and a path to the folder with the session's captured information:
ClearML Task: created new task id=offline-372657bb04444c25a31bc6af86552cc9
...
...
ClearML Task: Offline session stored in /home/user/.clearml/cache/offline/b786845decb14eecadf2be24affc7418.zip
In order to upload to the ClearML Server the execution data that the Task captured offline, do one of the following:
- Use the
import-offline-session <session_path>option of the clearml-task CLI - Use the
Task.import_offline_sessionmethod.
See Storing Task Data Offline.
Graphs and Logs
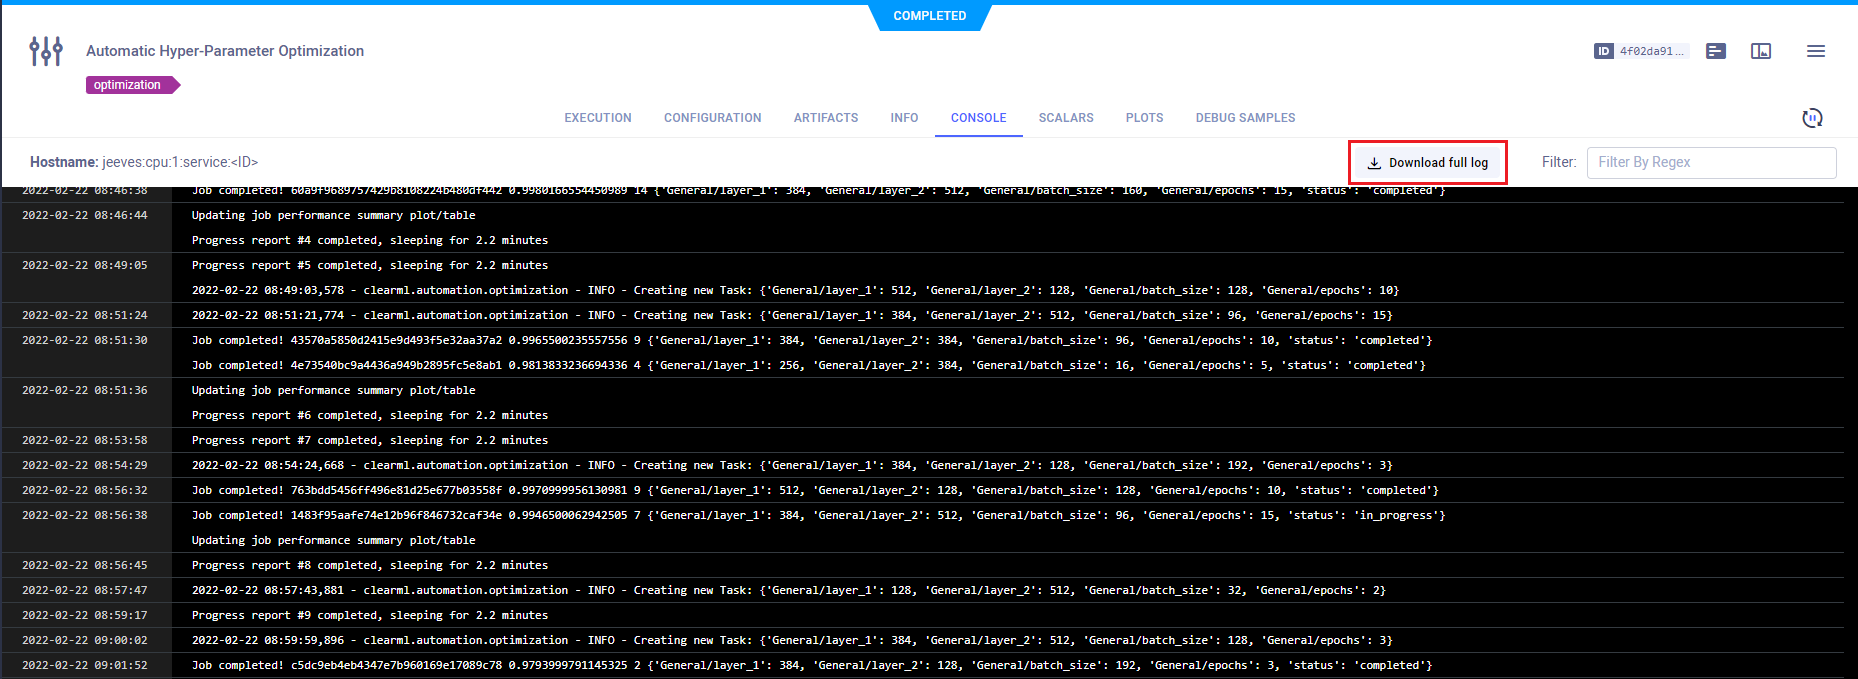
The first log lines are missing from the experiment console tab. Where did they go?
Due to speed/optimization issues, the console displays only the last several hundred log lines.
You can always download the full log as a file using the ClearML Web UI. In the ClearML Web UI > experiment's CONSOLE
tab, click Download full log.
How do I create a graph comparing hyperparameters vs. model accuracy?
You can use the UI's experiment comparison features to compare the logged hyperparameter and accuracy values of several experiments. In the experiment comparison page, under the HYPERPARAMETERS tab you can visualize experiments' hyperparameter values in relation to performance metrics in a scatter plot or parallel coordinates plot:
Scatter plot: View the correlation between a selected hyperparameter and metric. For example, the image below shows a scatter plot that displays the values of a performance metric (
epoch_accuracy) and a hyperparameter (epochs) of a few experiments: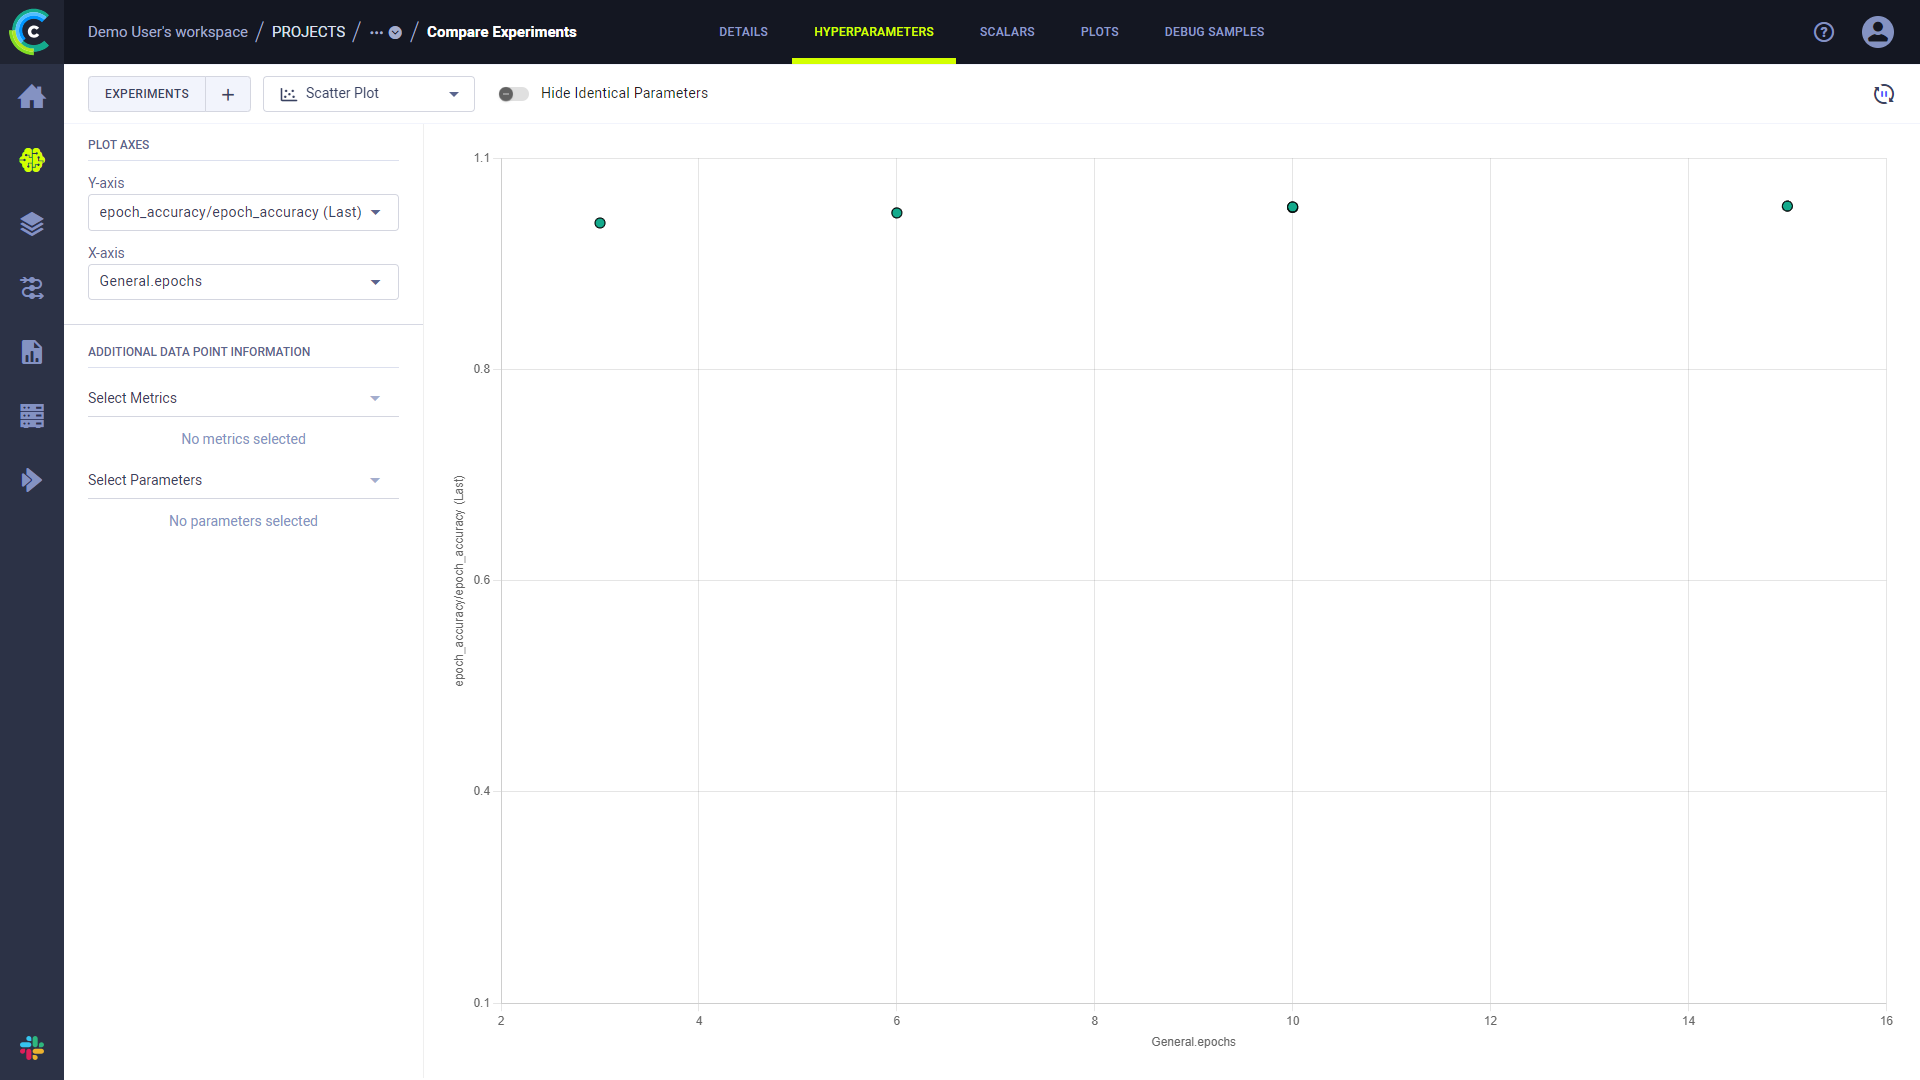
Parallel coordinates plot: View the impact of hyperparameters on selected metric(s). For example, the image below shows a parallel coordinates plot which displays the values of selected hyperparameters (
base_lr,batch_size, andnumber_of_epochs) and a performance metric (accuracy) of three experiments: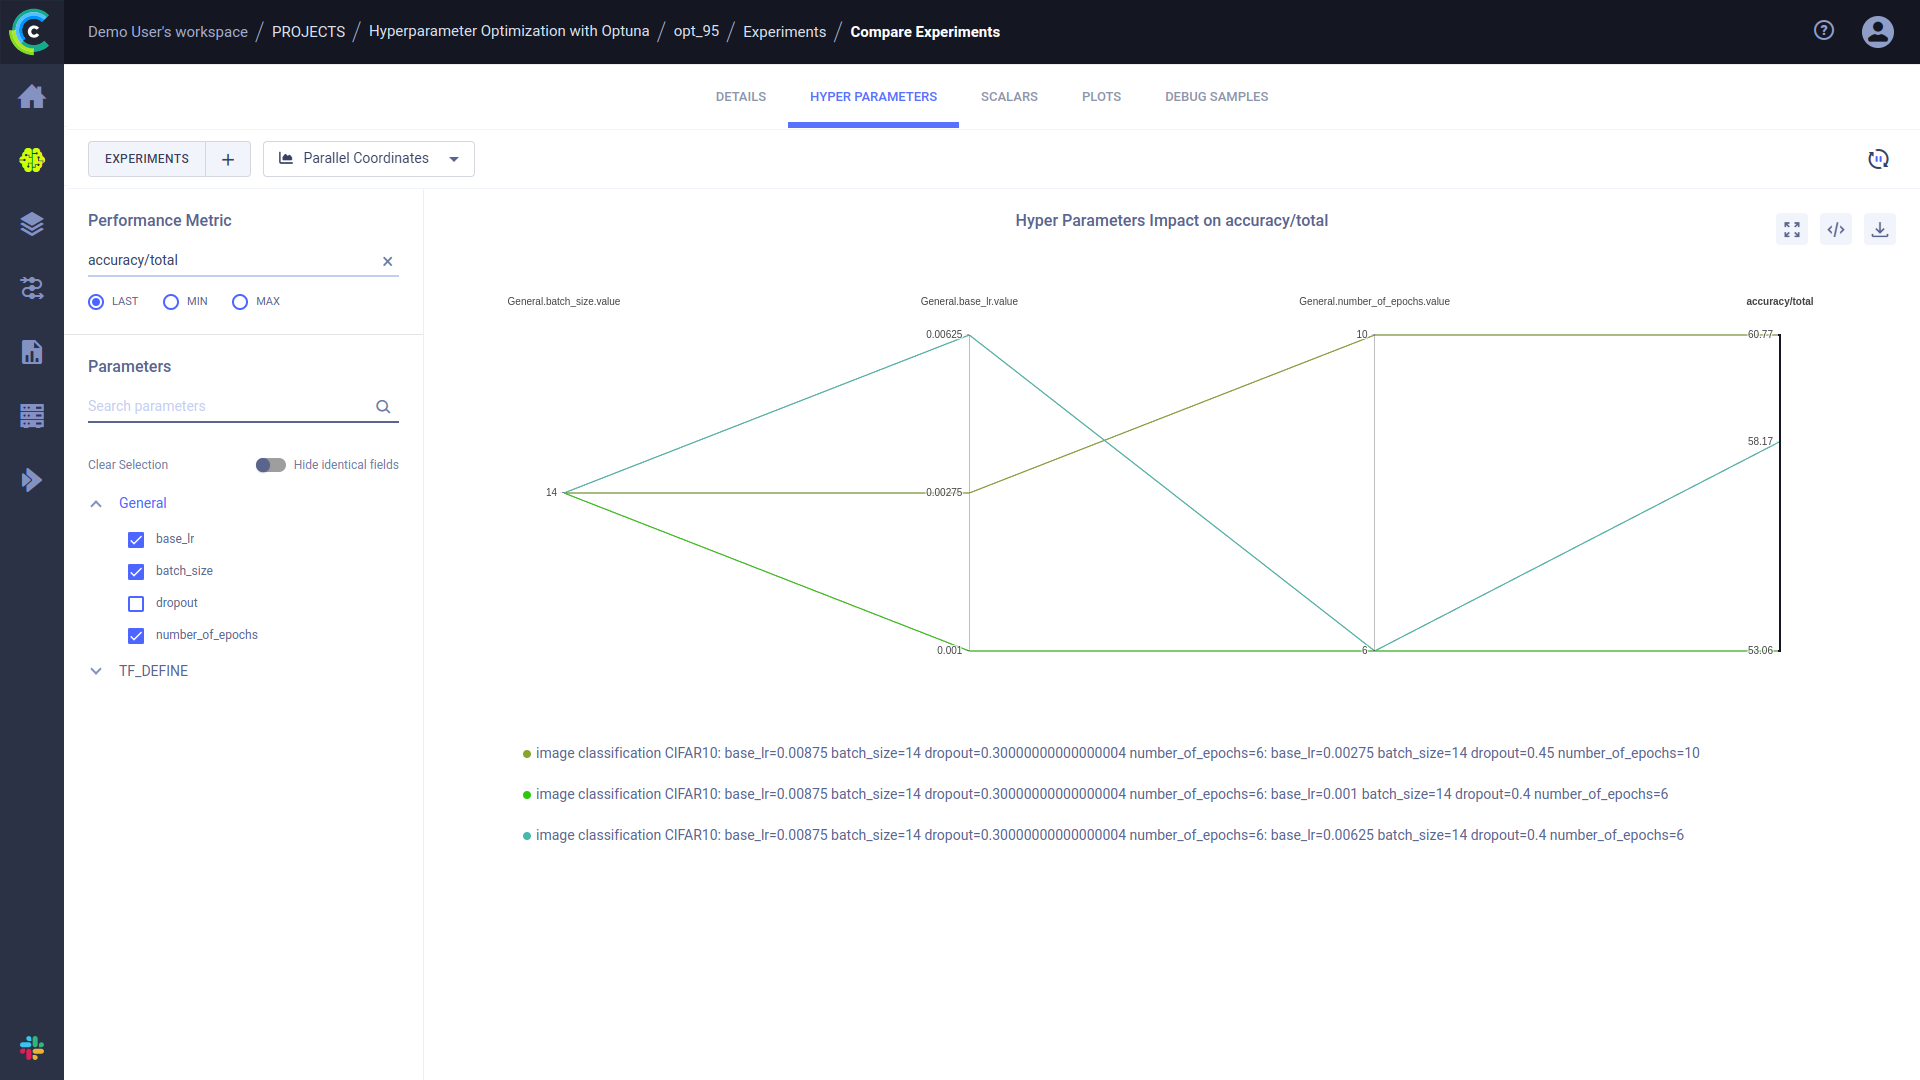
I want to add more graphs, not just with TensorBoard. Is this supported?
Yes! The Logger module includes methods for explicit reporting. For examples of explicit reporting, see the Explicit Reporting
tutorial.
How can I report more than one scatter 2D series on the same plot?
The Logger.report_scatter2d
method reports all series with the same title and iteration parameter values on the same plot.
For example, the following two scatter2D series are reported on the same plot, because both have a title of example_scatter and an iteration of 1:
scatter2d_1 = np.hstack((np.atleast_2d(np.arange(0, 10)).T, np.random.randint(10, size=(10, 1))))
logger.report_scatter2d(
    title="example_scatter",
    series="series_1",
    iteration=1,
    scatter=scatter2d_1,
    xaxis="title x",
    yaxis="title y"
)

scatter2d_2 = np.hstack((np.atleast_2d(np.arange(0, 10)).T, np.random.randint(10, size=(10, 1))))
logger.report_scatter2d(
    title="example_scatter",
    series="series_2",
    iteration=1,
    scatter=scatter2d_2,
    xaxis="title x",
    yaxis="title y"
)
GIT and Storage
Is there something ClearML can do about uncommitted code running?
Yes! ClearML stores the git diff as part of the experiment's information. You can view the git diff in the ClearML Web UI > experiment's EXECUTION tab.
I read there is a feature for centralized model storage. How do I use it?
When calling Task.init,
providing the output_uri parameter lets you specify the location in which model checkpoints (snapshots) will be stored.
For example, to store model checkpoints (snapshots) in /mnt/shared/folder:
task = Task.init(project_name, task_name, output_uri="/mnt/shared/folder")
ClearML will copy all stored snapshots into a subfolder under /mnt/shared/folder. The subfolder's name will contain
the experiment's ID. If the experiment's ID is 6ea4f0b56d994320a713aeaf13a86d9d, the following folder will be used:
/mnt/shared/folder/task.6ea4f0b56d994320a713aeaf13a86d9d/models/
ClearML supports other storage types for output_uri:
- S3:
s3://bucket/folder - Non-AWS S3-like services (such as MinIO):
s3://host_addr:port/bucket - Google Cloud Storage:
gs://bucket-name/folder - Azure Storage:
azure://<account name>.blob.core.windows.net/path/to/file
For example:
# AWS S3 bucket
task = Task.init(project_name, task_name, output_uri="s3://bucket-name/folder")

# Google Cloud Storage bucket
task = Task.init(project_name, task_name, output_uri="gs://bucket-name/folder")
To use cloud storage with ClearML, configure the storage credentials in your ~/clearml.conf. For detailed information,
see ClearML Configuration Reference.
When using PyCharm to remotely debug a machine, the Git repo is not detected. Do you have a solution?
Yes! ClearML provides a PyCharm plugin that allows a remote debugger to grab your local repository / commit ID. For detailed information about using the plugin, see the ClearML PyCharm Plugin.
Debug images and/or artifacts are not loading in the UI after I migrated ClearML Server to a new address. How do I fix this?
This can happen if your debug images and/or artifacts were uploaded to the ClearML file server, since the value
registered was their full URL at the time of registration (e.g. https://files.<OLD_ADDRESS>/path/to/artifact).
To fix this, the registered URL of each debug image and/or artifact needs to be replaced with its current URL.
For debug images, use the following command. Make sure to insert the old address and the new address that will replace it
curl --header "Content-Type: application/json" \
--request POST \
--data '{
    "script": {
        "source": "ctx._source.url = ctx._source.url.replace('https://files.<OLD_ADDRESS>', 'https://files.<NEW_ADDRESS>')",
        "lang": "painless"
    },
    "query": {
        "match_all": {}
    }
}' \
For artifacts, you can do the following:
Open bash in the mongo DB docker container:
sudo docker exec -it clearml-mongo /bin/bashInside the docker shell, create the following script. Make sure to replace
<old-bucket-name>and<new-bucket-name>, as well as the URL protocol prefixes if you aren't usings3.cat <<EOT >> script.js
db.model.find({uri:{$regex:/^s3/}}).forEach(function(e,i) {
e.uri = e.uri.replace("s3://<old-bucket-name>/","s3://<new-bucket-name>/");
db.model.save(e);});
EOTRun the script against the backend DB:
mongo backend script.js
Jupyter
I am using Jupyter Notebook. Is this supported?
Yes! You can run ClearML in Jupyter Notebooks using either of the following:
- Option 1: Install ClearML on your Jupyter Notebook host machine
- Option 2: Install ClearML in your Jupyter Notebook and connect using ClearML credentials
Option 1: Install ClearML on your Jupyter host machine
Connect to your Jupyter host machine.
Install the ClearML Python Package.
pip install clearmlRun the ClearML setup wizard.
clearml-initIn your Jupyter Notebook, you can now use ClearML.
Option 2: Install ClearML in your Jupyter Notebook
Install the ClearML Python Package.
pip install clearmlGet ClearML credentials. Open the ClearML Web UI in a browser. On the SETTINGS > WORKSPACE page, click Create new credentials. The JUPYTER NOTEBOOK tab shows the commands required to configure your notebook (a copy to clipboard action is available on hover)
Add these commands to your notebook
You can now use ClearML in your notebook!
# create a task and start training
task = Task.init(project_name='jupyter project', task_name='my notebook')
Remote Debugging (ClearML PyCharm Plugin)
I am using your ClearML PyCharm Plugin for remote debugging. I get the message "clearml.Task - INFO - Repository and package analysis timed out (10.0 sec), giving up". What should I do?
ClearML uses a background thread to analyze the script. This includes package requirements. At the end of the execution of the script, if the background thread is still running, ClearML allows the thread another 10 seconds to complete. If the thread does not complete, it times out.
This can occur for scripts that do not import any packages, for example short test scripts.
To fix this issue, you can import the time package and add a time.sleep(20) statement to the end of your script.
scikit-learn
Can I use ClearML with scikit-learn?
Yes! scikit-learn is supported. ClearML automatically logs models which are stored using joblib.
For more information, see scikit-learn.
ClearML Configuration
How do I explicitly specify the ClearML configuration file to be used?
To override the default configuration file location, set the CLEARML_CONFIG_FILE OS environment variable.
For example:
export CLEARML_CONFIG_FILE="/home/user/myclearml.conf"
How can I override ClearML credentials from the OS environment?
To override your configuration file / defaults, set the following OS environment variables:
export CLEARML_API_ACCESS_KEY="key_here"
export CLEARML_API_SECRET_KEY="secret_here"
export CLEARML_API_HOST="http://localhost:8008"
How can I track OS environment variables with experiments?
Set the OS environment variable CLEARML_LOG_ENVIRONMENT with the variables you need track, either:
All environment variables:
export CLEARML_LOG_ENVIRONMENT="*"Specific environment variables, for example, log
PWDandPYTHONPATH:export CLEARML_LOG_ENVIRONMENT="PWD,PYTHONPATH"No environment variables:
export CLEARML_LOG_ENVIRONMENT=
ClearML Hosted Service
I run my script, but my experiment is not in the ClearML Hosted Service Web UI. How do I fix this?
If you joined the ClearML Hosted Service and ran a script, but your experiment does not appear in Web UI, you may not have configured ClearML for the hosted service. Run the ClearML setup wizard. It will request your hosted service ClearML credentials and create the ClearML configuration you need.
pip install clearml

clearml-init
ClearML Server Deployment
How do I deploy ClearML Server on stand-alone Linux Ubuntu or macOS systems?
For detailed instructions, see Deploying ClearML Server: Linux or macOS.
How do I deploy ClearML Server on Windows 10?
For detailed instructions, see Deploying ClearML Server: Windows 10.
How do I deploy ClearML Server on AWS EC2 AMIs?
For detailed instructions, see Deploying ClearML Server: AWS EC2 AMIs.
How do I deploy ClearML Server on the Google Cloud Platform?
For detailed instructions, see Deploying ClearML Server: Google Cloud Platform.
How do I restart ClearML Server?
For detailed instructions, see the "Restarting" section of the documentation page for your deployment format. For example, if you deployed to Linux, see Restarting on the "Deploying ClearML Server: Linux or macOS" page.
Can I create a Helm Chart for ClearML Server Kubernetes deployment?
Yes! You can create a Helm Chart of ClearML Server Kubernetes deployment. For detailed instructions, see Deploying ClearML Server: Kubernetes using Helm.
My Docker cannot load a local host directory on SELinux?
If you are using SELinux, run the following command (see this discussion):
chcon -Rt svirt_sandbox_file_t /opt/clearml
ClearML Server Configuration
How do I configure ClearML Server for subdomains and load balancers?
For detailed instructions, see Configuring Subdomains and load balancers.
Can I add web login authentication to ClearML Server?
By default, anyone can log in to the ClearML Server WebApp. You can configure the ClearML Server to allow only a specific set of users to access the system.
For detailed instructions, see Web Login Authentication.
Can I modify non-responsive task settings?
The non-responsive experiment watchdog monitors experiments that were not updated for a specified time interval, and
marks them as aborted. The watchdog is always active.
You can modify the following settings for the watchdog:
- The time threshold (in seconds) of task inactivity (default value is 7200 seconds which is 2 hours).
- The time interval (in seconds) between watchdog cycles.
For detailed instructions, see Modifying non-responsive Task watchdog settings.
ClearML Server Troubleshooting
I did a reinstall. Why can't I create credentials in the WebApp (UI)?
The issue is likely your browser cookies for ClearML Server. Clearing your browser cookies for ClearML Server is recommended. For example:
- For Firefox - go to Developer Tools > Storage > Cookies > delete all cookies under the ClearML Server URL.
- For Chrome - Developer Tools > Application > Cookies > delete all cookies under the ClearML Server URL.
How do I fix Docker upgrade errors?
To resolve the Docker error:
... The container name "/trains-???" is already in use by ...
try removing deprecated images:
$ docker rm -f $(docker ps -a -q)
Why is web login authentication not working?
A port conflict between the ClearML Server MongoDB and/or Elastic instances, and other instances running on your system may prevent web login authentication from working correctly.
ClearML Server uses the following default ports which may be in conflict with other instances:
- MongoDB port
27017 - Elastic port
9200
You can check for port conflicts in the logs in /opt/clearml/log.
If a port conflict occurs, change the MongoDB and/or Elastic ports in the docker-compose.yml, and then run the Docker compose commands to restart the ClearML Server instance.
To change the MongoDB and/or Elastic ports for your ClearML Server, do the following:
Edit the
docker-compose.ymlfile.Add the following environment variable(s) in the
services/trainsserver/environmentsection:For MongoDB:
MONGODB_SERVICE_PORT: <new-mongodb-port>For Elastic:
ELASTIC_SERVICE_PORT: <new-elasticsearch-port>For example:
MONGODB_SERVICE_PORT: 27018
ELASTIC_SERVICE_PORT: 9201
For MongoDB, in the
services/mongo_4/portssection, expose the new MongoDB port:<new-mongodb-port>:27017For example:
20718:27017For Elastic, in the
services/elasticsearch/portssection, expose the new Elastic port:<new-elasticsearch-port>:9200For example:
9201:9200Restart ClearML Server, see Restarting ClearML Server.
How do I bypass a proxy configuration to access my local ClearML Server?
A proxy server may block access to ClearML Server configured for localhost.
To fix this, you may allow bypassing of your proxy server to localhost using a system environment variable, and configure ClearML for ClearML Server using it.
Do the following:
Allow bypassing of your proxy server to
localhostusing a system environment variable, for example:NO_PROXY = localhostIf a ClearML configuration file (
clearml.conf) exists, delete it.Open a terminal session.
Set the system environment variable to
127.0.0.1in the terminal session. For example:Linux:
no_proxy=127.0.0.1
NO_PROXY=127.0.0.1
Windows:
set no_proxy=127.0.0.1
set NO_PROXY=127.0.0.1
Run the ClearML wizard
clearml-initto configure ClearML for ClearML Server, which will prompt you to open the ClearML Web UI at, http://127.0.0.1:8080/, and create new ClearML credentials.The wizard completes with:
Verifying credentials ...
Credentials verified!
New configuration stored in /home/<username>/clearml.conf
ClearML setup completed successfully.
The ClearML Server keeps returning HTTP 500 (or 400) errors. How do I fix this?
The ClearML Server will return HTTP error responses (5XX, or 4XX) when some of its backend components are failing.
A common cause for such a failure is low available disk space, as the Elasticsearch service used by your server will go into read-only mode when it hits Elasticsearch flood watermark (by default, set to 95% disk space used).
This can be readily fixed by making more disk space available to the Elasticsearch service (either freeing up disk space disk, or if using dynamic cloud storage, increasing the disk size).
A likely indication of this situation can be determined by searching your clearml logs for "[FORBIDDEN/12/index read-only / allow delete (api)]".
Why is my ClearML WebApp (UI) not showing any data?
If your ClearML WebApp (UI) does not show anything, it may be an error authenticating with the server. Try clearing the application cookies for the site in your browser's developer tools.
Why can't I access my ClearML Server when I run my code in a virtual machine?
The network definitions inside a virtual machine (or container) are different from those of the host. The virtual machine's and the server machine's IP addresses are different, so you have to make sure that the machine that is executing the experiment can access the server's machine.
Make sure to have an independent configuration file for the virtual machine where you are running your experiments.
Edit the api section of your clearml.conf file and insert IP addresses of the server machine that are accessible
from the VM. It should look something like this:
api {
    web_server: http://192.168.1.2:8080
    api_server: http://192.168.1.2:8008
    credentials {
        "access_key" = "KEY"
        "secret_key" = "SECRET"
    }
}
ClearML Agent
How can I execute ClearML Agent without installing packages each time?
Instead of installing the Python packages in the virtual environment created by ClearML Agent, you can optimize execution
time by inheriting the packages from your global site-packages directory. In the ClearML configuration file, set the
configuration option agent.package_manager.system_site_packages to true.
ClearML API
How can I use the ClearML API to fetch data?
You can use the APIClient class, which provides a Pythonic interface to access ClearML's backend REST API. Through
an APIClient instance, you can access ClearML's REST API services and endpoints.
To use APIClient, create an instance of it, then call the method corresponding to the desired REST API endpoint, with
its respective parameters as described in the REST API reference page.
For example, the POST/ projects.get_all call returns all projects
in your workspace. The following code uses APIClient to retrieve a list of all projects whose name starts with "example."
from clearml.backend_api.session.client import APIClient

# Create an instance of APIClient
client = APIClient()
project_list = client.projects.get_all(name="example*")
print(project_list)
For more information, see APIClient.