ClearML Agent
ClearML Agent is a virtual environment and execution manager for DL / ML solutions on GPU machines. It integrates with the ClearML Python Package and ClearML Server to provide a full AI cluster solution.
Its main focus is around:
- Reproducing experiments, including their complete environments.
- Scaling workflows on multiple target machines.
ClearML Agent executes an experiment or other workflow by reproducing the state of the code from the original machine to a remote machine.
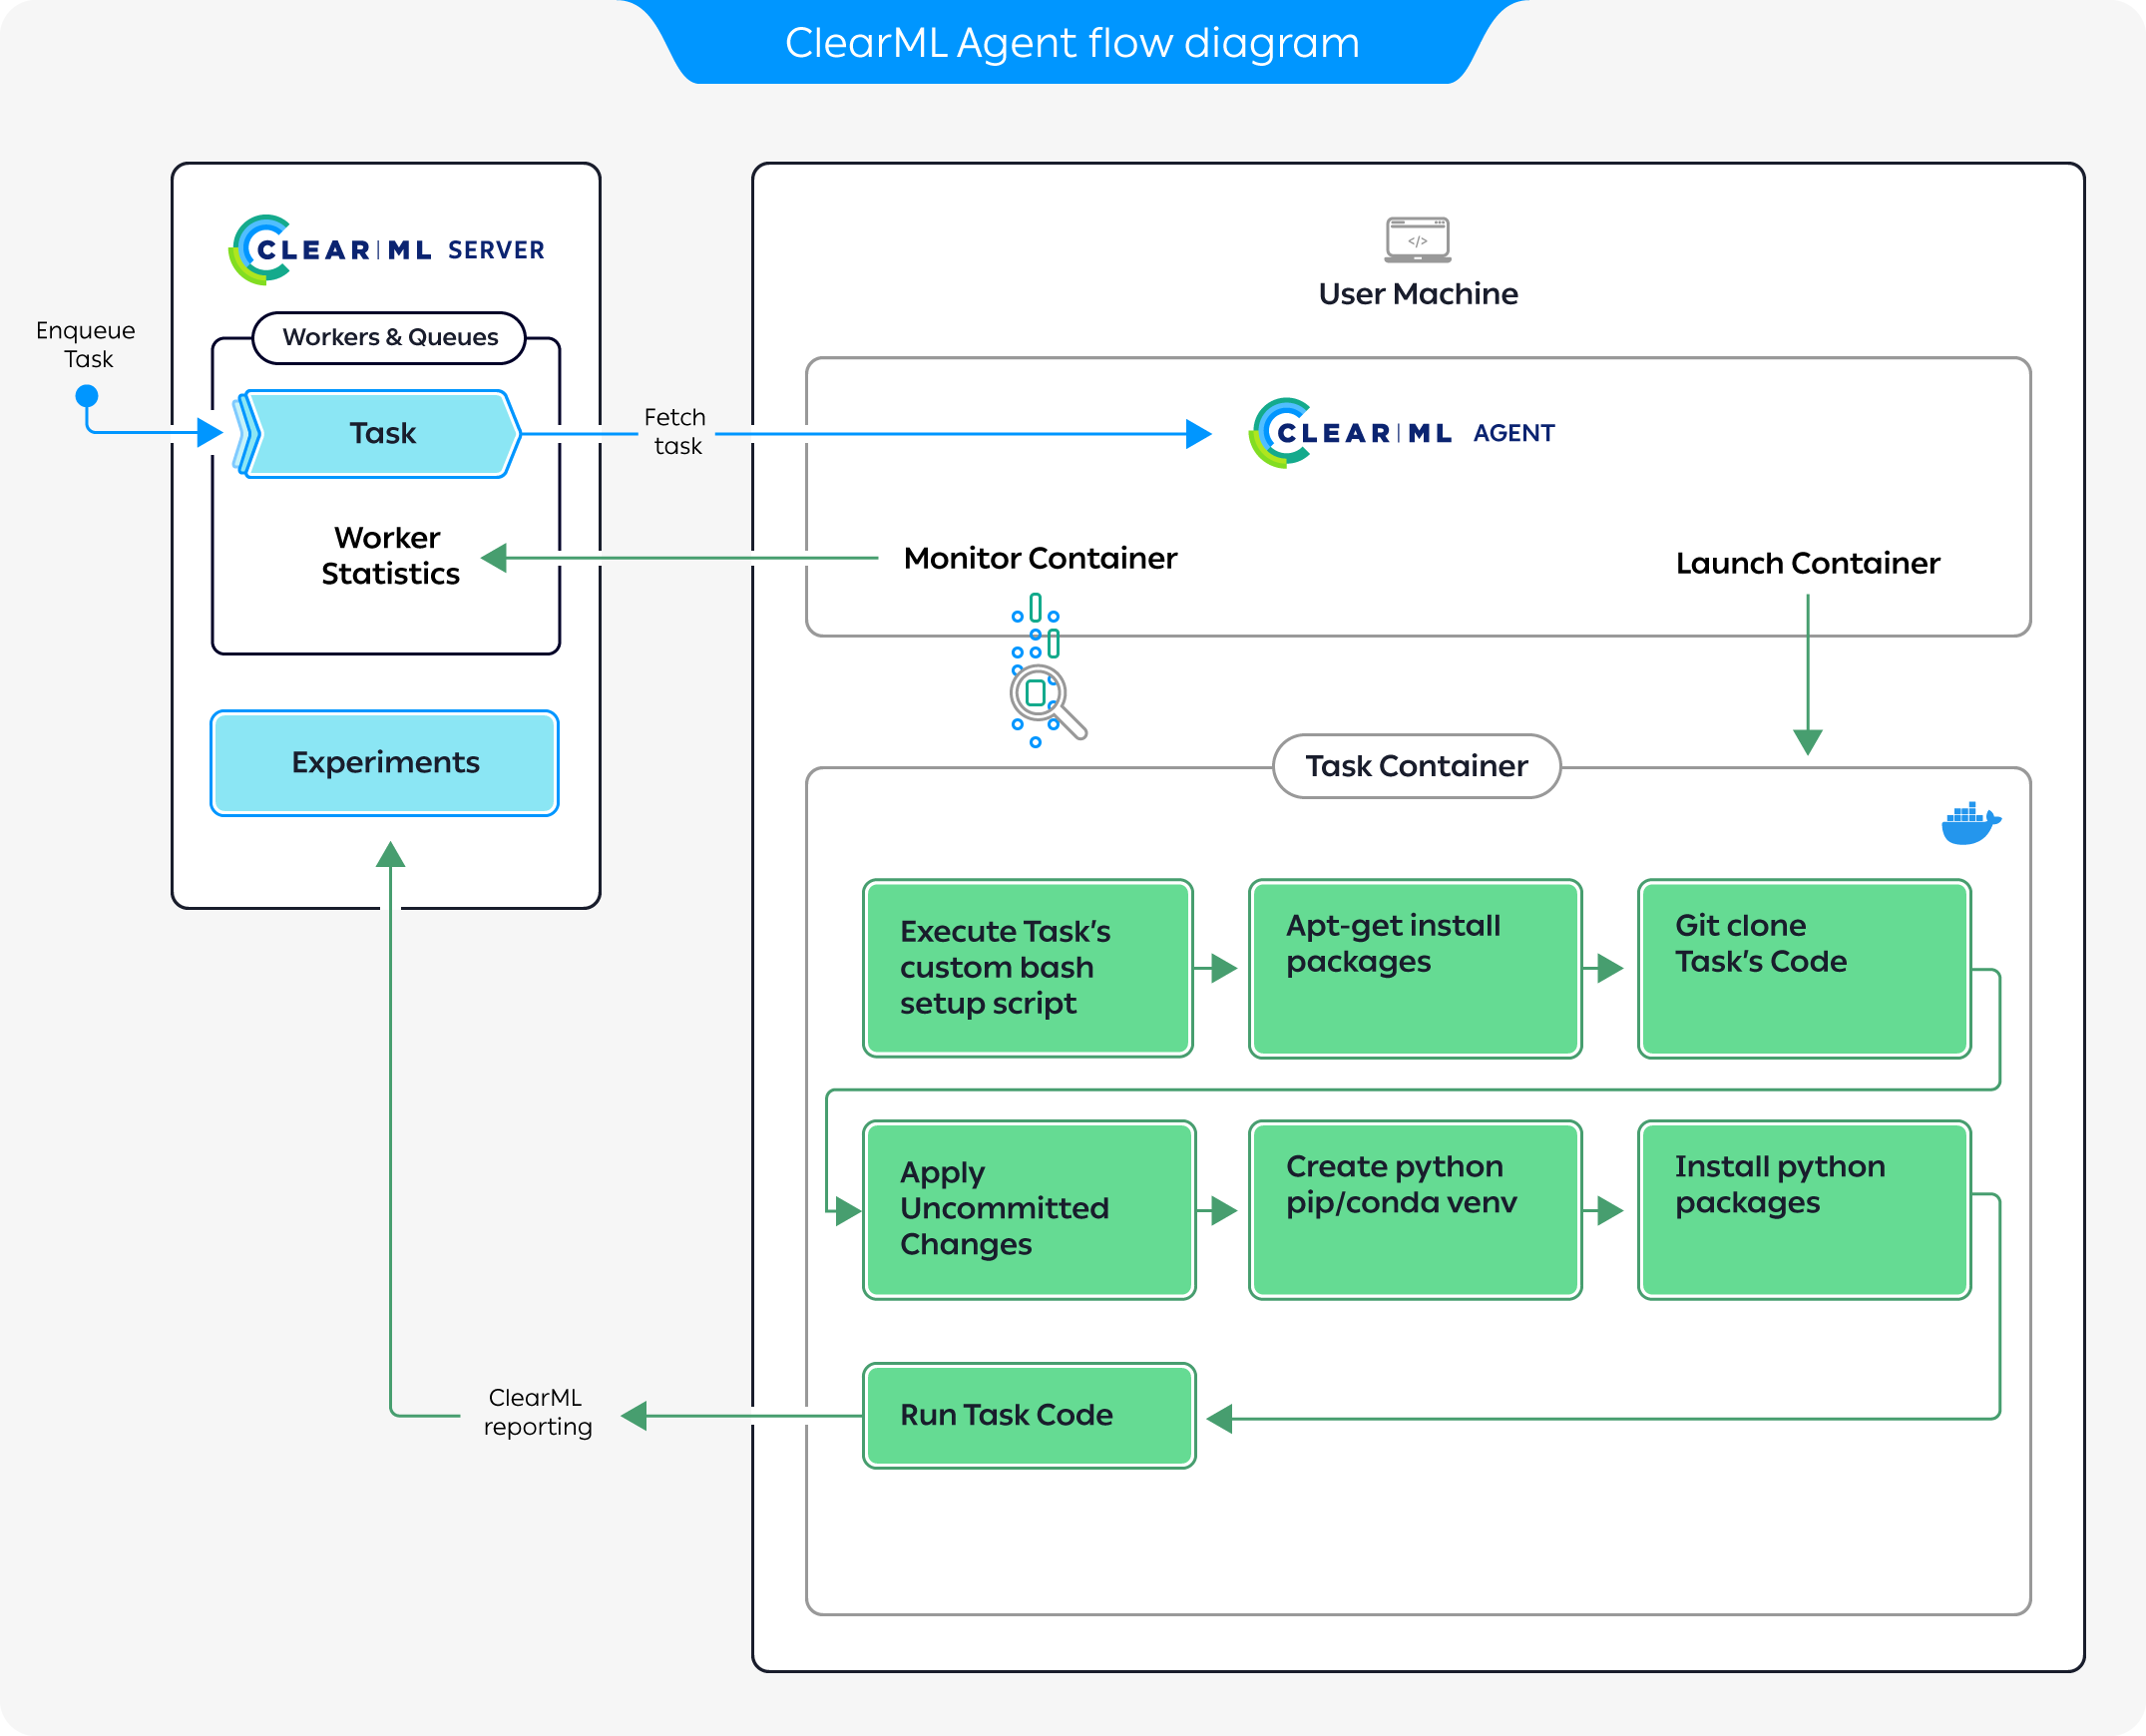
The preceding diagram demonstrates a typical flow where an agent executes a task:
- Enqueue a task for execution on the queue.
- The agent pulls the task from the queue.
- The agent launches a docker container in which to run the task's code.
- The task's execution environment is set up:
- Execute any custom setup script configured.
- Install any required system packages.
- Clone the code from a git repository.
- Apply any uncommitted changes recorded.
- Set up the python environment and required packages.
- The task's script/code is executed.
ClearML Agent uses the Python version available in the environment or docker in which it executes the code. It does not install Python, so make sure to use a docker or environment with the version you need.
While the agent is running, it continuously reports system metrics to the ClearML Server (these can be monitored in the Orchestration page).
Continue using ClearML Agent once it is running on a target machine. Reproduce experiments and execute automated workflows in one (or both) of the following ways:
- Programmatically (using
Task.enqueue()orTask.execute_remotely()) - Through the ClearML Web UI (without working directly with code), by cloning experiments and enqueuing them to the queue that a ClearML Agent is servicing.
The agent facilitates overriding task execution detail values through the UI without code modification. Modifying a task clone’s configuration will have the ClearML agent executing it override the original values:
- Modified package requirements will have the experiment script run with updated packages
- Modified recorded command line arguments will have the ClearML agent inject the new values in their stead
- Code-level configuration instrumented with
Task.connect()will be overridden by modified hyperparameters
For more information, see ClearML Agent Reference, and configuration options.
Installation
If ClearML was previously configured, follow this to add ClearML Agent specific configurations
To install ClearML Agent, execute
pip install clearml-agent
Install ClearML Agent as a system Python package and not in a Python virtual environment. An agent that runs in Virtual Environment Mode or Conda Environment Mode needs to create virtual environments, and it can't do that when running from a virtual environment.
Configuration
In a terminal session, execute
clearml-agent initThe setup wizard prompts for ClearML credentials (see here about obtaining credentials).
Please create new clearml credentials through the settings page in your `clearml-server` web app,
or create a free account at https://app.clear.ml/settings/webapp-configuration

In the settings > workspace  page, press "Create new credentials", then press "Copy to clipboard".

Paste copied configuration here:
If the setup wizard's response indicates that a configuration file already exists, follow the instructions here. The wizard does not edit or overwrite existing configuration files.
At the command prompt
Paste copied configuration here:, copy and paste the ClearML credentials and press Enter. The setup wizard confirms the credentials.Detected credentials key="********************" secret="*******"Enter to accept the default server URL, which is detected from the credentials or enter a ClearML web server URL.
A secure protocol, https, must be used. Do not use http.
WEB Host configured to: [https://app.clear.ml]noteIf you are using a self-hosted ClearML Server, the default URL will use your domain.
Do as above for API, URL, and file servers.
The wizard responds with your configuration:
CLEARML Hosts configuration:
Web App: https://app.clear.ml
API: https://api.clear.ml
File Store: https://files.clear.ml

Verifying credentials ...
Credentials verified!
Enter your Git username and password. Leave blank for SSH key authentication or when only using public repositories.
This is needed for cloning repositories by the agent.
Enter git username for repository cloning (leave blank for SSH key authentication): []
Enter password for user '<username>':
The setup wizard confirms your git credentials.
Git repository cloning will be using user=<username> password=<password>Enter an additional artifact repository, or press Enter if not required.
This is needed for installing Python packages not found in pypi.
Enter additional artifact repository (extra-index-url) to use when installing python packages (leave blank if not required):The setup wizard completes.
New configuration stored in /home/<username>/clearml.conf
CLEARML-AGENT setup completed successfully.
The configuration file location depends upon the operating system:
- Linux -
~/clearml.conf - Mac -
$HOME/clearml.conf - Windows -
\User\<username>\clearml.conf
- Linux -
Optionally, configure ClearML options for ClearML Agent (default docker, package manager, etc.). See the ClearML Configuration Reference and the ClearML Agent Environment Variables reference.
The ClearML Enterprise server provides a configuration vault, the contents of which are categorically applied on top of the agent-local configuration
Adding ClearML Agent to a Configuration File
In case a clearml.conf file already exists, add a few ClearML Agent specific configurations to it.
Adding ClearML Agent to a ClearML configuration file:
Open the ClearML configuration file for editing. Depending upon the operating system, it is:
- Linux -
~/clearml.conf - Mac -
$HOME/clearml.conf - Windows -
\User\<username>\clearml.conf
- Linux -
After the
apisection, add youragentsection. For example:agent {
# Set GIT user/pass credentials (if user/pass are set, GIT protocol will be set to https)
git_user=""
git_pass=""
# all other domains will use public access (no user/pass). Default: always send user/pass for any VCS domain
git_host=""
# Force GIT protocol to use SSH regardless of the git url (Assumes GIT user/pass are blank)
force_git_ssh_protocol: false
# unique name of this worker, if None, created based on hostname:process_id
# Overridden with os environment: CLEARML_WORKER_NAME
worker_id: ""
}View a complete ClearML Agent configuration file sample including an
agentsection here.Save the configuration.
Dynamic Environment Variables
Dynamic ClearML Agent environment variables can be used to override any configuration setting that appears in the agent
section of the clearml.conf.
The environment variable's name should be CLEARML_AGENT__AGENT__<configuration-path>, where <configuration-path>
represents the full path to the configuration field being set. Elements of the configuration path should be separated by
__ (double underscore). For example, set the CLEARML_AGENT__AGENT__DEFAULT_DOCKER__IMAGE environment variable to
deploy an agent with a different value to what is specified for agent.default_docker.image in the clearml.conf.
- Since configuration fields may contain JSON-parsable values, make sure to always quote strings (otherwise the agent might fail to parse them)
- To comply with environment variables standards, it is recommended to use only upper-case characters in environment variable keys. For this reason, ClearML Agent will always convert the configuration path specified in the dynamic environment variable's key to lower-case before overriding configuration values with the environment variable value.
Deployment
Spinning Up an Agent
You can spin up an agent on any machine: on-prem and/or cloud instance. When spinning up an agent, you assign it to service a queue(s). Utilize the machine by enqueuing tasks to the queue that the agent is servicing, and the agent will pull and execute the tasks.
ClearML Agent is platform agnostic. When using the ClearML Agent to execute experiments cross-platform, set platform specific environment variables before launching the agent.
For example, to run an agent on an ARM device, set the core type environment variable before spinning up the agent:
export OPENBLAS_CORETYPE=ARMV8
clearml-agent daemon --queue <queue_name>
Executing an Agent
To execute an agent, listening to a queue, run:
clearml-agent daemon --queue <queue_name>
Executing in Background
To execute an agent in the background, run:
clearml-agent daemon --queue <execution_queue_to_pull_from> --detached
Stopping Agents
To stop an agent running in the background, run:
clearml-agent daemon <arguments> --stop
Allocating Resources
To specify GPUs associated with the agent, add the --gpus flag.
To execute multiple agents on the same machine (usually assigning GPU for the different agents), run:
clearml-agent daemon --detached --queue default --gpus 0
clearml-agent daemon --detached --queue default --gpus 1
To allocate more than one GPU, provide a list of allocated GPUs
clearml-agent daemon --gpus 0,1 --queue dual_gpu
Queue Prioritization
A single agent can listen to multiple queues. The priority is set by their order.
clearml-agent daemon --detached --queue high_q low_q --gpus 0
This ensures the agent first tries to pull a Task from the high_q queue, and only if it is empty, the agent will try to pull
from the low_q queue.
To make sure an agent pulls from all queues equally, add the --order-fairness flag.
clearml-agent daemon --detached --queue group_a group_b --order-fairness --gpus 0
It will make sure the agent will pull from the group_a queue, then from group_b, then back to group_a, etc. This ensures
that group_a or group_b will not be able to starve one another of resources.
SSH Access
By default, ClearML Agent maps the host's ~/.ssh into the container's /root/.ssh directory (configurable,
see clearml.conf).
If you want to use existing auth sockets with ssh-agent, you can verify your host ssh-agent is working correctly with:
echo $SSH_AUTH_SOCK
You should see a path to a temporary file, something like this:
/tmp/ssh-<random>/agent.<random>
Then run your clearml-agent in Docker mode, which will automatically detect the SSH_AUTH_SOCK environment variable,
and mount the socket into any container it spins.
You can also explicitly set the SSH_AUTH_SOCK environment variable when executing an agent. The command below will
execute an agent in Docker mode and assign it to service a queue. The agent will have access to
the SSH socket provided in the environment variable.
SSH_AUTH_SOCK=<file_socket> clearml-agent daemon --gpus <your config> --queue <your queue name> --docker
Kubernetes
Agents can be deployed bare-metal or as dockers in a Kubernetes cluster. ClearML Agent adds the missing scheduling capabilities to Kubernetes, allows for more flexible automation from code, and gives access to all of ClearML Agent's features.
ClearML Agent is deployed onto a Kubernetes cluster through its Kubernetes-Glue which maps ClearML jobs directly to K8s jobs:
- Use the ClearML Agent Helm Chart to spin an agent pod acting as a controller. Alternatively (less recommended) run a k8s glue script on a K8S cpu node
- The ClearML K8S glue pulls jobs from the ClearML job execution queue and prepares a K8s job (based on provided yaml template)
- Inside each job pod the
clearml-agentwill install the ClearML task's environment and run and monitor the experiment's process
Fractional GPUs
Some jobs that you send for execution need a minimal amount of compute and memory, but you end up allocating entire GPUs to them. In order to optimize your compute resource usage, you can partition GPUs into slices.
Set up MIG support for Kubernetes through your NVIDIA device plugin, and define the GPU fractions to be made available to the cluster.
The ClearML Agent Helm chart lets you specify a pod template for each queue which describes the resources that the pod
will use. The template should specify the requested GPU slices under Containers.resources.limits to have the queue use
the defined resources. For example, the following configures a K8s pod to run a 3g.20gb MIG device:
# tf-benchmarks-mixed.yaml
apiVersion: v1
kind: Pod
metadata:
  name: tf-benchmarks-mixed
spec:
  restartPolicy: Never
  Containers:
     - name: tf-benchmarks-mixed
     image: ""
      command: []
      args: []
      resources:
        limits:
          nvidia.com/mig-3g.20gb: 1
  nodeSelector:  #optional
    nvidia.com/gpu.product: A100-SXM4-40GB
When tasks are added to the relevant queue, the agent pulls the task and creates a pod to execute it, using the specified GPU slice.
For example, the following configures what resources should be used to execute tasks from the default queue:
agentk8sglue:
  queue: default
  # …
  basePodTemplate:
    # …
    resources:
      limits:
        nvidia.com/gpu: 1
  nodeSelector:
    nvidia.com/gpu.product: A100-SXM4-40GB-MIG-1g.5gb
The ClearML Enterprise plan supports K8S servicing multiple ClearML queues, as well as providing a pod template for each queue for describing the resources for each pod to use.
For example, the following configures which resources to use for example_queue_1 and example_queue_2:
agentk8sglue:
  queues:
    example_queue_1:
      templateOverrides:
        resources:
          limits:
            nvidia.com/gpu: 1
      nodeSelector:
        nvidia.com/gpu.product: A100-SXM4-40GB-MIG-1g.5gb
    example_queue_2:
      templateOverrides:
        resources:
          limits:
            nvidia.com/gpu: 2
      nodeSelector:
        nvidia.com/gpu.product: A100-SXM4-40GB
Slurm
Slurm Glue is available under the ClearML Enterprise plan
Agents can be deployed bare-metal or inside Singularity
containers in linux clusters managed with Slurm.
ClearML Agent Slurm Glue maps jobs to Slurm batch scripts: associate a ClearML queue to a batch script template, then
when a Task is pushed into the queue, it will be converted and executed as an sbatch job according to the sbatch
template specification attached to the queue.
Install the Slurm Glue on a machine where you can run
sbatch/squeueetc.pip3 install -U --extra-index-url https://*****@*****.allegro.ai/repository/clearml_agent_slurm/simple clearml-agent-slurmCreate a batch template. Make sure to set the
SBATCHvariables to the resources you want to attach to the queue. The script below sets up an agent to run bare-metal, creating a virtual environment per job. For example:#!/bin/bash
# available template variables (default value separator ":")
# ${CLEARML_QUEUE_NAME}
# ${CLEARML_QUEUE_ID}
# ${CLEARML_WORKER_ID}.
# complex template variables (default value separator ":")
# ${CLEARML_TASK.id}
# ${CLEARML_TASK.name}
# ${CLEARML_TASK.project.id}
# ${CLEARML_TASK.hyperparams.properties.user_key.value}
# example
#SBATCH --job-name=clearml_task_${CLEARML_TASK.id} # Job name DO NOT CHANGE
#SBATCH --ntasks=1 # Run on a single CPU
# #SBATCH --mem=1mb # Job memory request
# #SBATCH --time=00:05:00 # Time limit hrs:min:sec
#SBATCH --output=task-${CLEARML_TASK.id}-%j.log
#SBATCH --partition debug
#SBATCH --cpus-per-task=1
#SBATCH --priority=5
#SBATCH --nodes=${CLEARML_TASK.hyperparams.properties.num_nodes.value:1}
${CLEARML_PRE_SETUP}
echo whoami $(whoami)
${CLEARML_AGENT_EXECUTE}
${CLEARML_POST_SETUP}Notice: If you are using Slurm with Singularity container support replace
${CLEARML_AGENT_EXECUTE}in the batch template withsingularity exec ${CLEARML_AGENT_EXECUTE}. For additional required settings, see Slurm with Singularity.tipYou can override the default values of a Slurm job template via the ClearML Web UI. The following command in the template sets the
nodesvalue to be the ClearML Task’snum_nodesuser property:#SBATCH --nodes=${CLEARML_TASK.hyperparams.properties.num_nodes.value:1}This user property can be modified in the UI, in the task's CONFIGURATION > User Properties section, and when the task is executed the new modified value will be used.
Launch the ClearML Agent Slurm Glue and assign the Slurm configuration to a ClearML queue. For example, the following associates the
defaultqueue to theslurm.example.templatescript, so any jobs pushed to this queue will use the resources set by that script.clearml-agent-slurm --template-files slurm.example.template --queue defaultYou can also pass multiple templates and queues. For example:
clearml-agent-slurm --template-files slurm.template1 slurm.template2 --queue queue1 queue2
Slurm with Singularity
If you are running Slurm with Singularity containers support, set the following:
Make sure your
sbatchtemplate contains:singularity exec ${CLEARML_AGENT_EXECUTE}Additional singularity arguments can be added, for example:
singularity exec --uts ${CLEARML_AGENT_EXECUTE}`Set the default Singularity container to use in your clearml.conf file:
agent.default_docker.image="shub://repo/hello-world"Or
agent.default_docker.image="docker://ubuntu"Add
--singularity-modeto the command line, for example:clearml-agent-slurm --container-mode --template-files slurm.example_singularity.template --queue default
Explicit Task Execution
ClearML Agent can also execute specific tasks directly, without listening to a queue.
Execute a Task without Queue
Execute a Task with a clearml-agent worker without a queue.
clearml-agent execute --id <task-id>
Clone a Task and Execute the Cloned Task
Clone the specified Task and execute the cloned Task with a clearml-agent worker without a queue.
clearml-agent execute --id <task-id> --clone
Execute Task inside a Docker
Execute a Task with a clearml-agent worker using a Docker container without a queue.
clearml-agent execute --id <task-id> --docker
Debugging
Run a clearml-agent daemon in foreground mode, sending all output to the console.
clearml-agent daemon --queue default --foreground
Execution Environments
ClearML Agent has two primary execution modes: Virtual Environment Mode and Docker Mode.
Virtual Environment Mode
In Virtual Environment Mode, the agent creates a virtual environment for the experiment, installs the required Python packages based on the task specification, clones the code repository, applies the uncommitted changes and finally executes the code while monitoring it. This mode uses smart caching so packages and environments can be reused over multiple tasks (see Virtual Environment Reuse).
ClearML Agent supports working with one of the following package managers:
To change the package manager used by the agent, edit the package_manager.type
field in the of the clearml.conf. If extra channels are needed for conda, add the missing channels in the
package_manager.conda_channels field in the clearml.conf.
Some versions of poetry (using install-poetry.py) do not respect pyenv global.
If you are using pyenv to control the environment where you use ClearML Agent, you can:
- Use poetry v1.2 and above (which fixes this issue)
- Install poetry with the deprecated
get-poetry.pyinstaller
Docker Mode
- Docker Mode is only supported in linux.
- Docker Mode requires docker service v19.03 or higher installed.
When executing the ClearML Agent in Docker mode, it will:
- Run the provided Docker container
- Install ClearML Agent in the container
- Execute the Task in the container, and monitor the process.
ClearML Agent uses the provided default Docker container, which can be overridden from the UI.
You can set the docker container via the UI:
- Clone the experiment
- Set the Docker in the cloned task's Execution tab > Container section

- Enqueue the cloned task
The task will be executed in the container specified in the UI.
All ClearML Agent flags (such as --gpus and --foreground) are applicable to Docker mode as well.
To execute ClearML Agent in Docker mode, run:
clearml-agent daemon --queue <execution_queue_to_pull_from> --docker [optional default docker image to use]
To use the current clearml-agent version in the Docker container, instead of the latest clearml-agent version that is
automatically installed, pass the --force-current-version flag:
clearml-agent daemon --queue default --docker --force-current-version
For Kubernetes, specify a host mount on the daemon host. Do not use the host mount inside the Docker container.
Set the environment variable CLEARML_AGENT_K8S_HOST_MOUNT.
For example:
CLEARML_AGENT_K8S_HOST_MOUNT=/mnt/host/data:/root/.clearml
Environment Caching
ClearML Agent caches virtual environments so when running experiments multiple times, there's no need to spend time reinstalling pre-installed packages. To make use of the cached virtual environments, enable the virtual environment reuse mechanism.
Virtual Environment Reuse
The virtual environment reuse feature may reduce experiment startup time dramatically.
By default, ClearML uses the package manager's environment caching. This means that even if no new packages need to be installed, checking the list of packages can take a long time.
ClearML has a virtual environment reuse mechanism which, when enabled, allows using environments as-is without resolving installed packages. This means that when executing multiple experiments with the same package dependencies, the same environment will be used.
ClearML does not support environment reuse when using Poetry package manager
To enable environment reuse, modify the clearml.conf file and unmark the venvs_cache section.
venvs_cache: {
        # maximum number of cached venvs
        max_entries: 10
        # minimum required free space to allow for cache entry, disable by passing 0 or negative value
        free_space_threshold_gb: 2.0
        # unmark to enable virtual environment caching
        # path: ~/.clearml/venvs-cache
    },
Dynamic GPU Allocation
This feature is available under the ClearML Enterprise plan
The ClearML Enterprise server supports dynamic allocation of GPUs based on queue properties. Agents can spin multiple Tasks from different queues based on the number of GPUs the queue needs.
dynamic-gpus enables dynamic allocation of GPUs based on queue properties.
To configure the number of GPUs for a queue, use the --gpus flag to specify the active GPUs, and use the --queue
flag to specify the queue name and number of GPUs:
clearml-agent daemon --dynamic-gpus --gpus 0-2 --queue dual_gpus=2 single_gpu=1
Example
Let's say a server has three queues:
dual_gpuquad_gpuopportunistic
An agent can be spun on multiple GPUs (for example: 8 GPUs, --gpus 0-7), and then attached to multiple
queues that are configured to run with a certain amount of resources:
clearml-agent daemon --dynamic-gpus --gpus 0-7 --queue quad_gpu=4 dual_gpu=2
The agent can now spin multiple Tasks from the different queues based on the number of GPUs configured to the queue.
The agent will pick a Task from the quad_gpu queue, use GPUs 0-3 and spin it. Then it will pick a Task from the dual_gpu
queue, look for available GPUs again and spin on GPUs 4-5.
Another option for allocating GPUs:
clearml-agent daemon --dynamic-gpus --gpus 0-7 --queue dual=2 opportunistic=1-4
Notice that a minimum and maximum value of GPUs is specified for the opportunistic queue. This means the agent
will pull a Task from the opportunistic queue and allocate up to 4 GPUs based on availability (i.e. GPUs not currently
being used by other agents).
Services Mode
ClearML Agent supports a Services Mode where, as soon as a task is launched off of its queue, the agent moves on to the next task without waiting for the previous one to complete. This mode is intended for running resource-sparse tasks that are usually idling, such as periodic cleanup services or a pipeline controller.
To run a clearml-agent in services mode, run:
clearml-agent daemon --services-mode --queue services --create-queue --docker <docker_name> --cpu-only
To limit the number of simultaneous tasks run in services mode, pass the maximum number immediately after the
--services-mode option (for example: --services-mode 5).
services-modecurrently only supports Docker mode. Each service spins on its own Docker image.- The default
clearml-serverconfiguration already runs a singleclearml-agentin services mode that listens to theservicesqueue.
Launch a service task like any other task, by enqueuing it to the appropriate queue.
Do not enqueue training or inference tasks into the services queue. They will put an unnecessary load on the server.
Setting Server Credentials
Self-hosted ClearML Server comes by default with a services queue. By default, the server is open and does not require username and password, but it can be password-protected. In case it is password-protected, the services agent will need to be configured with server credentials (associated with a user).
To do that, set these environment variables on the ClearML Server machine with the appropriate credentials:
CLEARML_API_ACCESS_KEY
CLEARML_API_SECRET_KEY
Exporting a Task into a Standalone Docker Container
Task Container
Build a Docker container that when launched executes a specific experiment, or a clone (copy) of that experiment.
- Build a Docker container that at launch will execute a specific Task.
clearml-agent build --id <task-id> --docker --target <new-docker-name> --entry-point reuse_task - Build a Docker container that at launch will clone a Task specified by Task ID, and will execute the newly cloned Task.
clearml-agent build --id <task-id> --docker --target <new-docker-name> --entry-point clone_task - Run built Docker by executing:
docker run <new-docker-name>
Check out this tutorial for building executable experiment containers.
Base Docker Container
Build a Docker container according to the execution environment of a specific task.
clearml-agent build --id <task-id> --docker --target <new-docker-name>
You can add the Docker container as the base Docker image to a task (experiment), using one of the following methods:
- Using the ClearML Web UI - See Base Docker image on the "Tuning Experiments" page.
- In the ClearML configuration file - Use the ClearML configuration file
agent.default_dockeroptions.
Check out this tutorial for building a Docker container replicating the execution environment of an existing task.
Google Colab
ClearML Agent can run on a Google Colab instance. This helps users to leverage compute resources provided by Google Colab and send experiments for execution on it.
Check out this tutorial on how to run a ClearML Agent on Google Colab!
Scheduling Working Hours
This feature is available under the ClearML Enterprise plan
The Agent scheduler enables scheduling working hours for each Agent. During working hours, a worker will actively poll queues for Tasks, fetch and execute them. Outside working hours, a worker will be idle.
Schedule workers by:
- Setting configuration file options
- Running
clearml-agentfrom the command line (overrides configuration file options)
Override worker schedules by:
- Setting runtime properties to force a worker on or off
- Tagging a queue on or off
Running clearml-agent with a Schedule (Command Line)
Set a schedule for a worker from the command line when running clearml-agent. Two properties enable setting working hours:
Use only one of these properties
uptime- Time span during which a worker will actively poll a queue(s) for Tasks, and execute them. Outside this time span, the worker will be idle.downtime- Time span during which a worker will be idle. Outside this time span, the worker will actively poll and execute Tasks.
Define uptime or downtime as "<hours> <days>", where:
<hours>- A span of hours (00-23) or a single hour. A single hour defines a span from that hour to midnight.<days>- A span of days (SUN-SAT) or a single day.
Use - for a span, and , to separate individual values. To span before midnight to after midnight, use two spans.
For example:
"20-23 SUN"- 8 PM to 11 PM on Sundays."20-23 SUN,TUE"- 8 PM to 11 PM on Sundays and Tuesdays."20-23 SUN-TUE"- 8 PM to 11 PM on Sundays, Mondays, and Tuesdays."20 SUN"- 8 PM to midnight on Sundays."20-00,00-08 SUN"- 8 PM to midnight and midnight to 8 AM on Sundays"20-00 SUN", "00-08 MON"- 8 PM on Sundays to 8 AM on Mondays (spans from before midnight to after midnight).
Setting Worker Schedules in the Configuration File
Set a schedule for a worker using configuration file options. The options are:
Use only one of these properties
agent.uptimeagent.downtime
Use the same time span format for days and hours as is used in the command line.
For example, set a worker's schedule from 5 PM to 8 PM on Sunday through Tuesday, and 1 PM to 10 PM on Wednesday.
agent.uptime: ["17-20 SUN-TUE", "13-22 WED"]
Overriding Worker Schedules Using Runtime Properties
Runtime properties override the command line uptime / downtime properties. The runtime properties are:
Use only one of these properties
force:on- Pull and execute Tasks until the property expires.force:off- Prevent pulling and execution of Tasks until the property expires.
Currently, these runtime properties can only be set using an ClearML REST API call to the workers.set_runtime_properties
endpoint, as follows:
- The body of the request must contain the
worker-id, and the runtime property to add. - An expiry date is optional. Use the format
"expiry":<time>. For example,"expiry":86400will set an expiry of 24 hours. - To delete the property, set the expiry date to zero,
"expiry":0.
For example, to force a worker on for 24 hours:
curl --user <key>:<secret> --header "Content-Type: application/json" --data '{"worker":"<worker_id>","runtime_properties":[{"key": "force", "value": "on", "expiry": 86400}]}' http://<api-server-hostname-or-ip>:8008/workers.set_runtime_properties
Overriding Worker Schedules Using Queue Tags
Queue tags override command line and runtime properties. The queue tags are the following:
Use only one of these properties
force_workers:on- Any worker listening to the queue will keep pulling Tasks from the queue.force_workers:off- Prevent all workers listening to the queue from pulling Tasks from the queue.
Currently, you can set queue tags using an ClearML REST API call to the queues.update endpoint, or the
APIClient. The body of the call must contain the queue-id and the tags to add.
For example, force workers on for a queue using the APIClient:
from clearml.backend_api.session.client import APIClient

client = APIClient()
client.queues.update(queue="<queue_id>", tags=["force_workers:on"])
Or, force workers on for a queue using the REST API:
curl --user <key>:<secret> --header "Content-Type: application/json" --data '{"queue":"<queue_id>","tags":["force_workers:on"]}' http://<api-server-hostname-or-ip>:8008/queues.update
References
- See ClearML Agent CLI for a reference for
clearml-agent's CLI commands. - See ClearML Agent Environment Variables for a list of environment variables to configure ClearML Agent