Fully automatic retraining loop using ClearML Data
Right, so you want to create a fully automatic retraining loop, that you can set up once and then pretty much forget about. Where do we even start?!
The plan
A common retraining loop might look like this:
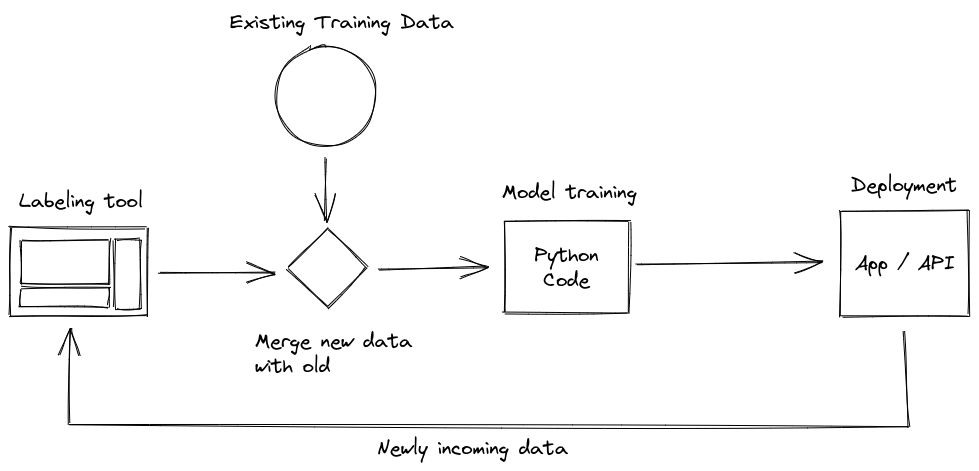
There’s a labeling tool that spits out newly labeled data. That data will then have to be merged with the already existing body of labeled data, which in turn has to be preprocessed. Finally, it can then be used to train a machine learning model. If you’re feeling really fancy, that model then has to be evaluated and, if performance is good, deployed.
Each of these steps has the potential to be messed up by human error, especially if the data isn’t tracked, it is very hard to keep track of which model was trained on which data. This is where data versioning comes in.
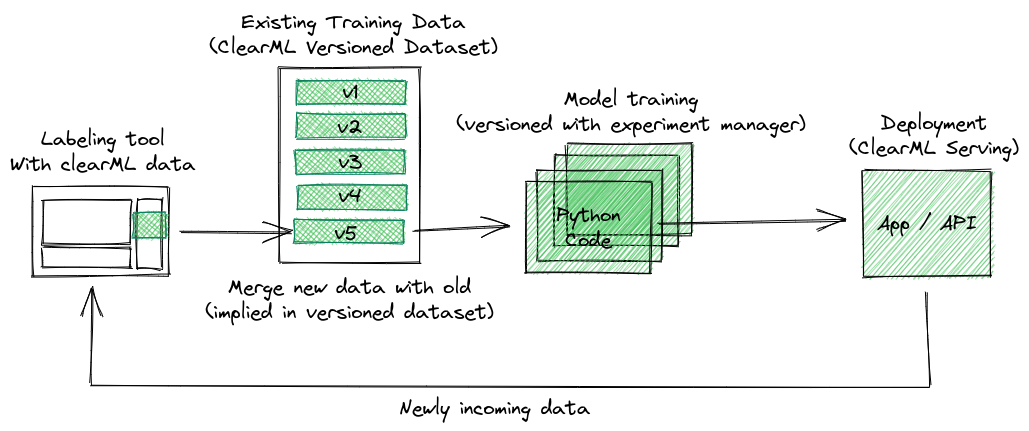
The plan for this blog post is to start versioning the data at the very beginning where it is first labeled. We will create a dataset that has a new version whenever someone draws up some new labels. The preprocessing task can then automatically be triggered when a new dataset version is detected, which in turn will kickstart a retraining run. So let’s get to it!
The use-case
Using IoT sensor data, we can try to predict whether or not a room is occupied at any given moment. The data is based on this kaggle dataset: https://www.kaggle.com/datasets/kukuroo3/room-occupancy-detection-data-iot-sensor.
The included sensors are:
- Temperature
- Humidity
- Light
- CO2
- HumidityRatio
Every sensor has a measurement every minute and we can label each minute as a binary class: the room is occupied, or it is not.
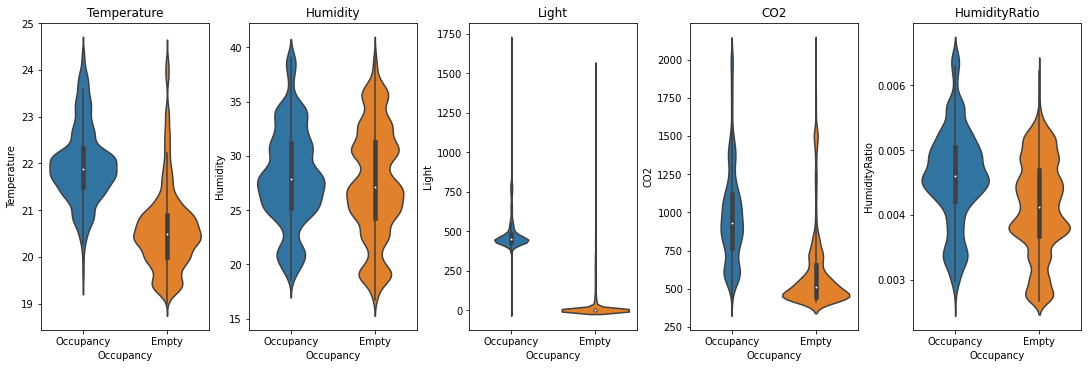
Credit: https://www.kaggle.com/code/kukuroo3/start-code-base-eda
Integrating with the labeling tool
Any continuous retraining loop has a labeling tool somewhere, provided we’re talking about a supervised machine learning problem. It is probably going to be the component with the most human interaction, which does not mean we have to leave slack on our automation.
This is anecdotal evidence, but it seems like a lot of projects tend to use their own custom labeling tool, which means we can try to actually integrate clearml data directly into the code! For the purpose of this blog post, we’ll use a simple structured data labeling tool called Time Series Labeler. Its clean codebase serves as an excellent example of how to integrate with your own tools.
Ideally, we want to automate the dataset version management as part of the normal labeling workflow, so we could integrate an “upload” button into our labeling tool of choice, clicking the sync button will upload all the newly labeled files as a new dataset version. The actual implementation of this button is highly dependent on the exact labeling tool you end up using, but the clearml data code will most likely be the same.
Clearml data continuous labeling workflow
When the upload button is pressed, the first thing we want to do is to get (not download!) the metadata of the latest dataset version that we want to add new labeled data to. If the dataset does not exist yet, we want to create it.
dataset = Dataset.get(
    dataset_project=CLEARML_PROJECT,
    dataset_name=CLEARML_DATASET_NAME,
    auto_create=True,
    writable_copy=True
)
The auto_create argument will create a dataset if one with that name in that project does not exist already. The writable_copy argument will actually do the equivalent of the following:
latest_version = Dataset.get(
    dataset_project=CLEARML_PROJECT,
    dataset_name=CLEARML_DATASET_NAME
)
new_version = Dataset.create(
    dataset_project=CLEARML_PROJECT,
    dataset_name=CLEARML_DATASET_NAME,
    parents=[latest_version]
)
Making a new dataset version that’s based on the already existing latest version of that dataset.
Now we can add all the files that changed, if the labeling tool has a list of only the files that changed, great! But if not, you can just add the root folder of the dataset and clearml data will take care of duplicates and find the delta for you.
dataset.add_files(path=save_path)Then we can finalize this dataset version and upload it!
dataset.finalize(auto_upload=True)![]()
Going one step further
The button itself is still a rather manual process. It has merit in that the labeler has the agency to only upload when and what they want, but they still have to remember to click the button every now and then. Another option is to automatically add and upload every file that’s done if the labeling tool tracks that.
Uploading is done in the background, so one can call the following code to get it going
dataset.add_files(path=done_file_path, dataset_path=/path/of/file/relative/to/dataset/root)
dataset.upload()
Since we’re now adding a single file, it makes sense to also provide the dataset_path which is where exactly in the dataset structure you want the file to end up. Usually, this will be the same path as locally, but this allows you to define a dataset structure that’s different from the one of the labeling tool.
And then only when the labeling tool is willingly closed down, we can finalize the dataset (which is a short process) right before the tool exists.
# A keyboard interrupt is of course for a CLI tool, a GUI tool will have its own
# way of gracefully handling a shutdown
try:
    # Run tool here
except KeyboardInterrupt:
    dataset.finalize()

# Example for PyQT/Pyside GUI code
class YourMainWindow(QtGui.QMainWindow):

    (...)

    def closeEvent(self, *args, **kwargs):
        super(QtGui.QMainWindow, self).closeEvent(*args, **kwargs)
        dataset.finalize()
Exploring the dataset versions
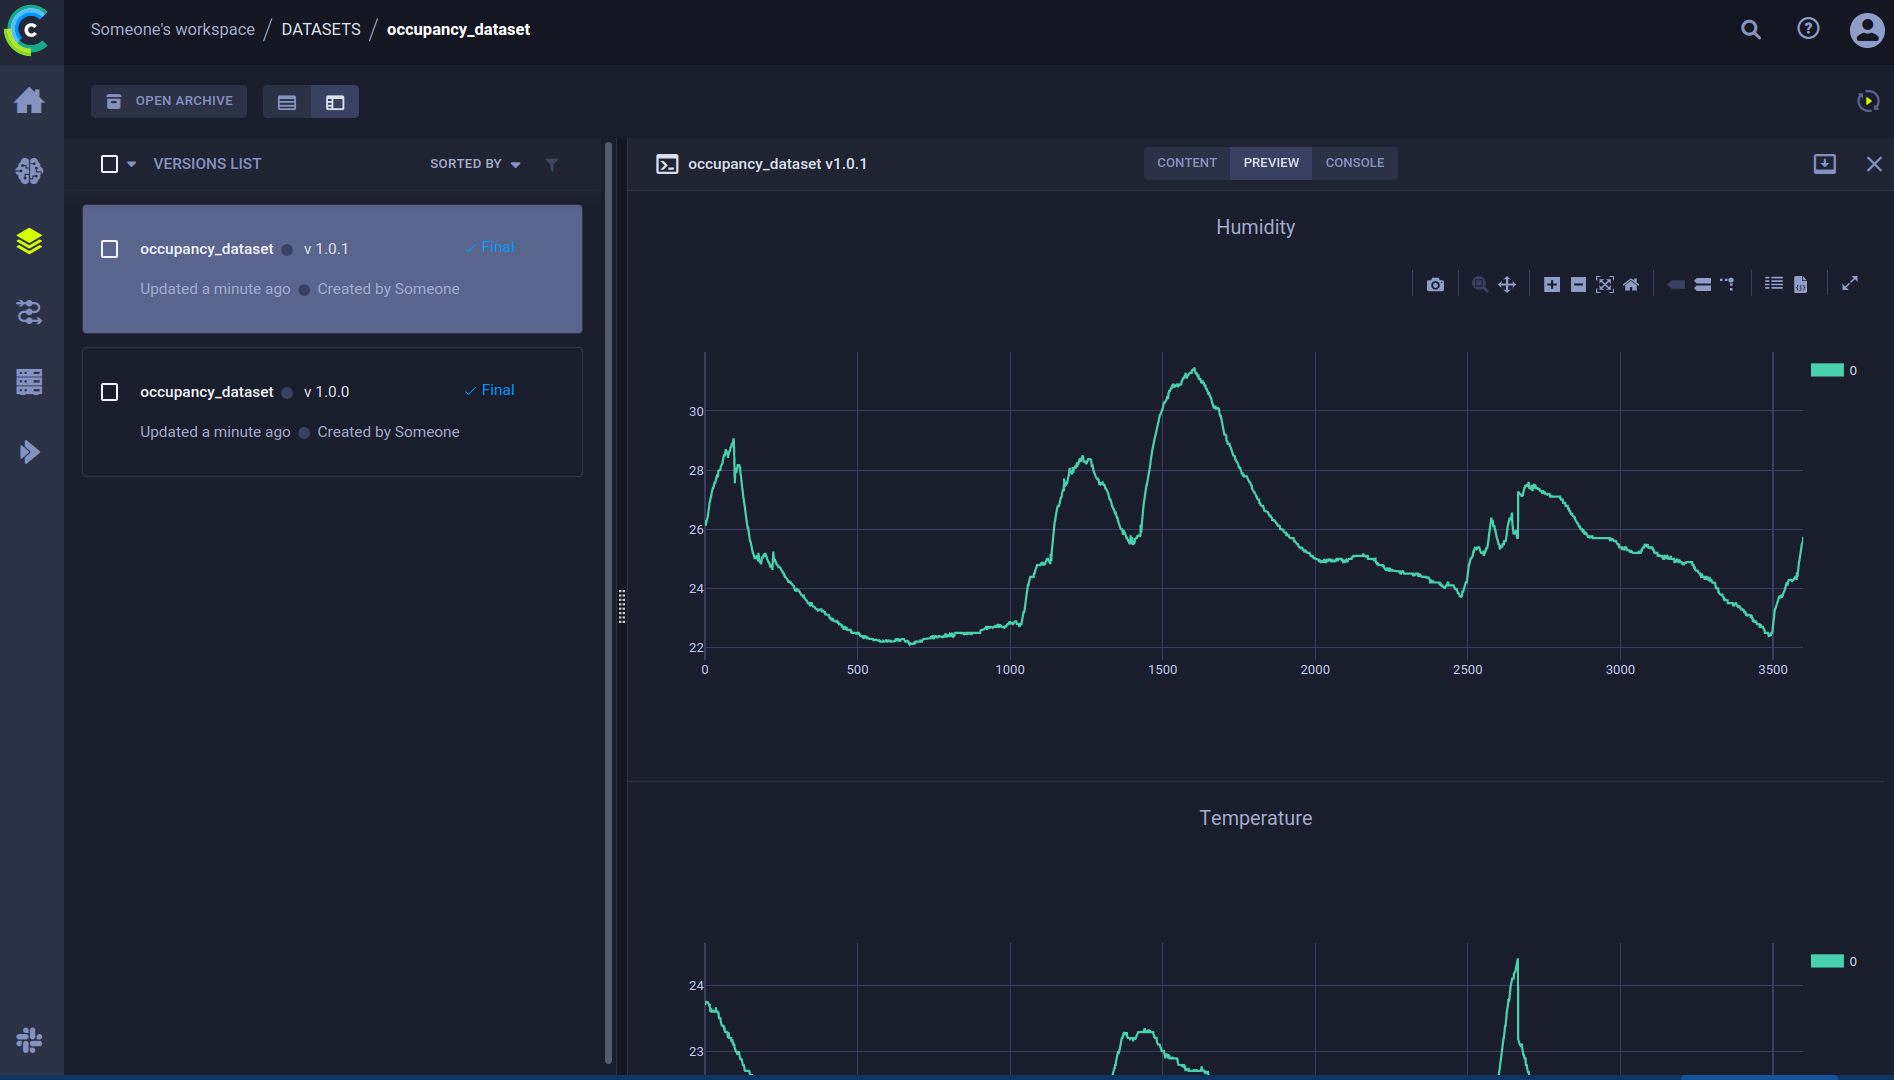
When we take a look at the ClearML UI now, we can see that over the course of a few labeling sessions, our dataset has acquired several new versions.

Details
After selecting a specific version, we can see the most important details in the pane on the right. (e.g. amount of files added, removed, or modified, delta size, etc.). To get information about the content, click on the details button. This will give an overview of the dataset contents, as well as a preview of the data inside and console logs for debugging purposes.
Adding custom plots or tables
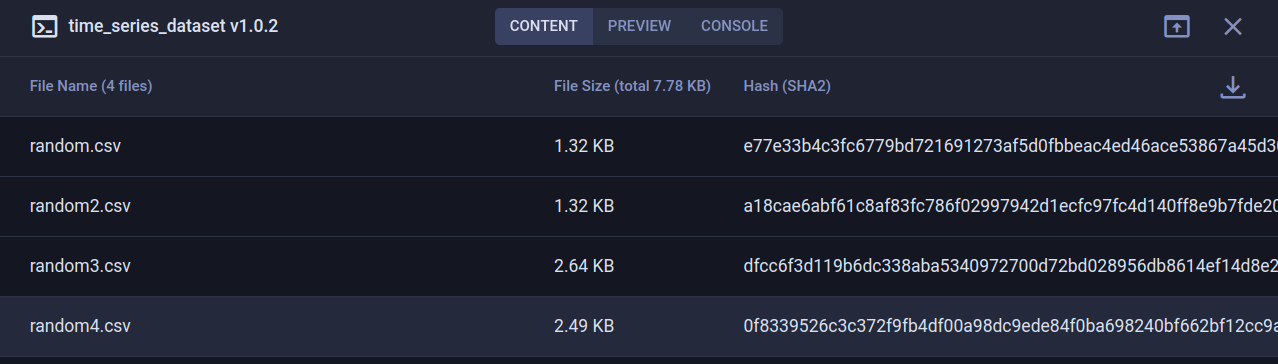
When we look at the preview tab, we can see that we get an automatically generated preview of our CSV files, which is nice! But we can do more. The beauty of using a dataset manager is that you can add all sorts of extra information to the dataset. We could for example plot the first few CSV files and then log them to the dataset. The resulting plot will end up in the preview tab.
dataset.get_logger().report_scatter2d(
title=column_name,
series=file_name.replace('.csv', ''),
scatter=np.stack([df.index, df[column_name].to_numpy()], axis=1),
iteration=0
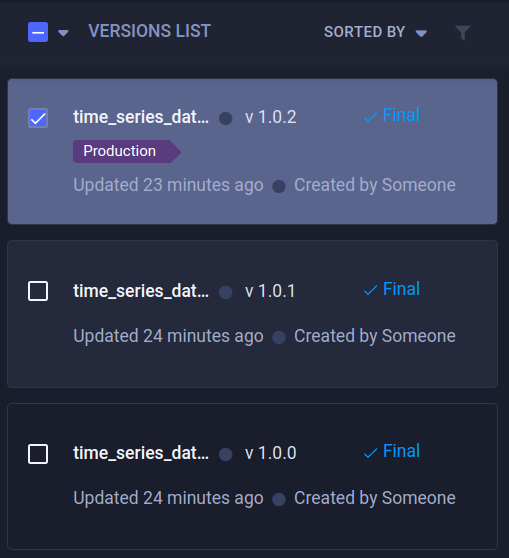
)Adding tags
A very handy way to keep things organized is by using tags. Adding a tag allows you to easily sort or query them. Doing so will only show the versions that you want to see. A tag can be added both from the UI as well as from code. We’ll see later in the blog post how useful that can be for later stages in the retraining loop.
Setting up the training code
Using the ClearML experiment manager, we can easily set up a training script and connect it to the dataset that we used.

Let’s break it down, in order to train the data we will need to get a local copy first.
Getting a local copy of a dataset version
Getting a local copy of a dataset is easy, simply get the dataset using the Dataset.get() method and provide the dataset name, project, id, tags, or any combination of these 4. This will give you a dataset object that’s actually a proxy object holding the metadata of the dataset. Then you have to actually download it using the .get_local_copy() method and you’re good to go!
from clearml import Dataset, Task
import config

# Initialize the experiment manager
task = Task.init(
    project_name='dataset_blogpost',
    task_name='training'
)
# Connect the parameters, so we can later change them
task.connect(config)
# Get the data and process it into a dataframe
# Getting the data will actually get a metadata object that represents
# that dataset. It does not actually download these files yet in case
# you just need some metadata like a list of files.
DATASET_PROXY = Dataset.get(dataset_id=config.CLEARML_DATASET_ID)
# Calling .get_local_copy() WILL download the data, to a local cached folder
# and return the path. This folder is read-only.
# Use get_local_mutable_copy() instead to get a mutable version and to choose
# in which folder to download it yourself.
DATA_PATH = DATASET_PROXY.get_local_copy()
# Concat all csv files into 1 dataframe
frames = []
for csv in os.listdir(DATA_PATH):
    frames.append(pd.read_csv(DATA_PATH / csv))
raw_data = pd.concat(frames)

# ... Training code ...
Connecting the parameters (spoiler: so we can later change them)
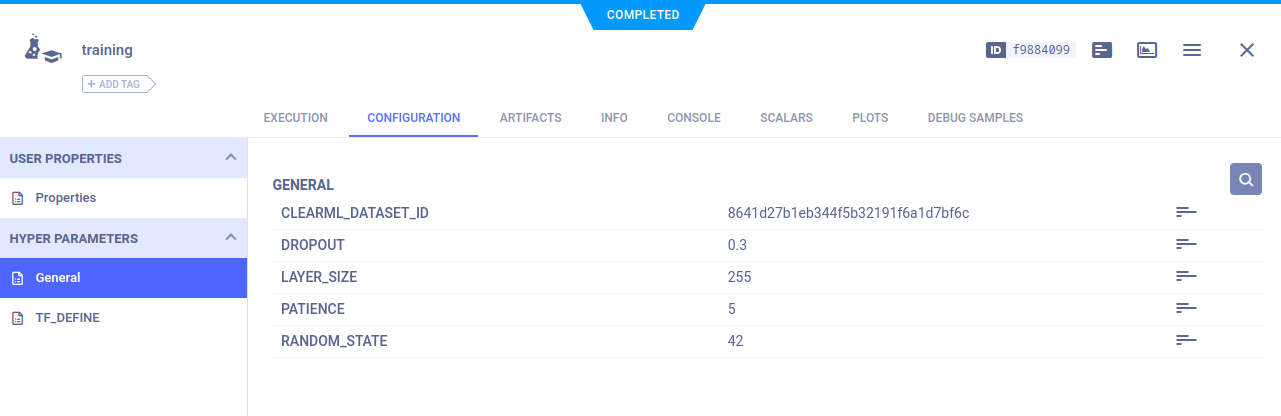
In our current setup, the only piece of information the training code needs to know is the dataset’s ID. This could easily also be a combination of dataset name, project, and tags, but we’ll focus on the ID for now. Of course, any other parameters that might be interesting, such as training hyperparameters, can be added.
Usually, it’s good practice to keep all your configuration options somewhere central, like a global dictionary or a config file. In this case, we have a config.py file that looks like this:
# ClearML parameters
CLEARML_DATASET_ID='8641d27b1eb344f5b32191f6a1d7bf6c'

# Model parameters
RANDOM_STATE=42
LAYER_SIZE=255
DROPOUT=0.3
PATIENCE=5
Throughout the model code, we can use these parameters to make it easy to change and experiment.
model = keras.Sequential ([
    layers.BatchNormalization(input_shape=input_shape),

    layers.Dense(config.LAYER_SIZE, activation='relu'),
    layers.BatchNormalization(),
    layers.Dropout(rate=config.DROPOUT),

    layers.Dense(config.LAYER_SIZE, activation='relu'),
    layers.BatchNormalization(),
    layers.Dropout(rate=config.DROPOUT),

    layers.Dense(1, activation='sigmoid')
])
It’s super easy to tell ClearML that it should also keep track of these:
task.connect(config)PS: if you’re using argparser, hydra, click, or any other supported frameworks, chances are your configurations will be captured automatically, no task.connect needed!
This makes it clear in the interface what the parameters are and makes it easier to compare experiments based on them. But there’s an even better reason why we want to track the parameters: automation.
Cloning an experiment
To get to our fully automated pipeline, we need to explain cloning. ClearML has captured everything that is needed to be able to reproduce an experiment on another machine. This includes things like git info, uncommitted changes, installed packages, etc.
There’s also a whole orchestration component using ClearML agents. How they work exactly is beyond the scope of this blog post, but you can watch this short youtube video to find out. TL;DR: You can run a ClearML agent on any (remote) machine and it will run experiments for you, including ones that are cloned.
But why would I want to rerun an existing experiment? Because you can change the parameters! Remember the previous section where it was so important we keep track of them? When you clone an experiment, you can change any of its parameters. When an agent runs the changed experiment, it will inject the new parameter value into the original code. So it will run as if the new value was always there.
And just like that, we can rerun the same code on a different dataset. Simply by editing the dataset ID in the parameters and sending it to the agents for execution.
Automating the retraining loop when a new dataset comes in
Setup a trigger to launch a new clone of the training experiment when a new version comes in. ClearML internally keeps track of events that happen in the system. A new dataset versioning coming in (potentially filtered on tag) can trigger another ClearML component to start.
from clearml.automation import TriggerScheduler


# create the TriggerScheduler object (checking system state every minute)
trigger = TriggerScheduler(pooling_frequency_minutes=1.0)

# Add trigger on dataset creation
trigger.add_dataset_trigger(
    name='retrain on dataset',
    # You can also call a function that would get the latest experiment version
    # instead of hardcoding the training task ID
    schedule_task_id='<training_task_id>',
    task_overrides={'General/CLEARML_DATASET_ID': '${dataset.id}'},
    # What to trigger on
    trigger_project='dataset_blogpost',
    trigger_on_tags=['Production'],
)

# start the trigger daemon (locally/remotely)
# trigger.start()
trigger.start_remotely()
That’s it! Now when a new version of the data comes into project dataset_blogpost, which also has the tag Production, the trigger will clone the task with your specified ID and override the CLEARML_DATASET_ID parameter with whatever the ID of the dataset was that set off the trigger.
The cloned task will be scheduled and then run by a ClearML agent. It will create a new experiment in the experiment list, complete with live updating scalars, plots, console logs, etc.
Next steps
The idea of cloning a task, editing its parameters, and relaunching it, is not limited to experiments. Pipelines too can be cloned and edited. So it’s easy to imagine a complex preprocessing → training → evaluation pipeline that is triggered by a newly incoming dataset with the “Production” tag for example. Which could then produce a model file, which in turn could trigger a canary deployment using ClearML Serving. Using these concepts, you can make a truly impressive retraining loop!