The ClearML Autoscaler
Sometimes the need for processing power you or your team requires is very high one day and very low another. Especially in machine learning environments, this is a common problem. One day a team might be training their models and the need for compute will be sky high, but other days they’ll be doing research and figuring out how to solve a specific problem, with only the need for a web browser and some coffee.
That’s exactly the problem an autoscaler is designed to solve. By looking at the incoming demand for compute resources, an autoscaler will spin up multiple machines when it detects the demand is high and will spin them back down to reduce costs when no tasks need to be executed. A good autoscaler will let you configure every part of this process meticulously, so you can decide yourself when you want to spin up which type of machines for how long etc.
Toy Example
To get started with the autoscaler, consider this simple task example
import time

# 2 magic lines of code

from clearml import Task

task = Task.init(

project_name='aws_autoscaler_example',

task_name='time_sleep'

)

time.sleep(60)

print("Hello World!")
The only thing our task does here is sleep for a while and then call it a day, just like me! We’re just using this task as a placeholder though, normally this is where your preprocessing or model training will happen.
First of all, running this task once locally makes sense in most cases. While you might not have the computational resources the cloud has, making sure the code runs at all, even for 1 epoch, is usually much faster than waiting for it to be remotely processed. That being said, you can of course execute it remotely immediately by using the task.execute_remotely() function.
Once we’ve run the task for the first time, we can go to the WebUI and clone it a few times to start testing our autoscaler. By now, our experiment UI looks like this:
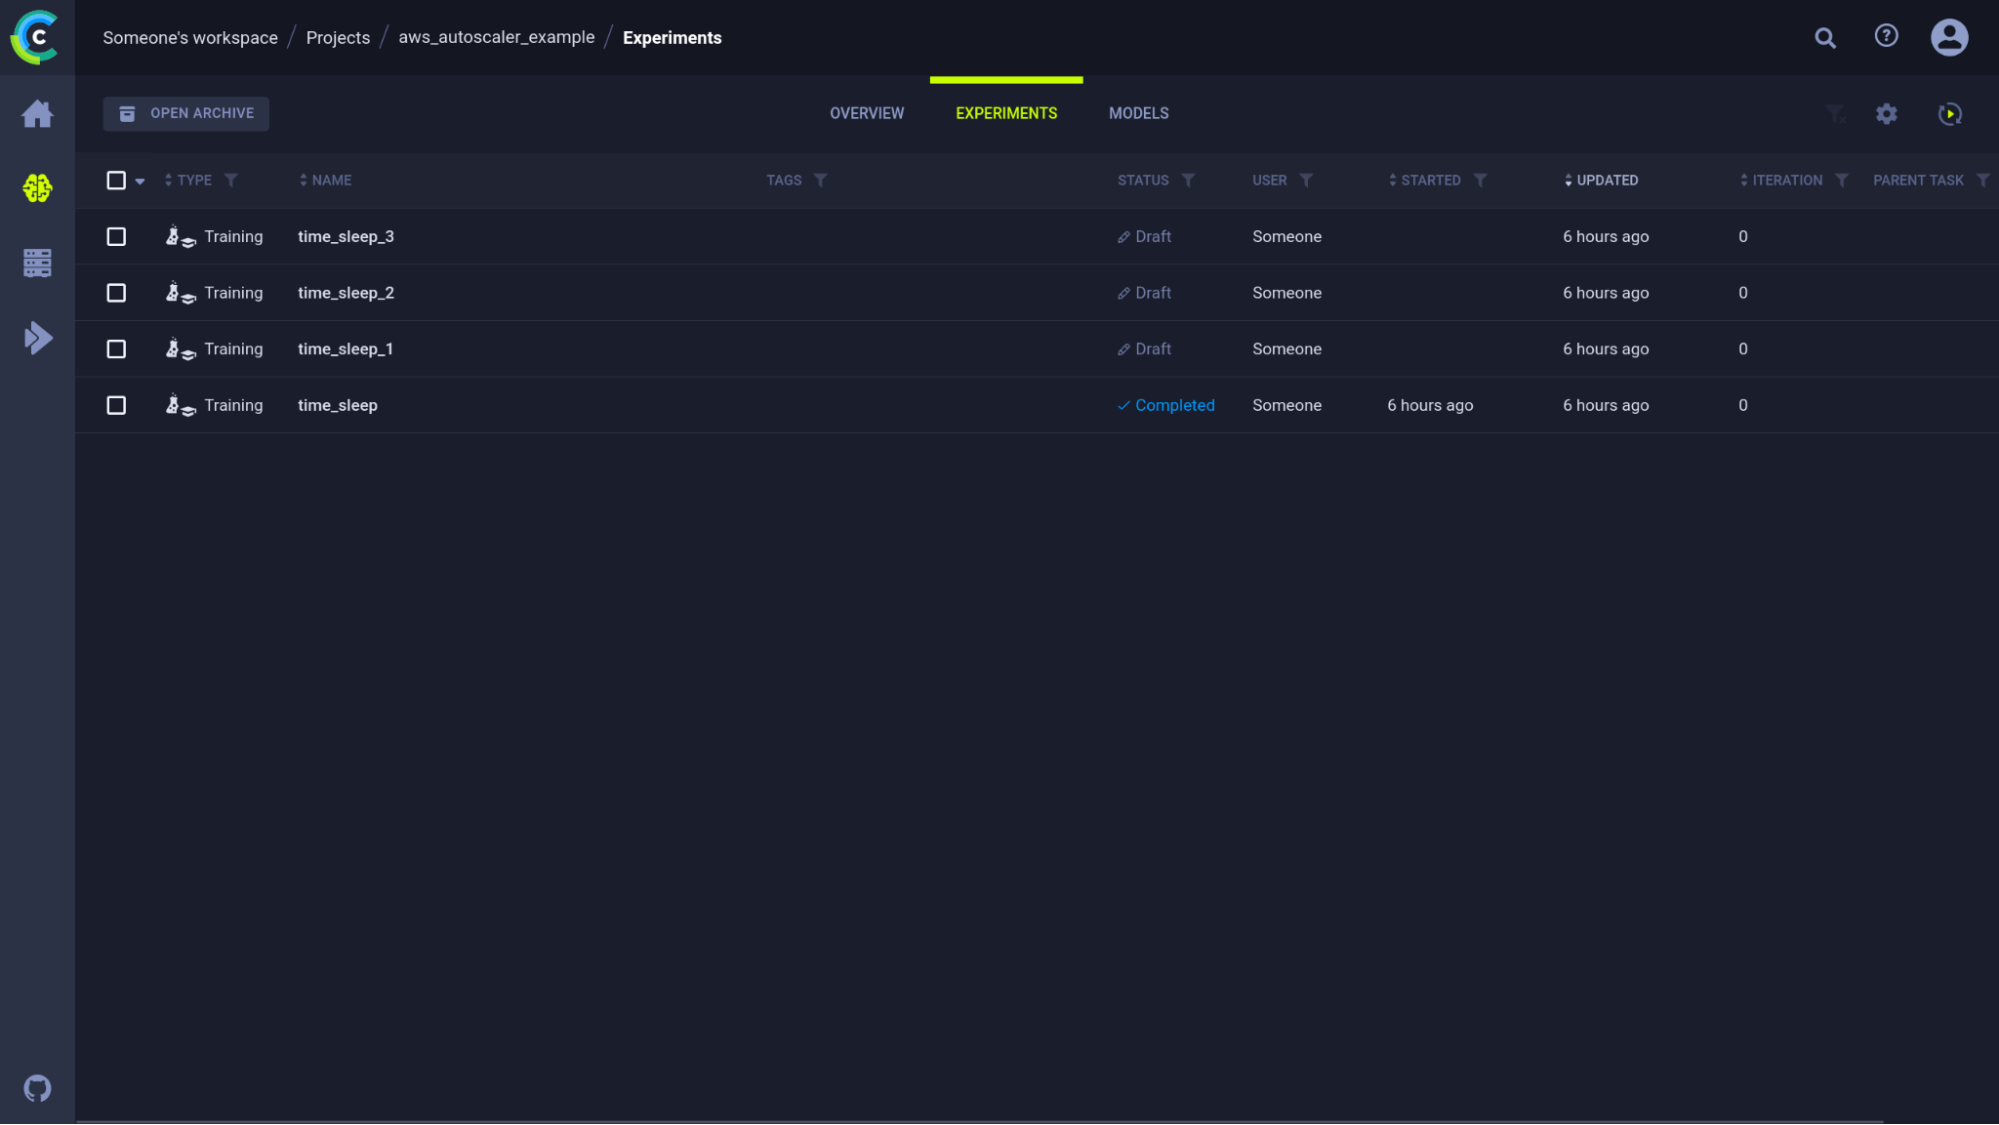
If we enqueue these 3 tasks now, they will be added to the queue, but no workers will be present yet. Let’s do something about that!
Setting up the autoscaler
There are 2 ways to make use of the autoscaler: using the web interface and using the SDK
Using the web interface
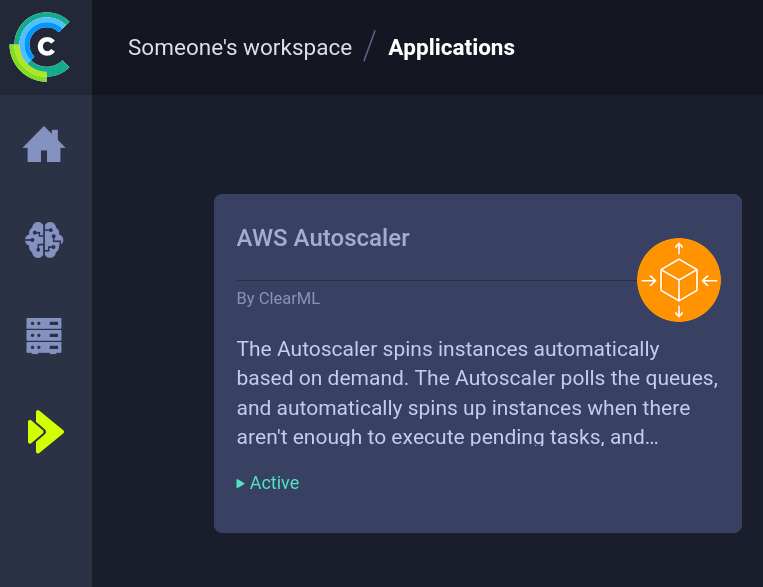
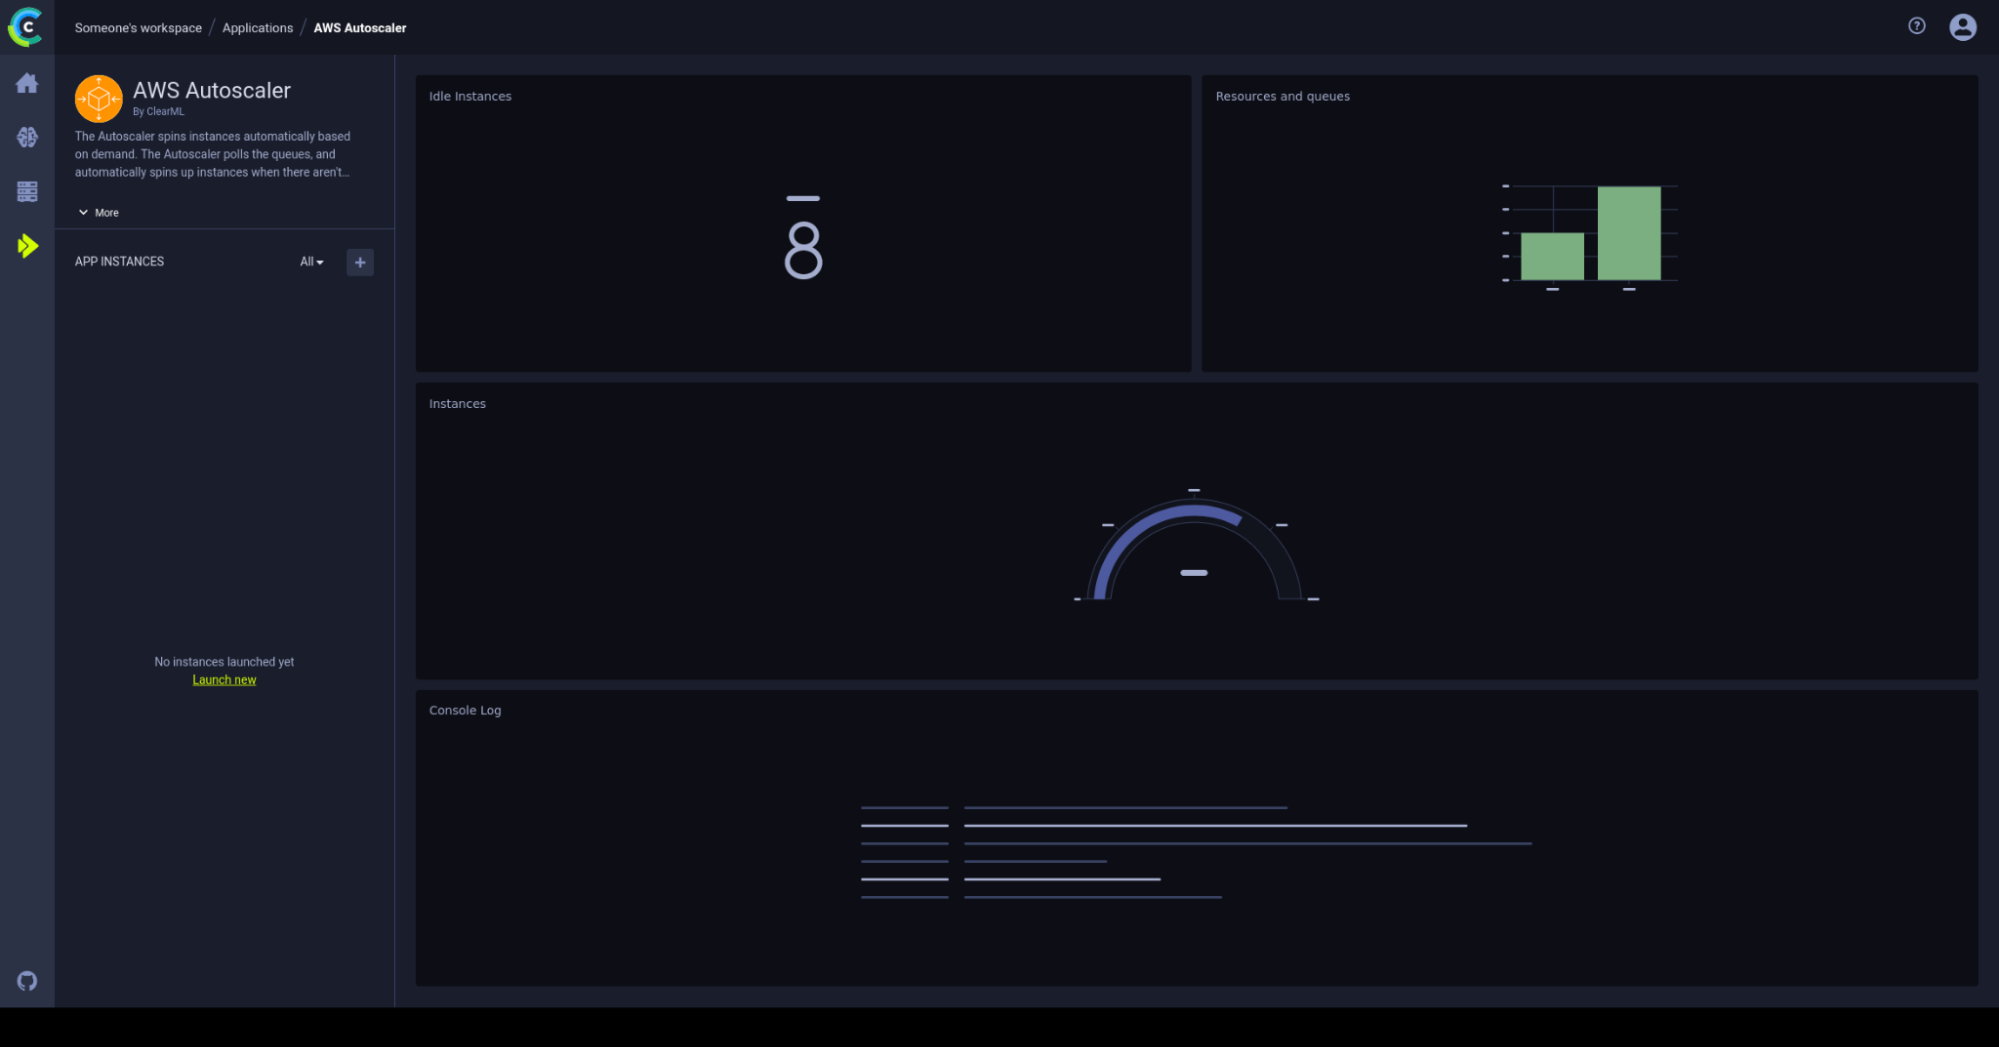
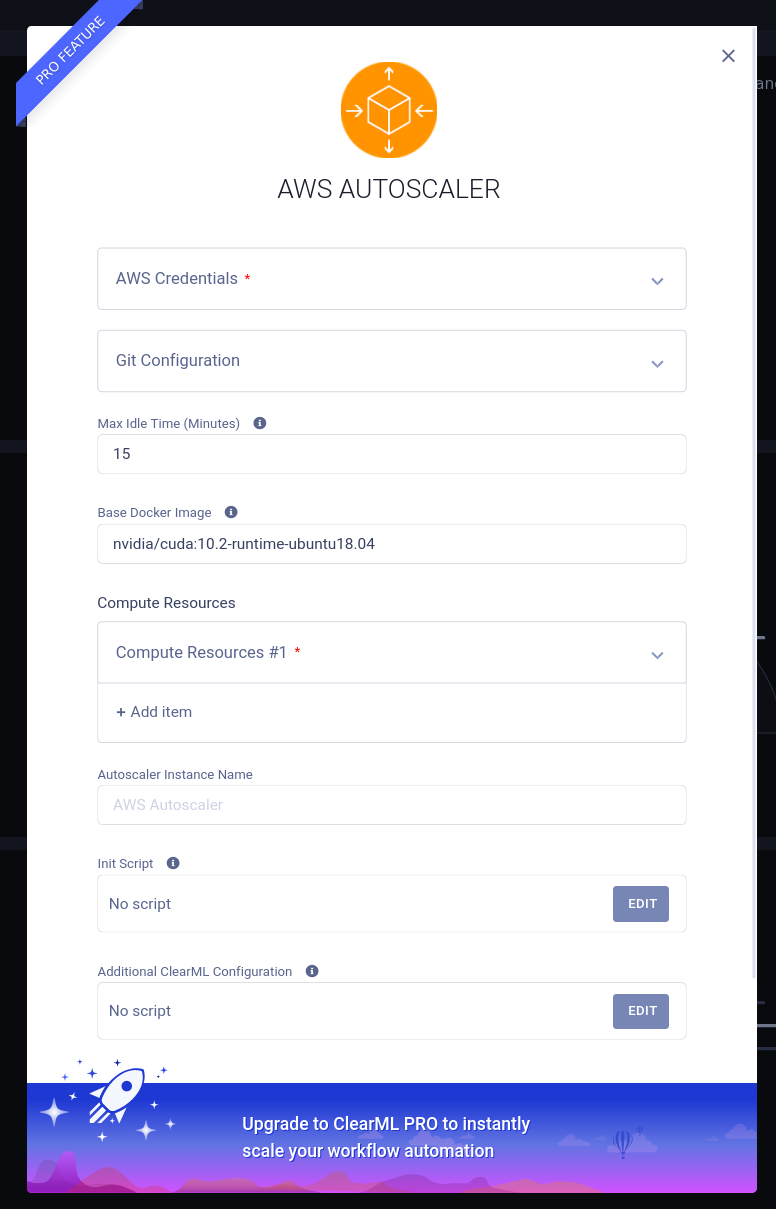
The web interface comes complete with a dedicated overview dashboard. In here new autoscalers deployments can be made and monitored easily. To set up an autoscaler go to the ClearML apps tab and select the AWS autoscaler tab. You should now be greeted by the AWS autoscaler dashboard as shown below.
From here you’ll be able to monitor the number of idle instances (left top), how many tasks there are in each queue, the number of instances currently working on a task (middle) and the logs of the autoscaler itself (bottom).
To create a new autoscaler deployment, just click the plus sign and fill in the form that pops up with your AWS and git information. Hover over the small “i” tooltips if you need any help understanding the specific field. If any of the tooltips are not clear (pun intended) feel free to drop by our slack channel and ask for help!
Using the SDK
If you’re rocking the free tier or the self-hosted version of our ClearML server you need to do a little more work. The exact details can be found in the documentation here, but the gist of it is this:
- Setup the autoscaler itself either locally or remotely using the aws_autoscaler.py script
- Or Clone the example task from the DevOps Services project and edit the parameters in the configuration tab
- If running remotely, set up a worker to handle the services queue
There is a worked-out example available in our documentation here.
We’ll explain a little more about why you still need a worker below.
Tips and Tricks for the autoscaler
Setup multiple worker types for multiple queues
Usually, you’ll want different worker types for different workloads. It’s not very cost-effective to run data preprocessing on a heavy GPU machine, nor is it to train a model on a 1 CPU core machine. So to accommodate this, one can set up multiple queues and assign similar task types to the same queues. We can then set up multiple types of EC2 instances to listen only to specific queues, with different timeouts etc. In this way, the cost can be optimized for heterogeneous workloads.
Note if you have docker installed in your AMI
By default, the autoscaler will try to launch a ClearML agent daemon using docker on the EC2 instance. If docker is not by default installed in the AMI you’ve chosen, there are 2 options:
- Remove the default docker image (UI) or set it to None (SDK) to signal ClearML to run the agent without docker
- Install docker using the init script by adding the following 2 lines:
curl -fsSL <https://get.docker.com> -o get-docker.sh

sh get-docker.sh
Force ClearML not to use GPU
If you have no need for a GPU and want only a GPU machine, then you can force CPU only by setting env var CUDA_VISIBLE_DEVICES=none in the same init script as above.
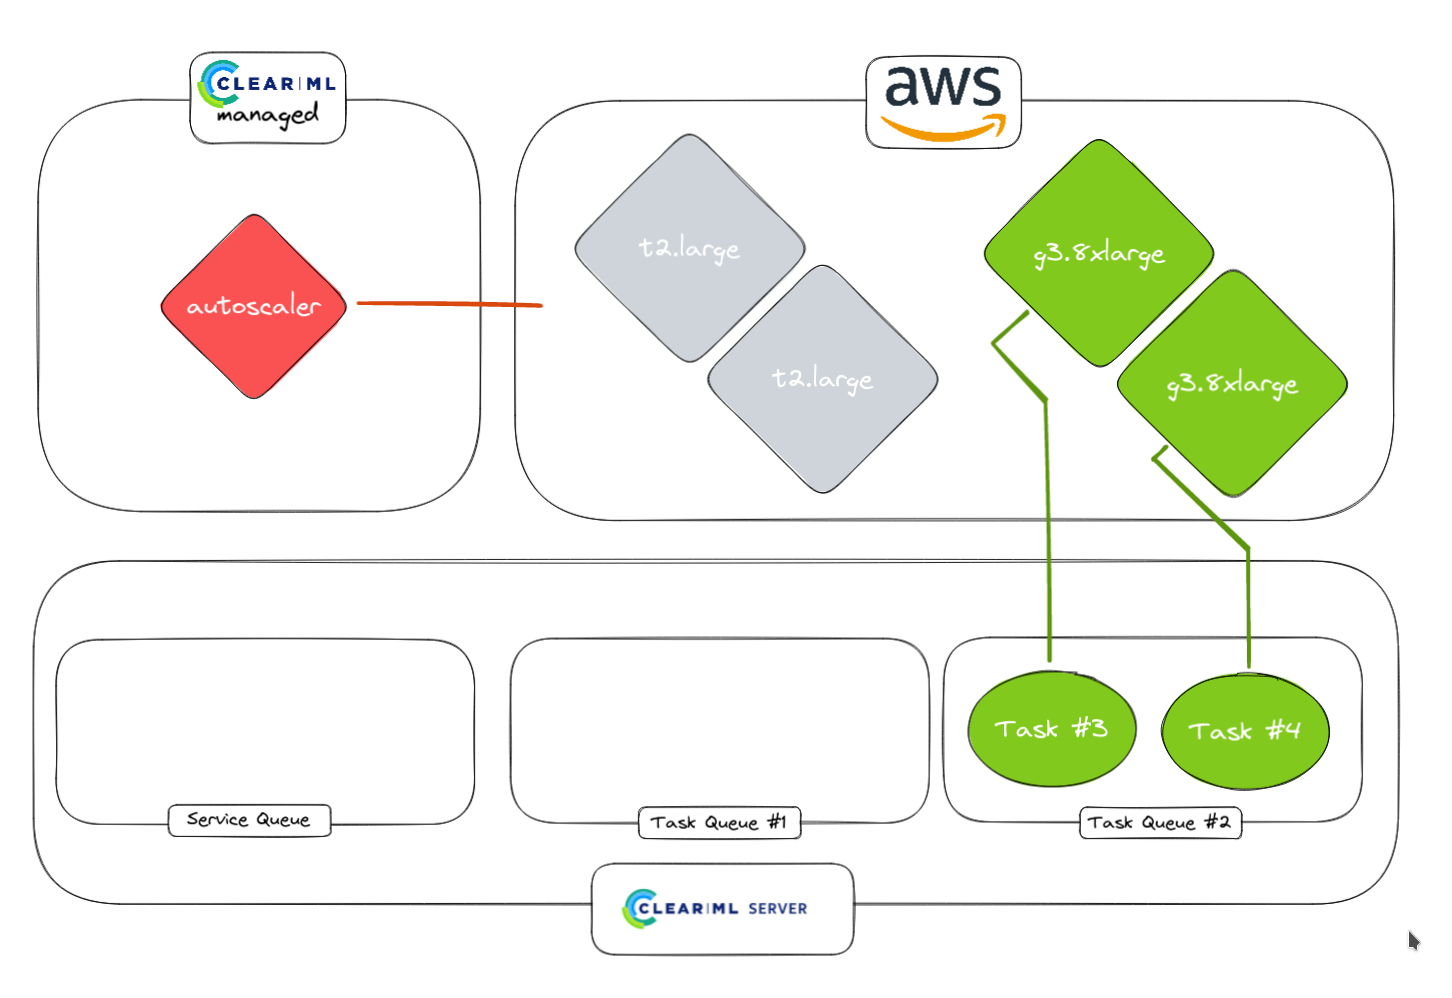
How does autoscaling actually work?
ClearML already uses queues and workers as part of its normal workflow. An autoscaler is fundamentally a simple process that sits in between this queue and the workers and monitors a queue for any incoming tasks. If it finds a new task it checks if there’s any idle workers available that are subscribed to that queue. If so, assign the task to that worker, if not however, it can use your AWS credentials to setup an EC2 instance and spin up a clearml-agent daemon to convert the instance into a worker!
The keen-eyed reader will ask themselves where the autoscaler itself lives and the answer depends on your deployment. If you’re a paying customer and using our hosted server at app.clear.ml, a small worker will be spun up in the background to take care of the orchestration, you have to do nothing yourself.
If you’re running the self hosted version or the free tier, you’ll have to manually spin up a worker that listens to the special services queue. This queue is special because it will only host tasks that are supporting other ClearML functionality such as, in this case, the autoscaler orchestrator.
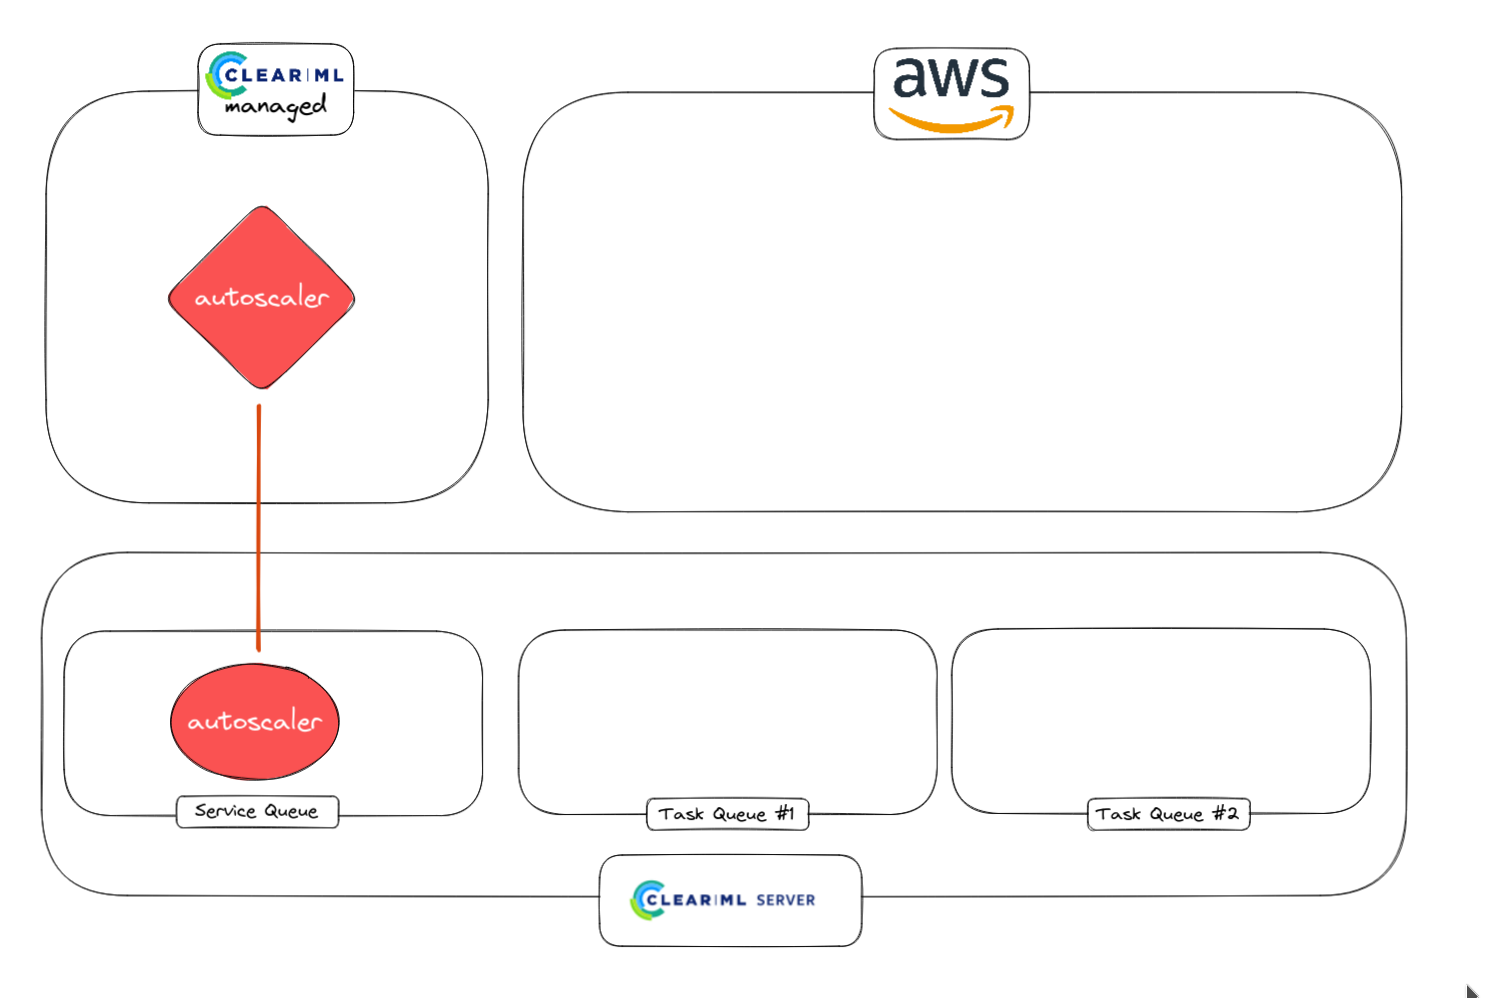
1. Autoscaler worker is launched from the service queue
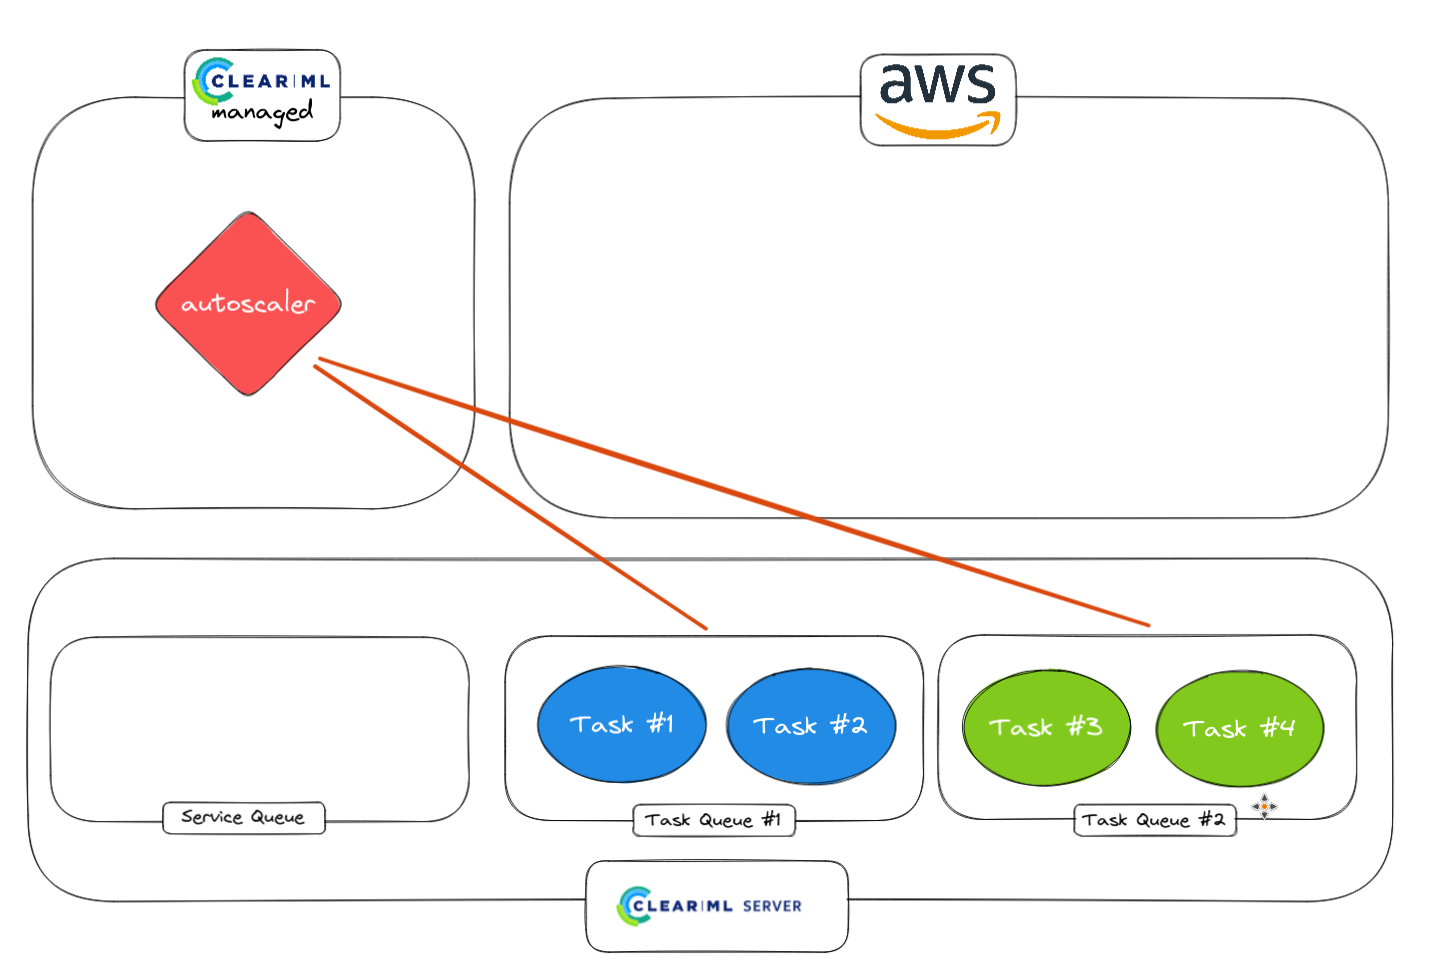
2. Monitoring normal tasks with the autoscaler worker.
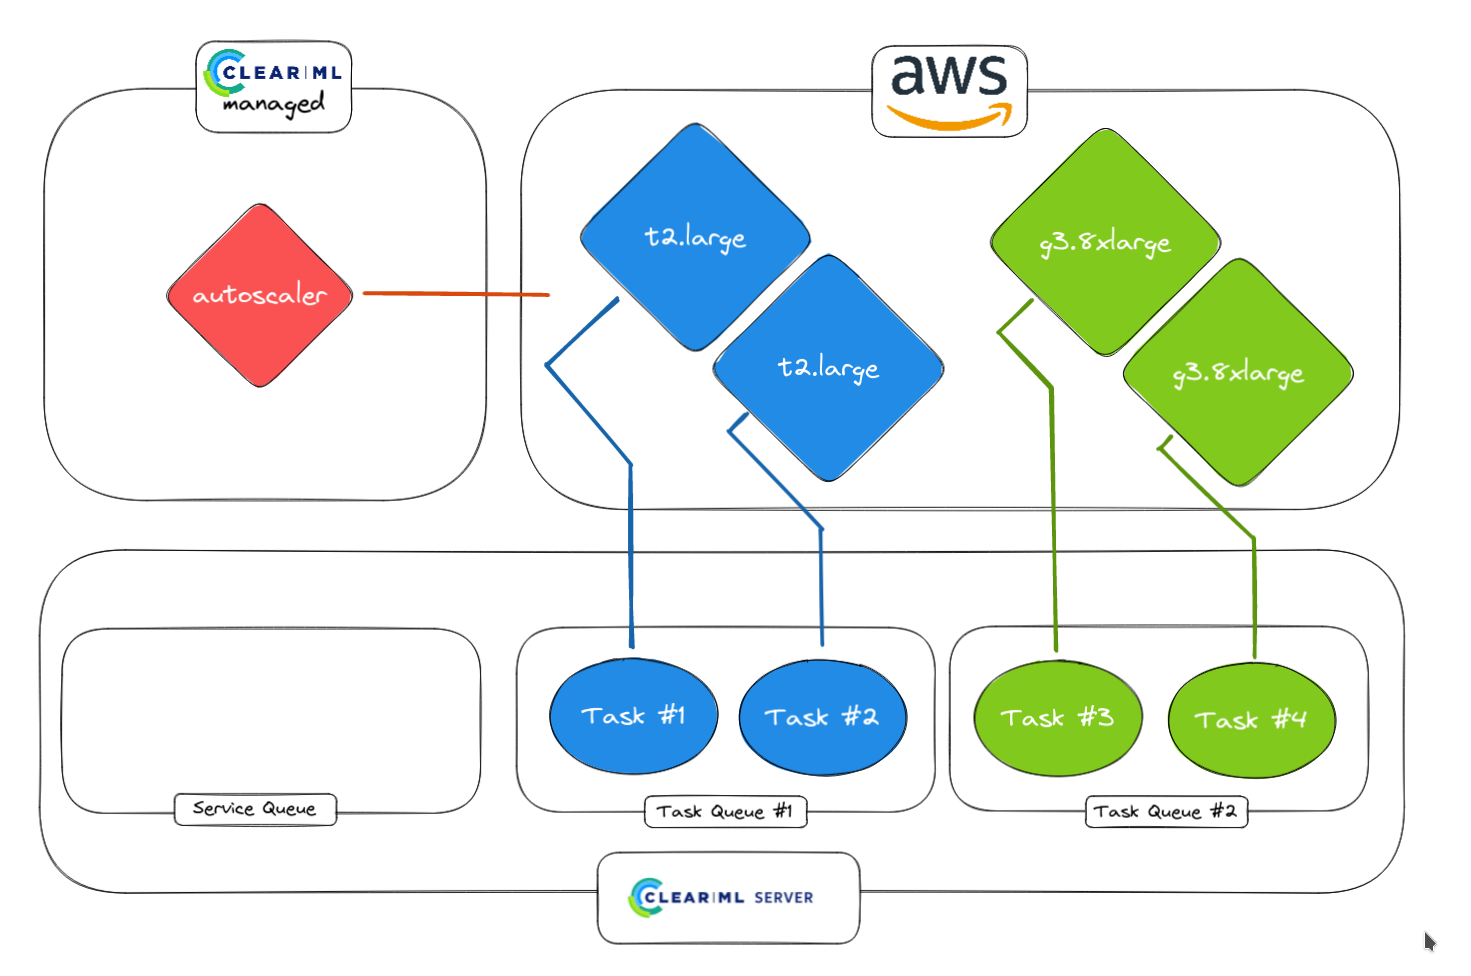
3. Autoscaler detected tasks and launches workers in AWS. Can be different instance types for different queues (e.g. CPU queue and GPU queue)
4. Faster tasks are done, workers will idle for a certain amount of time that can be chosen by the user. If any tasks come in in Task Queue #1, they will be started immediately
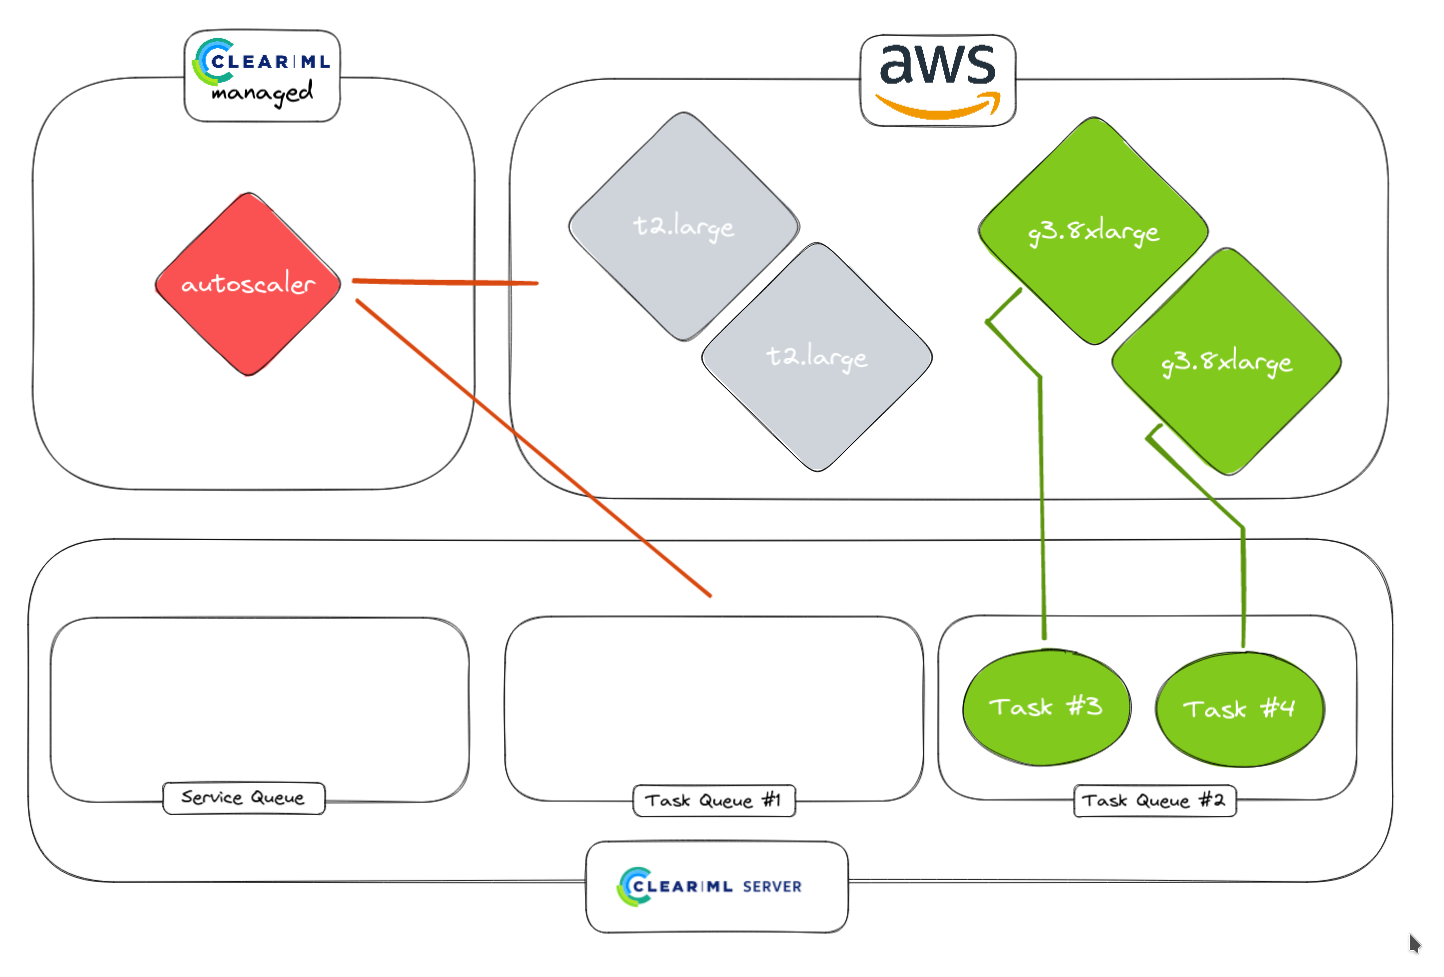
5. No additional tasks are detected by the autoscaler
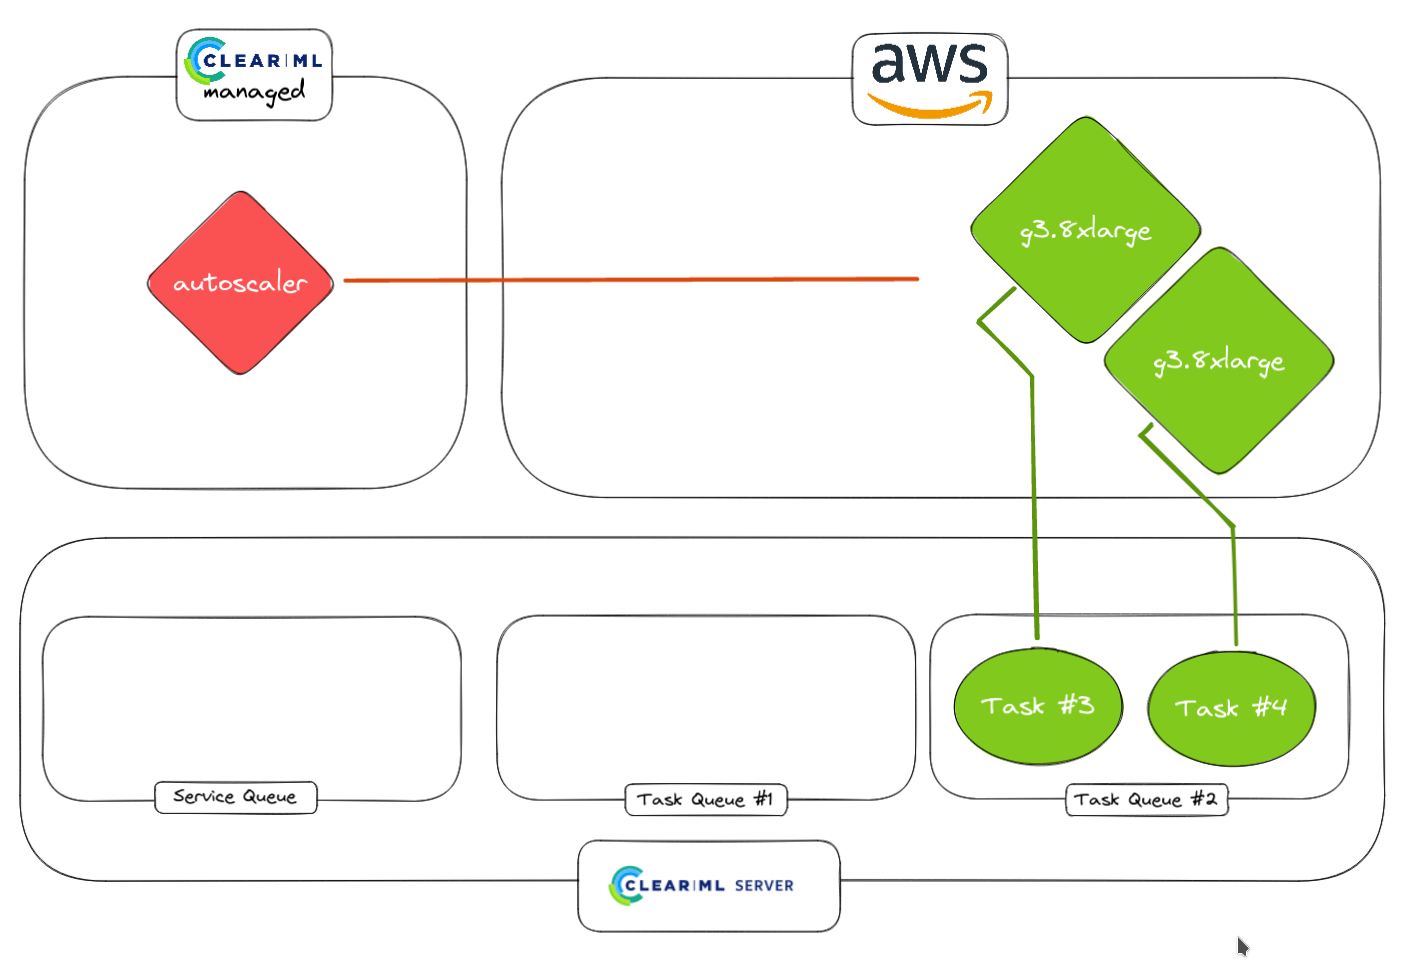
6. Idle workers are spun down if need be to complete 0. Running workers stay up of course